Wednesday 9 May 2012

Challenge 3 (March/April) - Winner and Top 3

Did you all think I'd forgotten about the winner of the last challenge??!!

Sorry, it's taken a while ... let's just say so many orders at the shop, new stock deliveries, crops and Open Days to organise and not enough hours in my day to do it all!!

Thank you to everyone who entered the 1,2,3 challenge!! 

So, at last I can announce that the winner of the Echo park chipboard, selected using random.org is.....

No 33!!

That's Dawn Lancaster!!!  Well Done Dawn! 

Please e mail me sarah at sj papercrafts (dot) co (dot) uk and let me know if you would like the This & That charming chipboard or the graceful chipboard 

Echo Park ~ This & That ~ Charming Chipboard *New*       Echo Park ~ This & That ~ Graceful Chipboard *New*


The TOP 3!!

As always, it was tough choosing a Top 3 from all the entries but I eventually settled on (in no particular order):

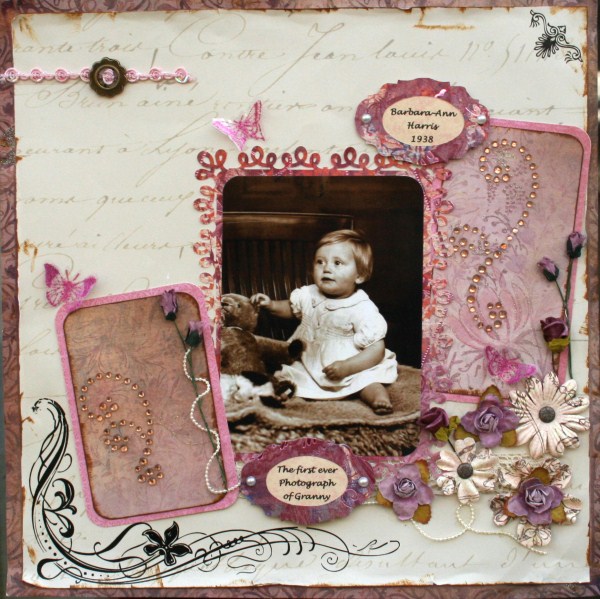
Claire ~ this layout is just stunning!! There are some fab close ups in Claire's UK Scrappers gallery here!


I just love the colours of Georgina's card and so appropriate for our recent weather!!


Mary's card stood out for me with such a beautiful dogwood image!!

Do click on the winner/Tops 3 names and visit their blogs to see more of their fabulous work!!

Congratulations to all the Top 3 entries!! 

If you would like to display our "Top 3" badge on your blog please e mail me sarah at s j papercrafts (dot) co (dot) uk and I'll get it sent to you!!

Don't forget there's still time to enter our current challenge - closing date is 16th May and the theme is "Favourites".

Tuesday 8 May 2012

Take one chocolate box!!


Jenny has altered an empty chocolate box using the brand new fairy belle 6" x 6" papers by Prima.


This is how the box looked before I got to work!

I used Prima Fairy Belle papers to cover the box and all the edges were inked with Tattered Rose Distress ink


The flower was cut from more of the Prima papers using a Tim Holtz Tattered Florals die and again I inked all the edges. The brad in the centre was a plain one onto which I stuck a Prima Pearl. A die cut swirl, some small punch butterflies and a couple of small pearls finished it off. I added a little bit of sparkle around the edge of the box, on the flower and butterflies with some stickles.


One very pretty box to hold some pretty things!!

Tuesday 1 May 2012

Childish Things!!


Have you seen the gorgeous new collection from Fancy Pants Designs yet?

Childish Things is packed with bright colours and fun designs!

I sent Lisa-Jane the papers, alphas, stickers and buttons to "play with"!! By using some of the bolder designs alongside the plainer "b" sides she has really made the bright designs "work" and I love these layouts.


The title and green gingham border are from the strips paper and LJ used glossy accents on the "dreamer" title to give it shine and dimension. The little blue journalling box is from the cards paper and a few buttons and stickers added to finish.  The heart was collaged with scraps.


Lisa Jane explains ...
One of my favourite papers is the orange woodgrain which marries so wonderfully with the orange and aqua polka dot.  I used my sewing machine to stitch around each block and around the page edge.


Taking inspiration from Glitter Girl's hand-made embellishments and loving the double sided designs on the papers I made my own pin-wheels. I added some brown glitter Thickers, and letter stickers and a few other embellishments from my stash.


For my next page, I knew immediately which story and photo I was going to scrap with these bright and bold papers.  Last Christmas my son got the weekly trophy at football club and the colours and stars on the imagination paper were perfect for this layout.  The alpha stickers in this collection are a good size for titles and there are loads on the sheet with plenty of punctuation marks too.


For the chevrons, I was inspired by this fab tutorial and again used my sewing machine.


I also made a card for my daughter's birthday using the bookshelf paper. I love the bright floral pattern with its bold colours and the cute chipboard piece is from October Afternoon.


This collection may be called Childish Things and it really is great for layouts featuring children of all ages but many of the papers would work equally well for more "grown up" themes.  A lovely, versatile collection that was a real joy to work with.

To see more of LJ's work pop over to her blog here!


Thursday 26 April 2012

Jenni Bowlin Hexagon Love!

Every now and then a new trend hits the scrapbooking world ... one of the latest seems to be hexagons!! So today I would like to hand over to DT member, Louise to share her fab ideas with hexagons!
*  *  *  *
Hexagons seem to be everywhere in scrapbooking at the moment so I was pleased when Sarah sent me these lovely Jenni Bowlin vintage journaling tags, Identify, Numbers and Memo stickers.

Jenni Bowlin Printed Tags ~ Vintage (JBPT712) *New*     Jenni Bowlin Stickers ~ Identify (JBSK730) *New*    
 Jenni Bowlin Stickers ~ Numbers (JBSK729) *New*     Jenni Bowlin Stickers ~ Memo (JBSK728) *New*


To go with the hexagon based stickers I cut out, by hand, lots of hexagons from papers from my Dilly Dally 6" x 6" pad. My journaling is on the Jenni Bowlin vintage tag which you can just see peeping out from under the photo.

So that I could get the placement of the hexagons exactly where I wanted them I first mounted the stickers onto card. This also made it easy to draw around them onto the patterned papers.

Stanley Age 6 - hence the number 6 stickers.


Some of the stickers are specifically for journaling or recording on, you can see in the above photo that I put words on these ones using Glitz white alphas.

Wondering how these hexagons would look on cards I used the same papers and some of the Jenni Bowlin stickers to make up a couple of cards.

Firstly, a card for him...


....and this one for her, using paper scraps from MME's lost and found two collection . The Jenni Bowlin identify sticker that you can just about see under the best wishes flag actually had "Place" written on it so I turned it upside down and placed the flag over the word.


I really enjoyed working with these stickers and as the sticker sheets are so generous I was able to use them on several different layouts and projects.

You can see more hexagons on this layout and also on this mini book!!

Thanks for stopping by!