Showing posts with label MME. Show all posts

Thursday 24 April 2014

One Step Further ... Playing with Patterned Paper!

Hi everyone, Annie here!

Like most scrappers, I love patterned papers and I have piles of the stuff. I can't get enough of it! It's beautiful just as it is, but it's also fun to tweak it a bit to add interest, or to suit a particular project.

Today I'd like to share a few ideas for altering patterned papers to take them one step further ...


This MME Lost & Found Record It! 6x6 paper pad is really gorgeous and so versatile - I've already used some of it to make a valentine for my DH and two pop-out birthday cards for a friend - but I have all of this left and I thought it would be perfect to experiment with.


Here are the results of my experiments with cutting sticking, punching, doodling, embossing, flocking, layering and eyeleting (if that isn't a word, then it should be!) ...


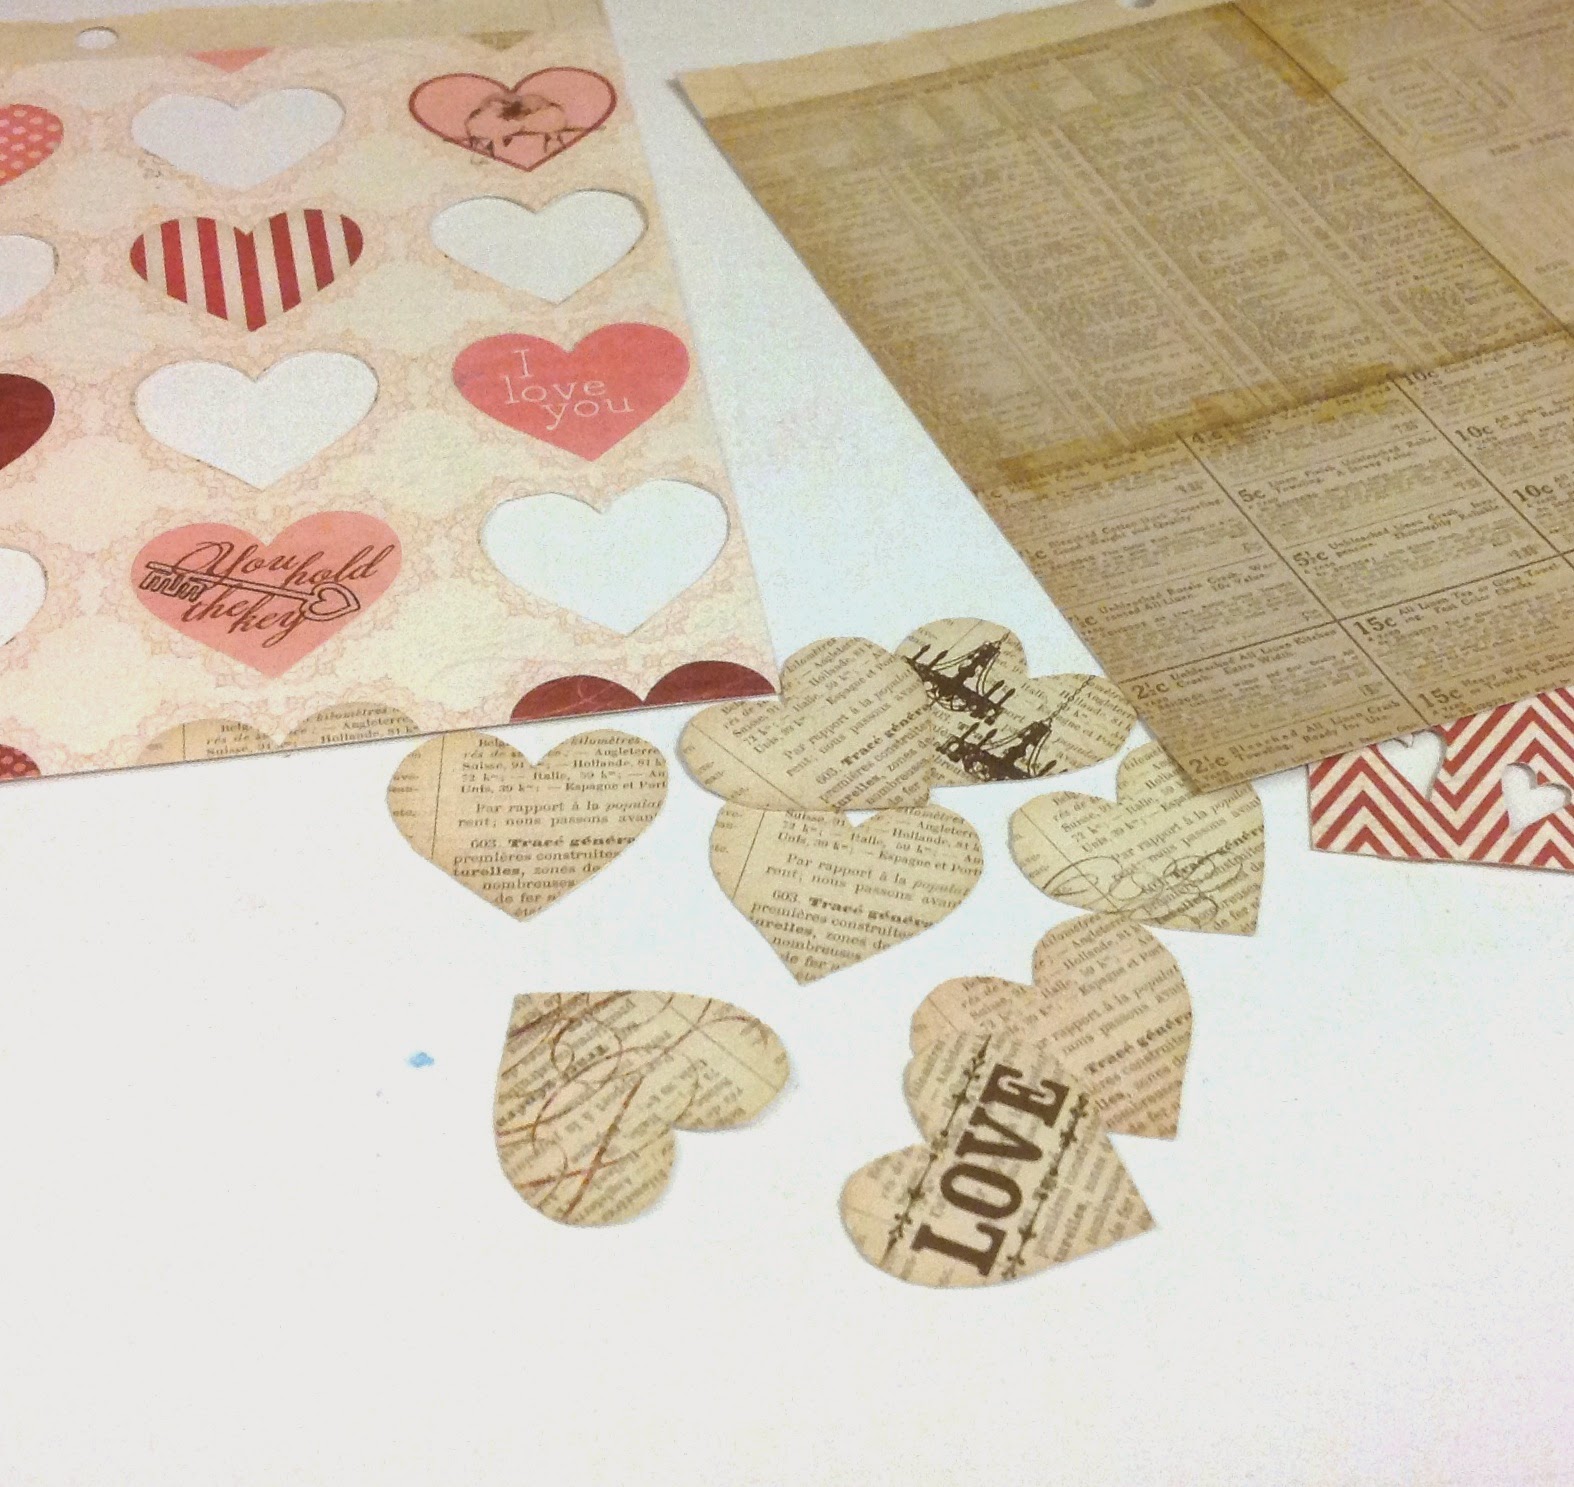
First I took the pretty heart pattern ...


... I cut a few of the hearts from another identical sheet, inked the edges with Distress Inks and adhered them with foam dots to add dimension ...


Then I took these three sheets ...


... I carefully cut out the bookprint hearts, inked the edges and adhered them to the bookprint paper to give extra interest and texture to the background ...


Layering the heart paper over the chevrons paper allowed the pattern to show through the cut-out heart shapes, and I doodled around them with a pencil to add some definition ...


Next, I dug out some eyelets (I can't be the only scrapper who has loads of these lingering in my drawers from years ago!) ...


... and had fun dotting them around to accentuate the spotty patterns ...


Out came my trusty heat gun next, and I used a pearlescent gold embossing powder to enhance some of the stripes ...


It works better with the extra-strong tape and I always burnish it with a bone-folder to make sure it's stuck and help the backing to come off more easily. Here's the result ...


Whilst I had the heat gun out, I did a bit more embossing, using a juicy Sakura pen to add handwriting and doodling to the bookprint background ...


... and then adding embossing powder in a deep shiny lipstick pink ...


I used a gold pen and more embossing to bring some fun textural detail to this lacy pattern ...


Finally, I broke out the flock and used it to create tactile accents ...


I tried a couple of different methods to make the flock stick, and this one seemed to work well. First, I filled in the parts I wanted to accent with the Sakura Glaze pen ...


... then sprinkled with the flock and left it to sit for a while until the pen had dried ...


... then, without shaking off the excess, I folded a sheet of copy paper around it and ran it through my Cuttlebug ...


... then brushed off the excess. This way, the shape stayed well defined and the flock was stuck fast, adding a nice tactile detail to the page ...


These little 6"x6" paper pads are so versatile and you can make them go a really long way. I used my "enhanced" papers to make a couple of scrapbook pages with very different looks ...

Watch:


For this page about my little great-nephew, I added in some chipboard stickers from the MME Chalk Studio Collection and a couple of scraps from the MME Chalk Studio 2 Collection, some Bazzill cardstock and black Prima Canvas Alphas.
I sanded the edges of all the chipboard pieces and used chalk inks to colour them - this is something I often do to make embellishments match my page.

I Love Us:


For this page showing a "double selfie" of me and my DH, I've used small pieces of my patterned paper to form a grid design. The camera is a Simple Stories Daily Grind chipboard sticker - I distressed it and added a button tied with twine to cover the heart motif which was the wrong colour for my page. There is also a cut-apart from the Teresa Collins Daily Stories Collection and I made a couple of embellies from the patterned paper scraps.

Well, after all this I still had loads left in my little paper pad, so I chucked in some more of the Chalk Studio chipboard stickers and four empty toilet rolls ...


... which have been squashed flat overnight for reasons which will become obvious when you see the finished project ...


... a little toilet roll mini book for my niece, with pull-out tags for photos and journaling. These mini books are so much fun to make - you can find loads of tutorials on You Tube.

I hope you will have a go at taking it one step further to give your patterned papers a unique twist and remember to share your results on our FB page!

Thanks for reading my post, see you again soon.

Annie :o)xxx

P.S. If you need more 'One Step Further' inspiration, check out Louise's Stitching and Stamping post HERE!

Annie blogs projects full of beautiful details at her blog Arty Farty Annie. Please pop by and say hello!

Friday 11 April 2014

Easter Card & Egg Holder!

Hello everyone, Jenny here today!


I have a quick and easy Easter project to show you, I made both the card and the egg holder from 1 sheet of Kraft card, with 1 sheet of 6 x 6 paper as the main decoration!


The card is 10 x 10 cm which was cut from the sheet of Kraft card. The paper is from MME Now & Then Mildred pad. I simply cut a strip from a sheet mounted it onto pale yellow paper and stuck it down the centre of my card blank. I coloured a cute Easter image from Pink Petticoat and mounted it on a die cut yellow scalloped circle which is then stuck to the card on foam pads to give it some dimension. 

I added some Studio Calico wood grain enamel dots to the corners and also in the centre of the flower on the top of the egg. Lastly I used Glossy Accents to make the chicks beak shiny.

Onto the egg holder I cut a piece of Kraft card 27 x 9 cm and then scored 11 cm, 17 cm, 19 cm and 25 cm. I made up a template below if you want to use it! Between the score lines at 19 cm and 25 cm I die cut a circle for my egg to sit into:


 Once folded up you can see you have almost a box shape with a flat back. I decorated the back similar to my card adding a strip of paper with die cut image attached. I also added a strip of paper and some enamel dots to the front of the box.

Here's the template:


I hope you have enjoyed my projects today, you can give them so someone this Easter for a really sweet gift!


Jenny is a busy mum of three who makes lovely cards and other projects and shares them at her blog Dragonllew's Spot!

Thursday 9 January 2014

Crafting Cards with a Common Theme - Part Two!

Hi! It's Louise back with my next set of four cards with a common theme - if you missed part one you can see it HERE!

I applied a similar process for my next set of cards, selecting some papers from the MME Lost and Found Record It 6x6 paper pad, a few rubber stamps, two Memento Ink Pads and two of the Studio Calico Mr Huey Mists.  

  • I worked on the inked backgrounds first. Using my son's Bart Simpson ruler (shushhh...he'll never know!!) I ran the edge through the momento ink pad and wiped the ruler over two of the cards.
  •  On the other two cards I used the chevron stamp for a stamped background.


  • Next I flicked drops of Studio Calico Huey Mist ink onto the cards.
  • Larger background papers were used on the two cards where I cut out frames from the 6x6 pad, with smaller strips used on the other two cards. The edges of all the papers were torn.
  • The flowers were stamped onto white card and cut out. These were adhered to the cards with foam tape after adding some white cotton to the back of the flowers for interest.  


Again, using a common theme, common colours and elements made another four cards came together nicely!


Making these made me wonder how you approach your card making?  
Are you like me and normally leave your card making to the last minute or do you have a stash waiting to be used?

If you leave your card making to the last minute, has this post inspired you to put together some common themed cards? 

If it has then please share your creations with us by leaving a link in the comments!

See you again soon,

Louise x


Louise is a mum of three boys and she blogs her life and crafting at Boys, Bugs, and Beautiful Buttons!

Monday 2 December 2013

MME Cut Paste Flair Mum Card

Jenny's back again today with a pretty project to brighten up a grey December day! It's something a little bit different for Jenny too - there's not a promarker in sight! 

Jenny:


 I have cut a panel out of a standard 6 x 6 card blank and stuck the letters over the gap. I have used papers from MME Cut Paste Flair pad teamed with some black card I love how the soft colours really stand out against the black. 

I used the word art function in word to create the letters and numbers, printing them onto normal card which I then cut out and stuck onto my patterned paper. You need to use quite thick card to give the card front some strength. I have put stickles all around the edges of the letters and numbers to finish them off. I used my fiskers scalloped lace border punch for the bottom edge.


This gorgeous flower has been cut with Tim Holtz Tattered Flowers die from some of the pink ombre paper in the MME Cut Paste Flair pad I love the way this has allowed me to cut the flowers all from the same sheet but with the differing shades. I have used a Basic Grey Candy Button to the centre of the flower and gone round all the edges with stardust stickles.


Here's a view of the card slightly open, you can just about see another sheet of that gorgeous ombre paper this time in an aqua green shade.


Jenny is a busy Mum with three children and regularly blogs her cards and crafts at Dragonllews Spot

Didn't Jenny make a beautiful card? If you missed her Cut & Paste Flair Altered Diary be sure to check it out HERE!

Tuesday 12 November 2013

MME "Cut & Paste Flair" Altered Diary.

Remember this lovely altered notebook on this post?!

 Today, Jenny is back with a fab altered diary which would make a perfect gift for Christmas.


I started off with this very plain and boring black diary which I bought for just £1 


I made this diary for my teenage daughter who has a thing about all things "nerdy" and as soon as I saw this glasses paper I knew I wanted to use it for something for her. Having recently started work she needs a diary to write her shifts down in. I started off with sheet of kraft card which I cover the whole diary with. I then matted the glasses paper which comes from MME Cut Paste Flair pad onto a piece of black card. I have used some Basic Grey Candy Buttons in the corners to add a little bit of interest to them. 


The glasses are from a necklace which I took apart I have used a set of numbers from an old set of Alpha's which I had tucked away. I stuck the glasses down with glossy accents and then filled the lenses with it to give them a more realistic appearance. I added a couple of flat backed gems to the corners for a little bit of sparkle.

Have you altered a notebook or diary (or some other office supply) recently? Leave a link in your comment so we can pop by and see it!

Jenny is a busy Mum with three children and regularly blogs her cards and crafts at Dragonllews Spot!


Thursday 3 October 2013

Chalk Studio Part Two - Timeless Chalkboard!

Hello, Jennifer here with more projects using My Mind's Eye's Chalk Studio collection! Today I want to show you how timeless these chalkboard embellishments are. You can use them for any season, just by changing the papers and other embellishments you put with them! 

The below projects are all cards, but the same techniques can be applied to layouts and other projects.

First up is a card for Halloween. I've been taking my daughter Trick-or-Treating for the last couple of years with a group of mums and kids. One of the other mums (who loves Halloween), is due to have a baby that week, so she won't be coming this year. I'm going to send her this card to make her feel part of it!

Admit One To Spooky Town:


I don't have any Halloween supplies, so I used some orange patterned paper, black and white cardstock, a twirly corner stamp, and the awesome Chalk Studio embellishments to create the spooky feel - the lines surrounding 'Admit One' look almost like bones! 

The word 'spooky' is heat embossed with white embossing powder to give it a ghostly sheen, which is a great texture difference to the chalky label. I finished the card off with a few black pearls and doodled lines around them so they became spiders!

Next is a traditional-looking Christmas card...

Be Good:


The 'Be Good' sentiment on here really stands out with a Chalk Studio Label Sticker backing it. I love the Chipboard Elements banner along the bottom like a ribbon, it looks like the reindeer is jumping across some snowy ground at night-time! I also added a couple of pieces at the top left to resemble icicles. The black chalkboard elements really help the traditional reds and greens to pop from the page!

Finally, here's a card for Valentines Day, though you could use it to send a little love at any time of year...

True Love 4 EVA:


For this card I teamed the Chalk Studio items up with the Glitz Wild & Free 6x6 Pad and Giant Rhinestones. All the hearts were perfect! I amped up the chalkboard on here by layering a Decorative Frame on top of a Label Sticker. The glittery number 4 and the yellow dots made with a pearl pen stop it looking too dark. The 'Well Hello' sentiment adds a cheeky touch that makes me smile!

I'm really loving the chalkboard trend and I know I'm going to be using the embellishments up completely! 

Don't forget these ideas from my two Chalk Studio posts for how to use the embellishments:

  • Frame small photos (you could adhere one with foam dots)
  • Journal onto the Labels using a white gel pen
  • Push some chalkboard items right up to the edge
  • Add colour to the chalkboard
  • Layer a sentiment piece onto another embellishment
  • Heat emboss onto a Label
  • Use a chipboard border like a ribbon
  • Put chalkboard on top of chalkboard!

And if these cards have given you some ideas, you can still join in with our Six Cards on the 6th series to be in with a chance of winning a pizza box filled with stash! There's a couple of days left on the current linky, and a new one will be here on the 6th of October!

Jennifer x

Check out more of Jennifer's layouts and cards at her blog Jennifer Grace Creates.

Tuesday 23 April 2013

My Minds Eye Collectable Birthday Card

 
Hello!!
 Jenny here today to share a card that I made using some of the papers from My Minds Eye - Collectable - Memorable 6 x 6 pad.
 

 I kept the card very simple to show off the gorgeous colours in this pad - lots of pinks / aqua / pale yellow and lime green. I cut the circles with nesties and inked the edges with distress inks just to soften them against the harsh white background I used the following colours Antique Linen, Worn lipstick & Iced Spruce. The White has been embossed with my swiss dots folder. The image has been stamped directly onto the patterned paper and I coloured it with my promarkers. I made a rolled flower from some scraps of paper and added some self adhesive pearls to finish it all off.
 
I'll be back soon with a tutorial to show you how to make a "Joy Fold" card!!
 
Jenny x
 
See more of Jenny's fabulous cards over on her blog : Dragonllew's Spot 

Thursday 31 January 2013

Trend Watch!

Hello, Jennifer here!


In January it was the Craft & Hobby Association’s Winter Show in Anaheim, California, which is when all the Scrapbooking manufacturers (along with other crafting brands) show off their upcoming releases. So I've been watching all their blogs with a close eye as they also revealed all the new products online, for us to drool over whilst we wait impatiently for it to get to the UK shops!

The good news is that Sarah from SJ Crafts has lots of lovely goodies on order, and some of it has already started to arrive! 

I want to tell you about a few of my favourite trends that I've been spotting, so you can watch out for them arriving to the shop!

Trend 1: The Pink and Turquoise Colour Combo 

This has appeared in many collections before, but it’s a combination that will never grow old for me. It just looks so fresh and pretty, and is perfect for spring and summer projects - something we all look forward to after these long grey months!
The Maggie Holmes Collection by Crate Paper has bold pink and turquoise hues, that make me think of tropical days and lots of laughter! Look out for the collection pack coming soon!


The Sundrifter Collection by Studio Calico has slightly softer pinks and blues, but it teams them with black, grey, and patterns with a slightly urban feel, that makes it oh-so trendy and cool! This one is due into stock early February.


The Collectable Collection from My Minds Eye is due to arrive at S J Crafts next week. This collection has four themes within it, and I think Memorable is my favourite with the pink/turquoise colour combination in a super sweet, girly way, with flowers, doilies, and lots of delicate details!


Trend 2: Hints of Travel

I love that a lot of brands are adding just small touches of travel to their lines, rather than it taking over a whole collection. I especially like ones that have hints of going up in the air, as it's been 6 years since I flew anywhere on holiday and I miss it! The travel details can usually be used on all kinds of pages though, so I can add an uplifting phrase here, or an aeroplane image there, and get a sense of travelling on projects that have nothing to do with going away!

The Scoot Collection by Echo Park is a really fun boy-themed collection. It's also got lots of aeroplanes and clouds, and a sweet 'up, up and away' sticker that I adore! Plus the collection pack is in stock already, so you can get your hands on this one straight away.


The Lucky Charm Collection by Dear Lizzy for American Crafts is based on bracelet charms, like horses and hot air balloons! My absolute favourite bit is the 'come fly away with me stamp' which is too dreamy for words! The mini-chevrons and clouds will be sweet little details too. The stamp and the 6x6 pad should be in the shop in early February.


The DIY Shop collection by Crate Paper also has hints of travel. It has a real vintage vibe about it, which works so well on projects all year round. The map-paper details and one little aeroplane chipboard are the perfect touch of escapism! The collection pack will be in stock very soon.


Trend 3: Arrows and Arrow Heads

This trend is so hot right now! There are arrows all over the place. I love it because each new year I feel like I need some 'direction' in my life! It looks great when you go over the top and add arrows all over the page to really emphasise something, or just one arrow tucked away on a layout or card can draw your attention to whatever it's pointing at. Whichever way you like it, the arrow trend is definitely something to embrace!


The Snippets Collection by Studio Calico has some great graphic chevron-arrow patterned papers and wood veneers. It also includes these fantastic arrow stickers, in nice bright colours - I like the mix of shapes and sizes! Look out for Snippets arriving soon. 


My final pick is from Studio Calico too - their awesome Huey's Masks. I just had to draw attention to this one from the Sundrifter collection. It's called a 'Triangles' mask, but it fits in well with the arrows trend, as it looks like arrow heads pointing up and down. This will make a great layering element on layouts, or a background for cards. And you could always block off some of the design to just have one or two rows of arrows! Look out for this and other Studio Calico goodness including more masks, wood veneers, and Mister Huey mists arriving soon.


So there's a few of my favourite trends that I'm looking out for this season! 
Has anything here caught your eye? Now I've just got to wait on the edge of my seat until it all arrives in the UK and into the SJ Crafts shop

Don't forget to 'like' the SJ Crafts Facebook page if you want to know as soon as the new stock arrives! I'll let you into a little secret (Shh!) ... Sarah usually announces new arrivals over there first!!

Bye for now, Jennifer x