Monday 30 December 2013

Decorated Frame for the New Year and Beyond!

Hello everyone!

Jennifer here today. I hope you all had a wonderful Christmas! 

I've started looking back over the year that's nearly finished, and looking forward to the year that's ahead. To try and channel good thoughts and welcome 2014 into my house I made this frame, which I can change the central panel of as the year goes by...


Want to make one for yourself? Here's how...

Step 1: Find a frame with a solid colour (woodgrain or patterns don't work so well for step 2) and take out any glass/plastic and backboards:


Step 2: Use some Jenni Bowlin Tiny Trims Gold Rub Ons to decorate the edge of the frame. I used triangles along two opposite edges and stars along the other two edges. If you want to make sure they go on straight then draw a pencil line with a ruler first as a guide - I didn't mind mine being a bit wobbly:


Step 3: Use a strong adhesive (I used a hot glue gun) to adhere three lengths of wire to the top of the frame at the back, and also a length of bakers twine a little below the top edge of the inner frame:


Step 4: Create a panel to hang inside your frame. I used the 'b' side of the Crate Paper Bundled Up 'Candy Cane' Paper layered onto some cream card. Then I decorated it with a Bundled Up Journal Card, a Chalk Studio Label Sticker, some Simple Stories Daily Grind Chipboard Stickers, Prima's White Canvas Alphas, and some Studio Calico Tiny Stars Wood Veneers. I also used a couple of Jenni Bowlin Doilies Gold Rub Ons.

Peg the panel onto the twine using some small pegs:


Step 5: Then use a few more Doilies Gold Rub Ons on some smooth white card - I used the white card that came as packaging in the rub ons packet! Fussy cut these out and glue them to the top of the wires:


I love how these look a bit like fireworks, but then in spring they could look like flowers, in summer they represent suns, in autumn they echo golden leafy trees, and in winter they are like pretty snowflakes - so I can use the frame all year round!

Then you just need to put the frame on display and smile each time you see it!

I wish you all a very Happy New Year!

In the meantime don't forget to check out our Design Team Call, and keep an eye on the Facebook Page for details of a sale that's coming soon!


Sunday 22 December 2013

UK Scrappers Blog Hop Layout

Hello!
Each day throughout December (up to the 23rd) UK Scrappers have been featuring a different project on their home page - kind of like a blog hop but one blog to visit each day! 
Today it's our turn!

UK Scrappers are offering a prize to one lucky winner who comments on all the participating blogs! More on that at the end of this post.

With just a couple of days to go now until the BIG Day, I thought we would have a little break from "full-on" Christmas themed crafting and so I've made a layout which focuses a little more on our day to day activities at this time of year. 

I wanted to document how we enjoy visiting our local coffee shop to warm up and sip coffees (me) or hot chocolate (her)!


I've used supplies from Echo Park "Keepin' Cozy". The papers in this collection are lovely for winter seasonal scrapping as they're not heavily Christmas themed. 


B sides of the papers!

 I kept the design very simple as at this time of year it's difficult to find the time to scrap so when I do get chance, I want to make fairly quick and easy pages. Less than hour from start to "in the album" is ideal!! I'm sure some of you are the same during the busy festive season.

I chose a piece of kraft bazzill cardstock as my background and two sheets of patterned paper. I started off by trimming .5" off two sides of the patterned paper (green) so that I would have a .25" border to my layout and I "gutted" both the patterned paper and the kraft to make the papers go further and also to use for punching shapes for embellishing later.


I also cut the other paper (red one) to a 12" x 7" panel. 
The edges are inked with distress ink and a blending tool.

Next I layered them all up and adhered in place so that the red strip was about 1.25" up from the bottom edge.


I'm loving instagram photos as the moment and picked one out, featuring my daughter enjoying a hot chocolate, for this page along with one of the journalling cards and adhered them into place.


Three clusters of embellishments using some Glitz heart washi tape, which I tucked just under the edge of the photo, a few punched scalloped circles, some stickers (from "Keepin' Cozy" and Simple Stories "Girl" Sn@p Stickers), wood veneers and enamel dots and my title (using letter stickers from Simple Stories December Documented) is all this page needed before I called it finished!


The supplies used on this page can be found in the S J Crafts Shop!


Don't forget if you visit each featured blog or project each day, leaving a comment (with your UK Scrapper user name) and then go back to UK Scrappers after you've visited the last project tomorrow and leave a comment on the "Blog Hop" thread over there you will be entered into the draw. The full list of projects and details can be found here.

We are currently on the look out for 1 or 2 talented crafters to join out Design Team. Details of our DT call is here and the call is open until 6th January.

All the S J Crafts team wish you a very Happy Christmas and Best Wishes for 2014!

Thursday 19 December 2013

Quick (Last minute!) Christmas Cards


Hi Jenny here today
How are your Christmas preparations going?
Not long until the 25th now!

This year, I seem to have got behind with all things Christmas and I have found myself in need of a few more cards. 

I thought I'd pop by and share with you some "super fast" cards in case you're like me and need a few last minute ideas!


I have used some of my Christmas dies to cut apertures behind which I have layered some scraps of Christmas papers. Then I have simply  layered this onto some coloured card and onto a card blank.


 I stamped a simple Christmas greeting underneath each aperture in black memento ink and added some stickles and flat backed gems as embellishments.


If you don't have a die cutting machine, you could achieve a similar affect using punches!


Have you finished making all your cards or are you needing a few more?

Happy Christmas!

Jenny x

See more of Jenny's cards over on her blog: Dragonllews Spot


Monday 16 December 2013

Fast Festive Scrapping with a Mini Book

Happy Monday to you! 
Louise is here today to show us some ideas to speed up our festive crafting!


Last week Lisa-Jane shared her process for telling her Christmas story in this post and this post! . She explained that gathering together and organising your scrapbook supplies helps with the whole Christmas Journal process. I really do second this and for several Christmas seasons this is exactly what I have done.

This year finds me restricted with my mobility. This limits the activities I might otherwise have been involved in over December which means unlike other years  I'm unlikely to have a daily photo. It has also meant that I've not been able to pull together all of my Christmas supplies.

It is still important to me that I record my Christmas however I didn't want the structure of a daily photo or entry so I started to think along the lines of a little book to hold some photos and record some stories in December, along with the big day itself.

Once I'd decided on the format for my little Christmas book - I found it a quick and easy project to undertake. This is an ideal project for a busy time of year, when lets face it most of us feel there aren't enough hours in the day.

Today I'd like to share with you five quick and easy steps to construct a little book for recording your family photos and stories during the month of December. 

There's also another five optional steps with ideas to help you add to your little book if you find you have more time available to craft than you thought, or if you find that you have more photos and stories you would like to include. Or you could add to it in January.

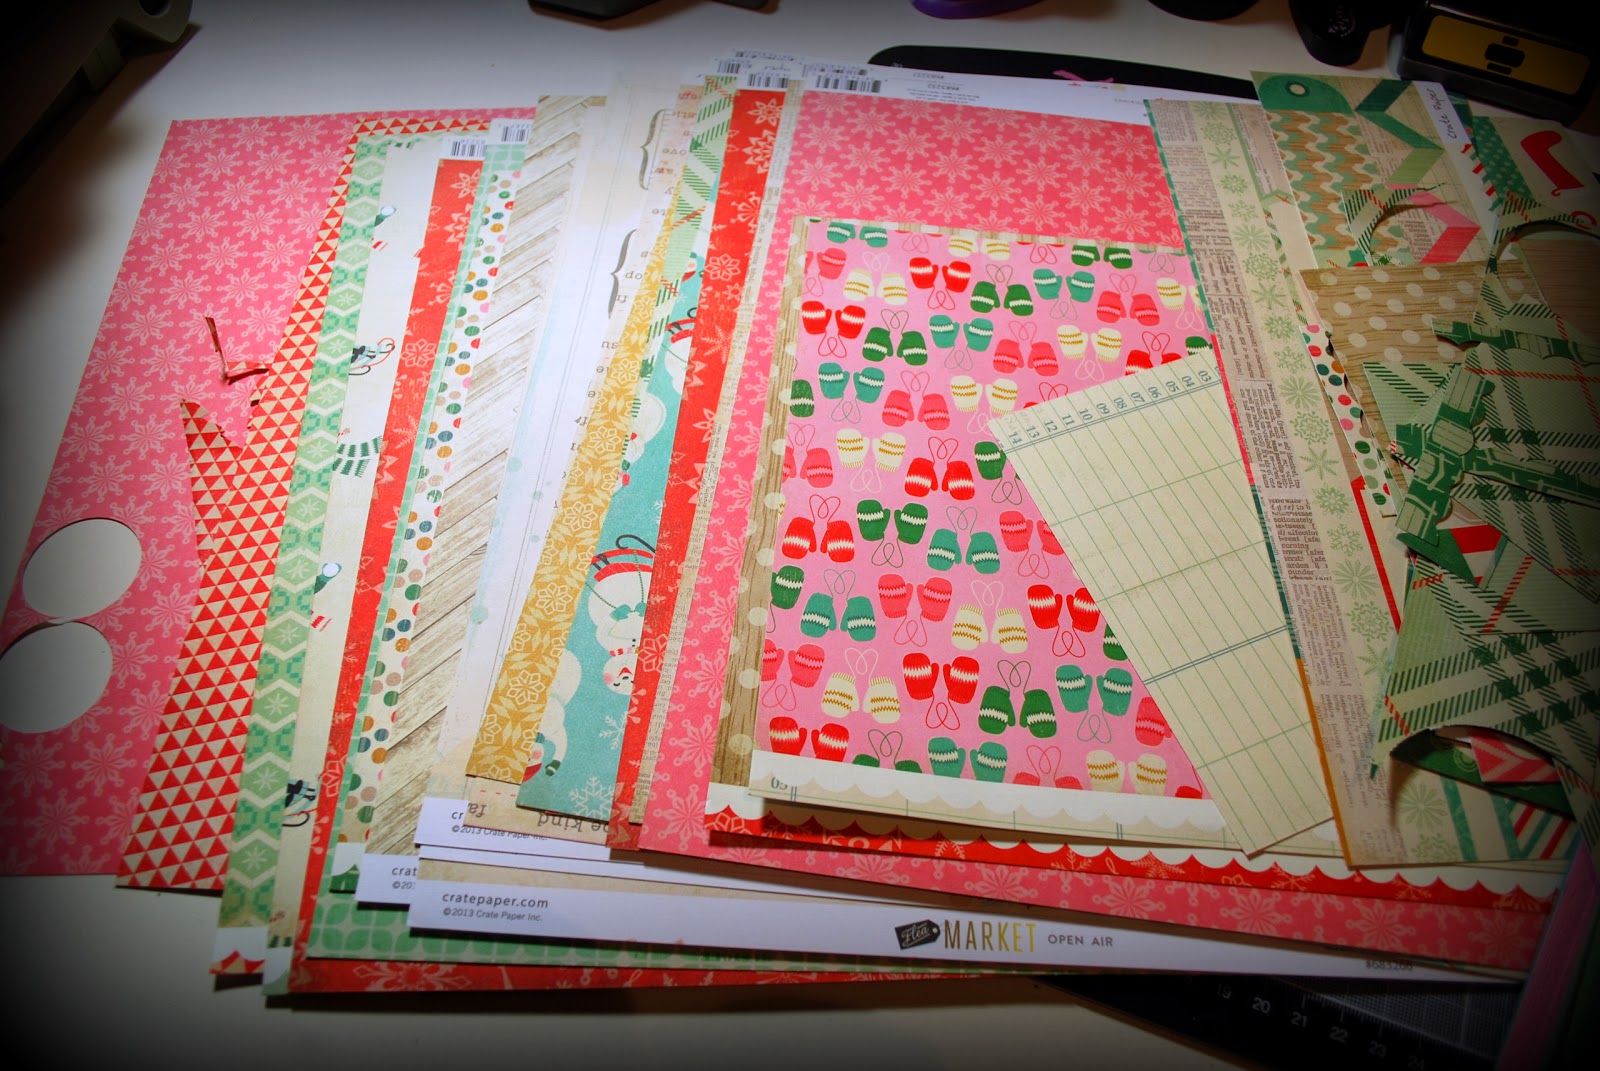
1. Restricting your supplies for a project can be more productive. If you are like me then you can spend hours looking for the right papers and embellishments. To narrow down your supplies use a Christmas collection Kit. I chose the gorgeous Echo Park's 'Tis The Season Kit perfect for this project. Within the collection kits you have your co-ordinated double sided patterned papers, including journaling cards, a sheet of alpha's and a sheet of festive stickers.


2. Pick out just one or two tools that you will use for the book.In addition to this Christmas collection kit I chose one punch (yes just one!) to use throughout the book.

3. Next, you will need to cut your papers to make the pages of the book.
I knew I wanted a smallish book so I selected some patterned paper from the collection kit for the pages and cut them to 6 x 7 inches.  I liked the squarish look of the album and decided to shape only the top cover into a tag shape. Of course, you can cut your pages to whatever size and shape you like.


I put a hole through the top of each page to hold them all together with a book ring.

4. Once you've got your pages and a front cover, you can use a few stickers to embellish. Try to limit yourself to using only the sticker sheets in the collection kit or if you're not using a kit choose just one or two sheets. This will make the whole embellishing process quicker and easier. I used stickers to decorate the front cover of my little book....(with a little help from the Teresa Collins Santa list sticker sheet, which in my defence just happened to be close to hand at the time!).


5. To complete the book you can add a page pocket to the back page of the book for somewhere to keep all of my Christmas memorabilia.


And that's all there is to it!
  
A little Christmas book all ready to be embellished and journalled in!


Optional Extras

Not only does a project of this type fit nicely around your hectic December schedule, it is also a superb project to add as many or as little pages as you like, when you like. Next Christmas....even!!

6. If you find that you have an hour to spare here and there, then you can add inserts or overlays. For example while I was waiting for the next few photos and stories to include in my Christmas book, I cross-stitched (freehand) this cute reindeer head from this pattern on Pinterest.


 I framed the reindeer and now it sits on top of the front cover.


7. Inserts can be in any form. Acetate pockets filled with confetti, decorative tags, envelopes for that special journaling. If you have the time and inclination these inserts can add interest and decoration to your book. This time I chose to
 include a glassine envelope to hold my children's Christmas wish lists.


8. At this busy time of year when we are trying to find the perfect present, inspiration can be lacking. This is the best time to consider a scraplift. I did it! I scraplifted a Christmas card (thank you Kandis Smith). It's a little inserted page that adds decoration to my book. Later on it will hold a photo and journaling.


9. Another quick and easy way I like to add interest to a project, is to add stitching. Hand stitching can be time consuming....so I dusted off my sewing machine. I do love how decorative stitching can transform a page.


10. Finally, no Christmas project is complete without bling. A pack of gems or enamel dots is a quick and easy way to bling up your little book.


I hope that this project has inspired you to put together a small book to record your Christmas. 

Please leave us a comment and let us know if it has!

I will be sharing the finished book on my blog after Christmas when I've recorded and included photos from Christmas day.

Happy Christmas Scrapping 

Louise x

Louise shares stories and her papercrafting projects at her blog Boys, Bugs, and Beautiful Buttons

P.S. Don't forget about our Design Team Call!

Friday 13 December 2013

Recording Christmas (Part Two)

Hello! Lisa-Jane here again to show you how I'm getting on with recording my Christmas so far!

How are you getting on with your festive crafting? 
Yesterday I explained a bit about my process for recording this year's Christmas memories. If you missed that post you can catch up on it right here!

I won't say that I'm behind or on target, because there is no ideal speed. I write something everyday and try and take photos when I can, and then I scrap them and write up the journalling the cards when possible, and often do a few days at a time. Even if you start documenting your Christmas from today, don't worry ... the important thing is capturing those memories!

Here's my first page and the first day!


The gorgeous pinky / red snowflake paper is actually the reverse of this page that I shared HERE.


When you are making a continuous album like this it can really help to stretch your stash and when the reverse of the page is so stunning it feels a shame to hide it.

I've used a few of the Crate Paper Bundled Up papers here as well as the Studio Calico Wood Veneer Tiny Stars to give a little bit of texture.


My first divided page is below. The photos are just a temporary print from my home printer so I could see where I wanted to put things, and where I wanted to overlap or use a small photo etc. As I've done each one I've put it into a separate folder on my computer so that when the holidays are finished and there is a suitable printing deal, I have everything that need to do a quick order with everything the right size.


The title pocket uses more of the Bundled Up papers with some ribbon and twine from my stash (actually the ribbon came from a cracker last year!) and the letter stickers are Echo Park's Reflection Falls Alpha Stickers which have that same beautiful deep cream. The dark green spotted paper at the bottom is from another current collection Simple Stories December Documented.


Below is the reverse of that page so far. The mitten print is the back of the ledger pattern that I used for a journalling block in the first side, and I will be using the snowman journalling card which is the reverse of the bottom left journalling card. This really cuts down my options which might not work for everyone, but I find that limiting my choices in this way helps to speed up the process. Of course if I don't want to use them in the end then I don't have to!


The pieces that I've used for the bottom left of this side were all off cuts. When I'm going a project like this I keep an A4 "slippy pocket" for all the scraps and half used pieces and this is where I head to first when I'm creating a new section of the page.

I've been asked a few times about having to make the back of the page work when you have designed around the front of the page. What if its not what you want? Well there are a couple of options here really. For me I will always make it work in the same way I would have done back in the days of only having 1 piece of patterned paper, or if you only had a 12x12 pocket. You design to what you have available! Alternatively you can just fill it with pretty things to make a pleasing section break and continue on with another protector on the facing page instead. 

It's worth keeping in mind that especially with longer term projects like this, we generally aren't looking for awards for our pages. I nearly always make pages that I would have tweaked if I was having another go, but the important things are that the memories are captured, the photographs stored safely and accessibly, and that we enjoyed the process. After all, we mostly do this for fun right?

We finally put our tree up now so I have many more memories to journal about. You'll find me in my craft room with a few festive scented candles and a Christmas CD playing.

Best wishes for Christmas and happy scrapping!

Lisa-Jane x

Lisa-Jane is a keen scrapbooker and crafter and has been posting lots of Christmas projects on her blog Inside My Head.

P.S. Don't forget about the Design Team Call HERE!

Thursday 12 December 2013

Recording Christmas (Part One)

Hello everyone! 
Today Lisa-Jane is here to share her method of recording the festive season!

Over to Lisa-Jane:

There are lots of different ways of recording and scrapbooking your memories of the holiday season .... through a specific class or by just doing your own thing. I tend to do a bit of Shimelle's Journal Your Christmas alongside my own recordings of our daily festive events. For me, documenting the story side of things is really important for taking a breather at this hectic time of year and helps me to focus on what really matters.

Hopefully this post will give you a few ideas to help you to record your Christmas! 

For many Scrappers, including me, scrapping a whole 12" x 12" page every day at this busy time is liable to induce insanity so I'm going to share my process with you - it's worked for me in previous years and keeps me sane and the stress to a minimum.

I find that a little preparation in the set up can help speed things up immensely. Even with eleven days of December already behind us you can still make preparations, because it will definitely help whenever you start.


Firstly, decide on what type and size of album or book you want to create. There's lots of options ... from albums of various sizes and shapes to mini books or envelope books (and more!)
I decided on using divided Page Protectors for a number of reasons. If I only have the time or inclination to do a little story or crafting then so be it, but on those days where I have a lot to record or more time for prettiness then that can be accommodated too. Some days I will fill all the pockets but other days I can just do a part of a page and have a clean separation from the following day which I wouldn't be able to do with a full 12x12.

I also find it helpful to decide on a collection of papers or a colour scheme.

I happened to have the Winter Project Life kit which is identical to Crate Paper's Bundled Up Collection. I really didn't NEED any more Christmas paper and I tend to be a traditional red and greens girl when it comes to Christmas.  However, when Sarah showed me the gorgeous papers and embellishments I let out a very loud "ooooh!" (You know what I mean don't you?  You've done that too, right?!) The B sides of even the full sized 12x12 papers are subtle enough to work really well in small pockets so I knew this collection had the versatility I needed for my eclectic album this year. While perusing the papers I also noticed that some of the new Maggie Holmes collection called Flea Market went really well with it too so I added some of those into the mix.  The deep cream, aqua and range of pinks are a perfect compliment and will really help to tell my story on the days which are not so festive too.


 For speed and preparation, I clear everything away from my desk and just have out the things I intend to use for this project. In addition to the papers above, I went through my stash and picked out some other (sometimes very old!) papers in the same colours. 

Another idea is to select some crafting tools and punches or dies that you will use and keep them close at hand.

I chose a few punches to use throughout the album. This means I don't have to keep returning to my punch draw and deliberating over which one to choose. It also lends continuity to the project as the same shapes crop up across the pages. I find that having the punches out like this also helps to give me a bit of inspiration on what to do in my individual pockets.


 For an ongoing project like this I like to have a few containers for the different elements that I intend to use. I have a bowl of Washi Tapes, a bowl of buttons and embroidery threads and a little heart shaped dish of small items like snowflake brads, sequins and Studio Calico Wood Veneer Tiny Stars. I also have a cake stand with adhesives in the top.  In the middle I have festive trims, ribbons and Enamel Dots, and in the bottom tier I have doilies, stickers, Project Life cards and other plain cards cut to various pocket sizes. This means I can just grab what I need and not have to think too hard about what to use. I also have a little bowl of Bundled Up Ephemera which are so cute and you get so many in the pack.


I also keep a pink pot of my most used tools and a variety of plain Cardstock to hand, some of which I cut to size. And my desk wouldn't be complete without a cup of tea and some Vintage Photo Distress Ink. Inking the edges brings all the collections together and again adds continuity throughout the album.


Here you can see some of the other things I've added from my stash like some old music paper, stickers and gold printed vellum. The album to the left is the one I am using this year. Its an American Crafts Modern Album so I just need to fancy up the plain front however I see fit but that might be a job for the new year.


So, gathering together all your supplies and tools in one place is my tip for scrapping your Christmas.

If you'd like to see how I'm getting on with my album then please do pop back tomorrow for Part Two!

Are you scrapping about the festive season this year? How are you hoping to achieve yours?  We'd love to see some of your ideas too so don't forget to link up in the comments.

Merry Christmas everyone!

Lisa-Jane x

Lisa-Jane is Mum to two small children and adores December and all things Christmas .... she blogs regularly at Inside My Head 

P.S. Want to join the SJ Crafts Design Team? See the DT Call HERE!

Tuesday 10 December 2013

SJ Crafts Design Team Call!

Would you like to join our Design Team?


Don't worry, the current Design Team aren't going anywhere right now, in fact I'm delighted that they've all just agreed to stay on for 2014! However I would like to expand the team so we are on the look out for another talented crafter (or maybe two!) to join us. The DT spot will initially be for a 3 month term (February - April 2014), with the possibility of staying on longer term.

Interested? Then read on for how to apply!
Don't worry if you've never been on a Design Team before - previous experience is absolutely not necessary! But you do need to be UK based and have your own active blog!

What we'll ask of the new Design Team Member(s):

  • Create projects/layouts and write at least two blog posts with clear photographs from each Design Team package of stash.
  • Upload these blog posts to the DT blog by a set deadline (we'll tell you more about how to do this once appointed!)
  • You must be prepared to post on your own blog with links to the S J Crafts shop and blog to coincide with your DT posts going live. We will also require that you have the SJ Crafts button on your blog sidebar.
  •  Actively participate on the SJ Crafts Facebook Page and assist with the positive promotion of SJ Crafts on any social media / forums you belong to. (eg: Facebook, Twitter, Pinterest, UK Scrappers). We will be looking for someone with a strong online presence!
  • You must be passionate about crafting! Our main customer base is scrapbookers, so we would prefer that  you enjoy some form of memory keeping, but other papercrafts like card-making or home-decor items would be helpful.
  • You must be able to work to deadlines, work well as a team and encourage and support the rest of the DT.
  • We are planning some special online/blog events during 2014 and should you stay on longer you will be asked to participate in the planning, promoting, creating and writing for such events.
What you receive for being on the Design Team:

  • You will receive a generous amount of papercrafting goodies to work with and to create projects/layouts for your DT posts.
  • Sometimes you will be sent additional items to use for special online/blog events.
  • A generous DT discount to use at S J Crafts for your own shopping throughout your DT term.
  • Links back to your own blog from the shop blog - both in our blog sidebar and your blog posts and special mentions on the SJ Crafts Facebook page and Twitter feed
  • You'll also get lots of encouragement and support from Sarah (SJ Crafts owner) and the rest of the team and hopefully you will enjoy the experience of being on the team.

Still interested? Yes? Then here's how to apply:
Send an email to dtapply@sjpapercrafts.co.uk by Monday 6th January 2014 11.59pm GMT

Your email should include:

Your Name
A little bit about you and your crafts (eg: what crafts you have experience in, how long you've been crafting, any current/past DT teams etc)
A Link To Your Blog
Details of (and if you can include links to) any Social Media/On line Forums/communities you participate in.
Photos and brief details of 3 of your craft projects which best showcase your craft talent (see below)

We would like you to include in your email application photos of 3 different projects (1 photo of each project only). If possible please ensure your photos are no bigger than 700pix square. If you want to show us more photos (such as more pages of a mini-book or detail shots of a scrapbook layout) then please provide a link to the blog post or online album where we can see the photos. Please don't attach more than 3 photos to the email. 

If you have written tutorials and/or tips on your blog in the past then you can include a link to one or two of these as well.

The new DT member will be contacted in the middle/end of January so they can be ready to join us for the start of February.

As I mentioned at the start please don't be put off if you've never been on a DT before or applied - We're so looking forward to hearing all about YOU!

Sarah x

Friday 6 December 2013

December's Six Cards On The 6th!

Hello and welcome to December's Six Card's on the 6th!


This is the last post in our series that's all about getting those Christmas cards made in time. You can link up your own cards at any time throughout the month, and at the end of the series one link-up from all the posts will win a pizza box stuffed full with scrapbook stash! 


 As you may have made most of your Christmas cards by now, this month we'd love you to link up even if you just have one or two cards to show us - or maybe you've made a few tags for Christmas presents? Let us see!

Today we have inspiration from Louise and Lisa-Jane, who have put some festive 6x6 pads to good use!

Louise:

The countdown has commenced and I have a long list of things that I need to do before the big day. Thankfully my Christmas card making has been under way for a while now which has all been down to the 6 on the 6th challenge. I have really enjoyed making a few cards each month!  

The cards I am going to share today have been made using the Teresa Collins Santas List 6x6 pad and stickers sheet. A perfect Christmas collection!


 I've already made cards with Christmas trees, snowflakes and holly, so this time I wanted to use stars.


To start I cut a silver glitter circle and a slightly smaller vellum circle for each of the six cards. These were layered and placed onto a background patterned paper. 


Then on top of each vellum circle I wrapped a circle of either tinsel, wire or twine. These were adhered with Glossy Accents.


Using a die cutting machine I cut six stars... or you could use a template and cut them out by hand.


To make them 3D I scored from the tip of each point across to the other side. By creasing the score lines to create peaks and valleys the star comes to life!


As I wanted the star to appear as though it is hanging...I threaded some cotton through one of the points and a silver bead. The cotton was fixed to the back of the background paper to hold it in place.


Here are some close up photos so you can see a little more of the detail:


Oh.....Christmas is the most wonderful time of the year!

Lisa-Jane:

I've recently been using the Bo Bunny Elf Magic 6x6 Pad to create some really colourful cards. The beauty of this collection is that the designs are so bright that you don't need to add much more to make a striking card.  Also there are some more traditional designs too for a more subtle feel.


I made 2 ranges of cards and chose 3 of each to show you here. 

The top row were made by cutting 5x5" squares of paper a third of the way down, and then swapping two pieces over to make 6 cards out of the 3 original squares. I covered the join with some glitzy trim and added a few sequins (inspired by Jennifer!) and a little arrangement of punched shapes with a pre-made topper:


The second row were made by matting 5x5" white card with slightly smaller papers from the pad. I then attached a strip of coordinating paper and some festive trim. I coloured some stamped images and matted them on coordinating paper before adhering them over the trim with pop dots. 

You can see what a range of looks you get in the Elf Magic collection, especially when you change up the embellishments too!

I also made some cards from the inch that I trimmed off by layering the strips up in a tree shape - even the children helped!

I've loved doing this series because I have a lovely little pile of cards that I otherwise wouldn't have had.

Merry Christmas!

Didn't Louise and Lisa-Jane make some fabulous cards! Do you have a Christmassy 6x6 pad that you could use on a couple of cards or some tags? How about trying Louise's idea to make some 3D stars, or Lisa-Jane's tip to hide paper-joins with glitzy trim? 

Now it's your turn! Link up your cards below for a chance to win the pizza box full of stash (prize will go out in early January). We can't wait to see what you create! Jennifer x