Thursday 31 January 2013

Trend Watch!

Hello, Jennifer here!


In January it was the Craft & Hobby Association’s Winter Show in Anaheim, California, which is when all the Scrapbooking manufacturers (along with other crafting brands) show off their upcoming releases. So I've been watching all their blogs with a close eye as they also revealed all the new products online, for us to drool over whilst we wait impatiently for it to get to the UK shops!

The good news is that Sarah from SJ Crafts has lots of lovely goodies on order, and some of it has already started to arrive! 

I want to tell you about a few of my favourite trends that I've been spotting, so you can watch out for them arriving to the shop!

Trend 1: The Pink and Turquoise Colour Combo 

This has appeared in many collections before, but it’s a combination that will never grow old for me. It just looks so fresh and pretty, and is perfect for spring and summer projects - something we all look forward to after these long grey months!
The Maggie Holmes Collection by Crate Paper has bold pink and turquoise hues, that make me think of tropical days and lots of laughter! Look out for the collection pack coming soon!


The Sundrifter Collection by Studio Calico has slightly softer pinks and blues, but it teams them with black, grey, and patterns with a slightly urban feel, that makes it oh-so trendy and cool! This one is due into stock early February.


The Collectable Collection from My Minds Eye is due to arrive at S J Crafts next week. This collection has four themes within it, and I think Memorable is my favourite with the pink/turquoise colour combination in a super sweet, girly way, with flowers, doilies, and lots of delicate details!


Trend 2: Hints of Travel

I love that a lot of brands are adding just small touches of travel to their lines, rather than it taking over a whole collection. I especially like ones that have hints of going up in the air, as it's been 6 years since I flew anywhere on holiday and I miss it! The travel details can usually be used on all kinds of pages though, so I can add an uplifting phrase here, or an aeroplane image there, and get a sense of travelling on projects that have nothing to do with going away!

The Scoot Collection by Echo Park is a really fun boy-themed collection. It's also got lots of aeroplanes and clouds, and a sweet 'up, up and away' sticker that I adore! Plus the collection pack is in stock already, so you can get your hands on this one straight away.


The Lucky Charm Collection by Dear Lizzy for American Crafts is based on bracelet charms, like horses and hot air balloons! My absolute favourite bit is the 'come fly away with me stamp' which is too dreamy for words! The mini-chevrons and clouds will be sweet little details too. The stamp and the 6x6 pad should be in the shop in early February.


The DIY Shop collection by Crate Paper also has hints of travel. It has a real vintage vibe about it, which works so well on projects all year round. The map-paper details and one little aeroplane chipboard are the perfect touch of escapism! The collection pack will be in stock very soon.


Trend 3: Arrows and Arrow Heads

This trend is so hot right now! There are arrows all over the place. I love it because each new year I feel like I need some 'direction' in my life! It looks great when you go over the top and add arrows all over the page to really emphasise something, or just one arrow tucked away on a layout or card can draw your attention to whatever it's pointing at. Whichever way you like it, the arrow trend is definitely something to embrace!


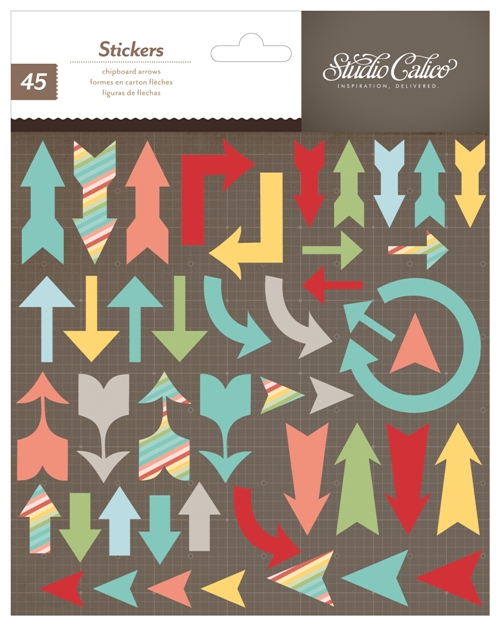
The Snippets Collection by Studio Calico has some great graphic chevron-arrow patterned papers and wood veneers. It also includes these fantastic arrow stickers, in nice bright colours - I like the mix of shapes and sizes! Look out for Snippets arriving soon. 


My final pick is from Studio Calico too - their awesome Huey's Masks. I just had to draw attention to this one from the Sundrifter collection. It's called a 'Triangles' mask, but it fits in well with the arrows trend, as it looks like arrow heads pointing up and down. This will make a great layering element on layouts, or a background for cards. And you could always block off some of the design to just have one or two rows of arrows! Look out for this and other Studio Calico goodness including more masks, wood veneers, and Mister Huey mists arriving soon.


So there's a few of my favourite trends that I'm looking out for this season! 
Has anything here caught your eye? Now I've just got to wait on the edge of my seat until it all arrives in the UK and into the SJ Crafts shop

Don't forget to 'like' the SJ Crafts Facebook page if you want to know as soon as the new stock arrives! I'll let you into a little secret (Shh!) ... Sarah usually announces new arrivals over there first!!

Bye for now, Jennifer x

Friday 25 January 2013

Winners of Challenge 10 & 11 AND the Future of our Challenges


Hi Everyone!
It's Jenny here with the winners for Challenge 10 & 11!
Huge apologies for the long delay in announcing the winners of the last two challenges .... real life got in the way for a while.

First up Challenge 10
Our winner of a £5 voucher to spend in the S J Crafts Shop!, selected using random.org is.....
 
No 10!!
 
 
Thats Anne Marie Lewis !!!  Well Done! 
 
Please e mail sarah at sj papercrafts (dot) co (dot) uk to claim your prize!       
 
Then onto .... Challenge 11

 
Our winner of a Mystery Christmas themed prize!!, selected using random.org is.....
No 37!!

Thats Fiona L !!! Well Done!
Please e mail sarah at sj papercrafts (dot) co (dot) uk and with your address details to send you your prize!  

***    ***    ***

The Future of S J Crafts Challenges!

You may have noticed there has not been a challenge this month.
After a lot of thought we have decided not to run the challenges for 2013.
However there will be ad hoc competitions and challenges from time to time with prizes to be won!
And Giveaways too!!
We know how much you like to win stuff!!

These will be both on our Facebook page and right here on this blog!

If you've not already joined our Facebook page ... you can find us on this link:

S J Crafts on Facebook

We'd love you to "like" our page to keep up to date with all our news!

A huge thank you to everyone who entered our challenges in 2012!!
 
Have a great day!


Wednesday 23 January 2013

NEW Echo Park Collections

Sorry the blog has been a little quiet lately. I've been busy browsing the new CHA stock ... sadly not in person (I wish!!) but on line and choosing new stock for the shop. There are just so many gorgeous new lines and products coming out, I can't wait!

New stock is gradually starting to arrive, kicking off with two collections from the ever fabulous Echo Park!

Just arrived today:


I just love the bright colours and fun images! A great for boy layouts - young and old!!


Also new from Echo Park:


Love Story is for all those Valentine/love themed layouts but also many of the papers are pretty floral designs which can be used for a wide variety of layouts!


Watch out for lots more new stash arriving soon!

Wednesday 9 January 2013

Studio Calico Burst Mask - Part 2


Hello! Jennifer here, and I'm back with some more Studio Calico Burst Mask Projects!

If you missed the first part, you can find that here.

 For this next project, I decided to try something other than misting. I played with some stamping through the mask instead!

Step 1: Take a 4.5" square piece of white cardstock, and position your burst mask on top. My mask still has ink on it from where I had been trying different stamps out earlier!


Step 2: Stamp all over the mask with a rubber stamp, using a few different colours of ink pad. I used blue, yellow, and pink. The rubber stamp needs to be one with a deep design - the flatter ones won't press down enough between the mask's gaps.


Here's the card with the mask removed.


Step 3: To finish the card off, sew some straight lines in the gaps between the stamped bursts. Add a brad in the centre. Then ink the edges of the white cardstock with pink ink, and mat it onto a piece of 5" square blue cardstock. Mount it onto a 5.5" white square card.


I'll keep this card on standby to send to someone who needs cheering up with a burst of colour!


Next, I wanted to try something a bit different so I used the burst mask to make my own unique t-shirt.


It was great fun and I love the final effect! I'm going to show you how it's done - but first of all I must point out that you can't use regular scrapbooking mists on a t-shirt that you'll want to wash. They'd wash right out! You need to get some fabric spray paint and follow manufacturers instructions for drying / setting the paint.


Step 1: Protect your work surface (and it's a good idea to wear your old clothes!!) and put newspaper or similar inside your t-shirt so the paint doesn't bleed through. Then place your mask on the t shirt where you want it to go.


Step 2: Spray all over your mask going over the edges a little, with yellow fabric spray paint.


Step 3: Spray the centre of your mask with orange fabric spray paint.


Step 4: Take the lid off your orange fabric spray paint and tap it above the t-shirt so you get little drops all over it.


Step 5: Take the mask off. Just after this photo I also sprayed a couple of times with the yellow fabric spray paint, from high above, so the t-shirt wasn't quite so stark white where the mask had been.


Step 6: Leave the t-shirt to dry, or follow the fabric paint instructions for how to dry / set the paint. Sew on a few scattered orange and yellow buttons, and your new t shirt is ready to wear! 

My Mum kindly modelled it for me!!


Thanks so much for reading my Studio Calico Burst Mask projects - let us know what you think about them and whether they've inspired you to make something! 

Jennifer X

See more of Jennifer's crafting at Jennifer's Jumbles

Saturday 5 January 2013

Studio Calico Burst Mask - Part 1


Hello, Jennifer here!

I hope you've had a wonderful Christmas and 2013 is bringing you lots of happiness and crafting time!!

I've been having some fabulous fun playing with the Studio Calico Burst Mask! I've got several projects and ideas to show you, and first up are are two layouts.

Magical Moments Layout


For this first layout, about my daughter at a Christmas parade, I used the mask in the simplest way - to fill the whole page. I began by spraying the back of the mask with removeable adhesive, to stop the mask moving as I misted, and I stuck it onto a piece of white cardstock.


I protected my surface with newspaper, and then spritzed all over the mask with Mr Huey's Honor Society Mist. To get an even coverage you need to move your hand quickly from left to right (or from right to left if you're left handed) as you are spraying.

Once the blue mist had dried a little, I carefully pulled the mask off. Remember not to leave the mask on too long if you've used adhesive on it, as it will end up getting stuck forever! About 5 minutes after misting should be okay. I then left the mist to dry completely for about an hour.

Once the blue mist was dry, I unscrewed the lids of Mister Huey's Calico White and Pretty Pink Mists, held the 'straws' over the layout, and tapped the lids with my finger to sprinkle drops of mist all over the page.


Once it was completely dry I trimmed the a little off each side, and mounted it onto some mauve cardstock. 

Then I just had to add my photo and embellish the layout!
I used: My Mind's Eye All is Bright stickers from the Collection pack 
MME Rhinestones and 6x6 Paper (for the journaling)
and a few Hero Arts Clear Gemstones!


Little Angel Layout

For my next layout, I used the mask in a few different ways...


To start this layout, about my son when he was first born, I first misted a starburst in the top left corner. I covered the parts of the mask where I didn't want the mist to seep through. It's worth testing this on a spare piece of paper to check you get the size/shape you want. Once I had done my "test" piece I cleaned the mask and placed it on the piece of Sugar Cookie cardstock (I covered up the other holes too after taking this photo) 


And then sprayed it a couple of times in the middle with Honor Society Mist. I pulled the mask off while the mist was still wet, and used the 'straw' of the Calico White Mist to flick streaks from the middle of the starbust out to the edges  - make sure you clean the 'straw' before you put it back in the bottle!!


Next I created an a mat for the journalling, by blocking off all of the mask except one section of the 'burst'.


 And then I sprayed this with My Huey Letter Jacket Mist. 

A little word of warning if you do have a go at this technique - spray quite lightly.

On my first attempt I sprayed on way too much mist and it seeped below the mask and ended up looking like this!!


Not the look I was going for! 
On my next attempt I was much more sparing with the mist and it came out much better.

I used another section on the burst as a template to cut out a piece of Studio Calico Hey Day 6x6 paper.


Which I placed below the red misted section


And added a piece of My Mind's Eye All is Bright Decorative Tape above the red section.

I checked where my photo was going to go, and added some detail to the top right corner, by covering up most of the Starburst Mask, leaving just a small arrow shape to point down at my photo.


I misted the "arrow" with Warm Calico Mist, and then outlined with a black pen so it was extra defined, and topped with a little sticker.

I then just off the layout, adding some droplets of White Calico Mist, and using the same stickers and alphas as the last layout, plus some All is Bright Decorative Brads. The cherub image was especially apt for the layout.


Hopefully this post has given you a few ideas for using the mask. I've used lots of ways all on one layout but you could use just one of the techniques.
I'll be back soon with some more ways to use the mask! 

Jennifer x


Studio Calico ~ Burst Mask ~ *New*

See more of Jennifer's crafting on her blog: Jennifer's Jumbles