Showing posts with label Jenny. Show all posts

Friday 2 May 2014

May Challenge - Bingo!

Hello and welcome to our May challenge! 

Did you know it's (Inter)National Scrapbooking Day (otherwise known as NSD!) tomorrow on the 3rd of May? Happy National Scrapbooking Day to you, we hope this challenge will give you some inspiration if you are crafting this weekend, and there's a chance to win a small prize if you enter!

Thank you to everyone who took part in our April Challenge, we loved looking at the entries, and we'll announce a few of our favourites and a winner here on the blog soon!

If you haven't seen our challenges so far this year, then here's how it works. Each month throughout 2014 we will set a challenge and we'd love it if you would play along. Each month the challenge will vary - sometimes we'll have a sketch, sometimes a colour palette, a photo inspiration or a "recipe" of stash to use or maybe a technique.

At the end of this post there is "linky tool" for you to link up your challenge entry so we can pop along and see and we will feature a few of our favourite projects next month. 

This time it's a BINGO Challenge!

Here's how to play ...

Select 3 boxes from the grid in a line (horizontal/vertical or diagonal) and include the items or technique in those 3 boxes on your project!

Eg: you may choose Ink, Metal, Bow (diagonal line) .... OR .... Transparent, Metal, Stamp (horizontal) but you couldn't select Transparent, Metal, Torn Paper as they are not next to each other in a line!


Here's some inspiration from the Design Team:

Louise:


 Louise was inspired by the top row of the bingo grid. She used Mr Huey Mist, a border punch across the bottom and a 1" circle punch. All supplies are from the March kit which included lots of the 7 Dots Studio "Illumination" Collection, with the addition of a blue cardstock, file tab, cotton and badge. 


Jenny also used the top row from the bingo grid: ink /mist, border punch, and circles. Her products include Kraft cardDistress ink (Weathered Wood), Glossy Accents, and Stickles.


Lisa-Jane selected the middle row: Transparent - Metal - Stamping 
Her supplies include stamps by Hero Arts, papers, stars, vellum and ephemera pack by Crate Paper Boyz Rule, enamel dots by Studio Calico and kraft cardstock.


Jimjams - for S J Crafts - March Illumination Kit & Insta Word Stickers

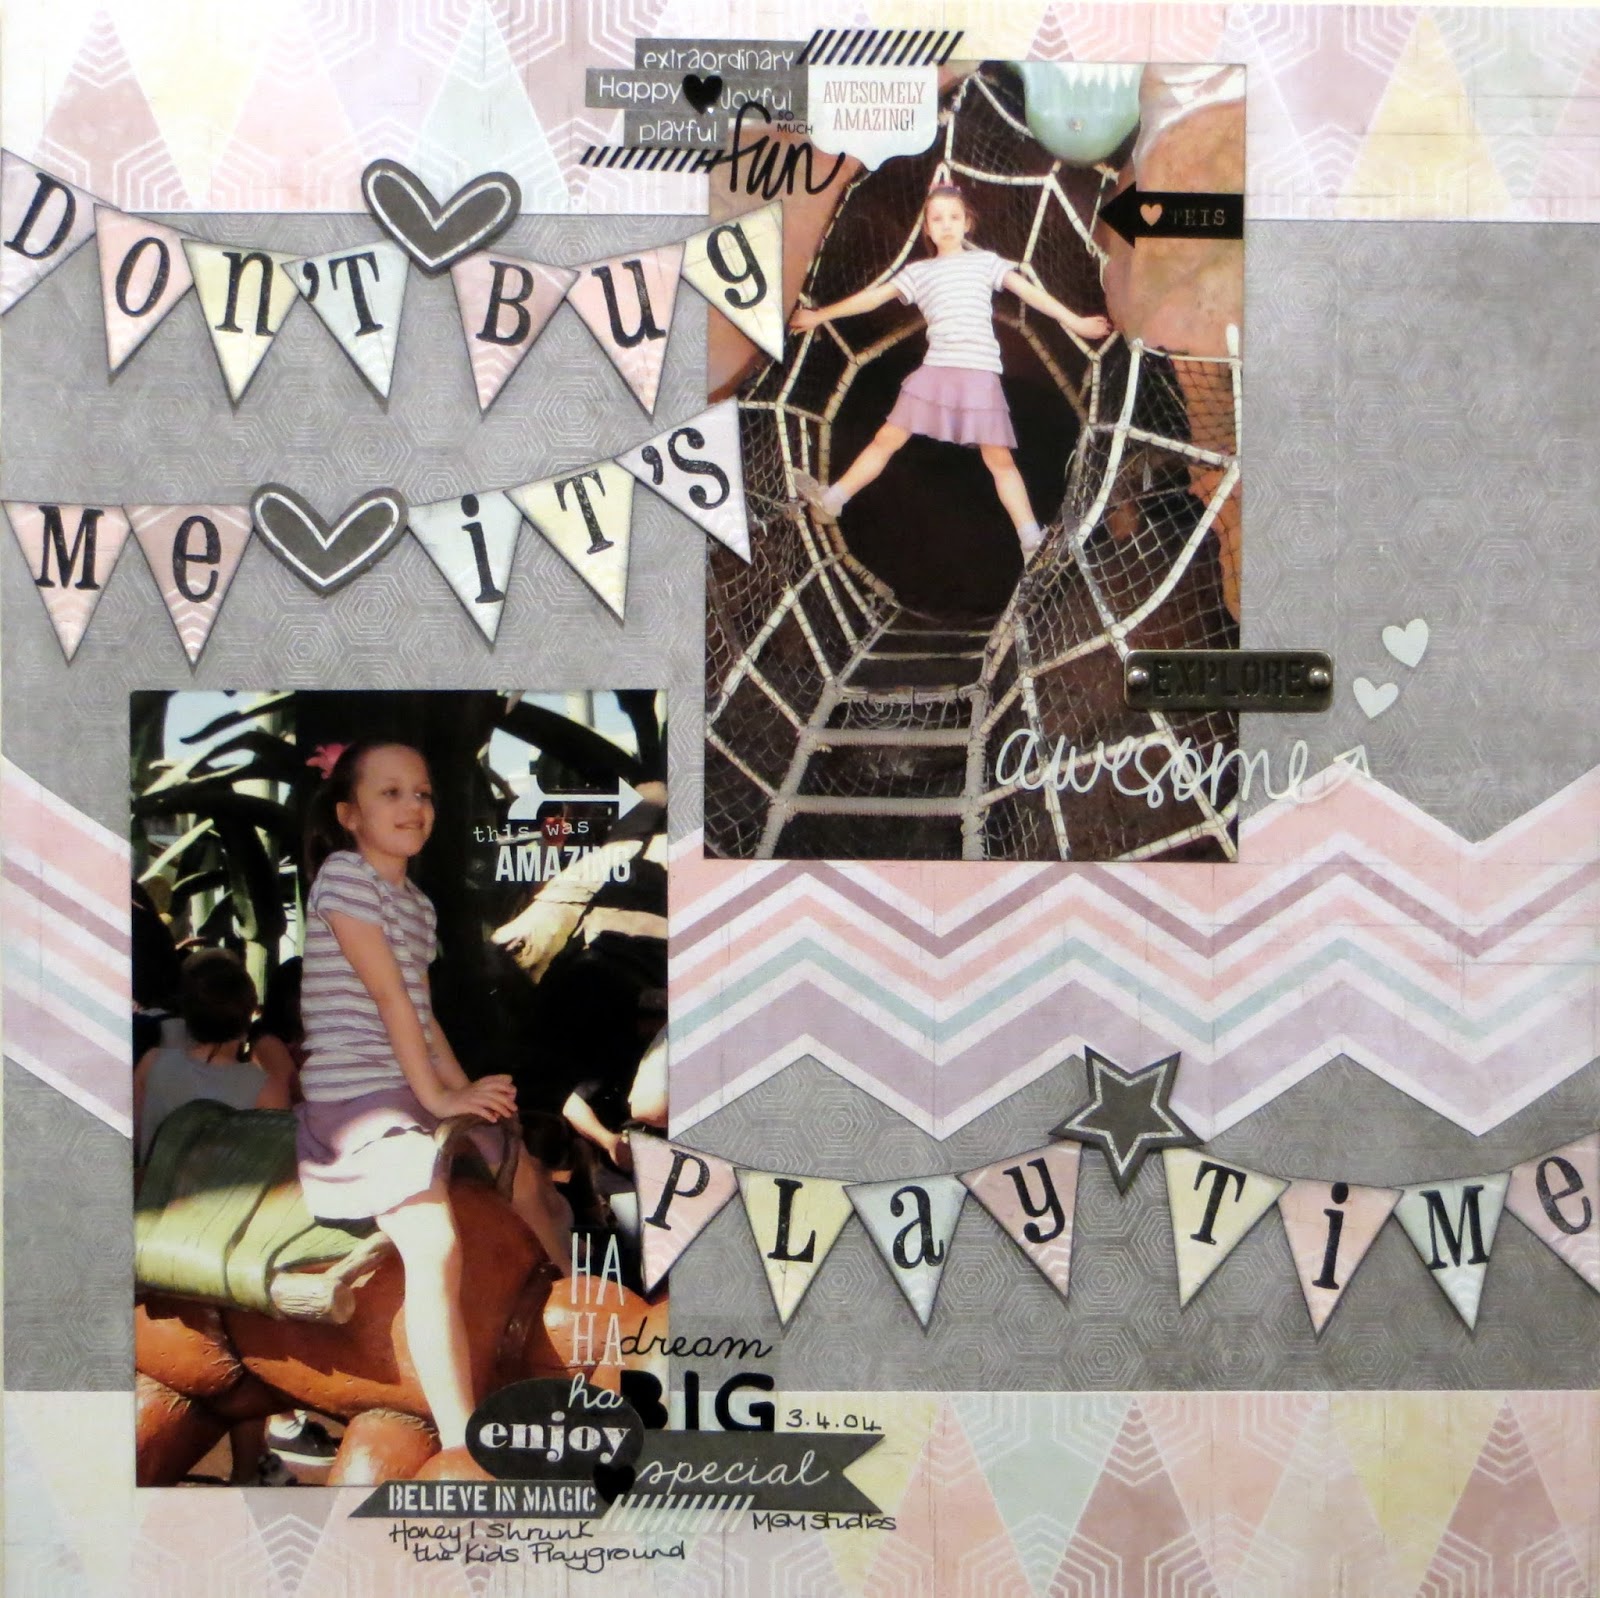
Jemma's page features holiday snaps of her daughter playing in the "Honey, I Shrunk The Kids" playground at Disney! She also chose the middle row:
Transparent stickers from a pack of Simple Stories Insta Clear Word StickersMetal word by Prima, and Stamps from her stash.  

The rest of the supplies are 7 Dots Studio products


Annie went for the middle vertical row and used a border punch, metal embellishment (staples), and torn paper - but in fact she ended up using mixed alphas and circles too, so it could just as well be the diagonal row bottom left to top right!

Her supplies include patterned papers, stickers and diecuts from the 7 Dots Illuminations collection, Studio Calico wood veneersSimple Stories DIY Typeset stickers and Burlap StickersPrima Alphas in black and one of the Prima stitched diecuts from the March kit.   


Jennifer chose a diagonal line from top left to bottom right on the bingo grid (Mist, a Metal Embellishment, a Knot). Her products include Heidi Swapp's Navy Color Shine Mist, Crate Paper's Boys Rule collection Zap & Top Score paper and some Wood Embellishments and Ephemera pieces, and some Studio Calico Cork Stars. Her metal embellies are an old key and some metal rimmed brads, and she has two knots - one in string under the title and one in bakers twine on the key.


We'll have a little mystery prize this month for one entry picked at random from all those who link up! The winner will be announced after the challenge has closed along with a few of our favourites! 

So, will you take up our challenge this month?

Use the linky tool below to add a link to the blog post (or your gallery) with your layout or card and a link back to this post is much appreciated.

You will need to ensure your link is added by the 31st of May (11.59pm).

Enjoy!

Friday 11 April 2014

Easter Card & Egg Holder!

Hello everyone, Jenny here today!


I have a quick and easy Easter project to show you, I made both the card and the egg holder from 1 sheet of Kraft card, with 1 sheet of 6 x 6 paper as the main decoration!


The card is 10 x 10 cm which was cut from the sheet of Kraft card. The paper is from MME Now & Then Mildred pad. I simply cut a strip from a sheet mounted it onto pale yellow paper and stuck it down the centre of my card blank. I coloured a cute Easter image from Pink Petticoat and mounted it on a die cut yellow scalloped circle which is then stuck to the card on foam pads to give it some dimension. 

I added some Studio Calico wood grain enamel dots to the corners and also in the centre of the flower on the top of the egg. Lastly I used Glossy Accents to make the chicks beak shiny.

Onto the egg holder I cut a piece of Kraft card 27 x 9 cm and then scored 11 cm, 17 cm, 19 cm and 25 cm. I made up a template below if you want to use it! Between the score lines at 19 cm and 25 cm I die cut a circle for my egg to sit into:


 Once folded up you can see you have almost a box shape with a flat back. I decorated the back similar to my card adding a strip of paper with die cut image attached. I also added a strip of paper and some enamel dots to the front of the box.

Here's the template:


I hope you have enjoyed my projects today, you can give them so someone this Easter for a really sweet gift!


Jenny is a busy mum of three who makes lovely cards and other projects and shares them at her blog Dragonllew's Spot!

Tuesday 1 April 2014

April Challenge - A Spring-Time Mood Board!

Hello and welcome to our April challenge!

Thank you to everyone who took part in our March Challenge, we loved looking at the entries, and we'll announce a few of our favourites and a winner here on the blog soon!

If you haven't seen our challenges so far this year, then here's the "scoop" Each month throughout 2014 we will set a challenge and we'd love it if you would play along. Each month the challenge will vary - sometimes we'll have a sketch, sometimes a colour palette, a photo inspiration or a "recipe" of stash to use or maybe a technique.

At the end of this post there is "linky tool" for you to link up your challenge entry so we can pop along and see and we will feature a few of our favourite projects next month.  
There's even a little prize to be won - more on that further down!
We really hope lots of you will play along!

During April we'd love you to take your ideas from this mood board:


Take ideas from this however you choose. You could: 

Use the colours - Yellow, Green, Peach, White, Cork/Kraft
Use the quote 'Look How They Grow' 
Make a page about flowers or plants
Use some of the elements, eg. feathers and stars on your page 
Use the composition somehow (eg. two lines along the base of your project)
Or anything else you get from the mood board!

The SJ Crafts Design Team have created some projects to show what ideas they got from the mood board...


Louise took the composition of the mood board to put together a layout of a (rare) photo of her with her three sons. Her page supplies include the Teresa Collins Family Stories Collection Kitcamera and heart wood veneersenamel dots, and an Amy Tangerine Badge.


Annie was inspired by the mood board to create a pinboard-style page, following the composition and using sticky pearls and enamel dots to "pin" items to the background. To echo the fresh, spring colour palette she used peach/green/yellow/pink - the chalky pastels in the Chalk Studio 2 collection were perfect and contrast beautifully with the Chalk Studio chipboard pieces, frames and stickers. Other elements picked from the mood board added some interest and fun to Annie's page - washi tape, flowers, cork arrows and wood veneer stars. Finally, the quote inspired her journalling!
Jimjams - The Wrong Runes - April Challenge for SJ Crafts

Jemma was inspired by the 3 columns and the colours from the mood board to create a holiday album page.

Jenny:


Jenny was inspired by the colours and some of the elements on the mood board. She has used kraft card, some pretty yellow striped paper from MME Now & Then Mildred pad. Jenny printed her sentiment onto vellum to look like the title on the mood board, and added some paper flowers and adhesive pearls. 


Jennifer mainly took inspiration from the colours, using yellow, lime green, and some cork elements (including the American Crafts Cork Alphas and Arrows), though she swapped the coral hue for a bolder orange from the Amy Tangerine Cut & Paste collection. She also used some feathers, along with some Studio Calico Stars and Enamel Dots!


Taking her inspiration from the colours, gold highlights, the feathers and flowers Lisa-jane created a pretty card for a special girl's birthday. Those enamel dots finish it all off perfectly.

We have a little mystery "Spring themed" prize this month for one entry picked at random from all those who link up! The winner will be announced after the challenge has closed along with a few of our favourites! 

So, will you take up our challenge this month?

Use the linky tool below to add a link to the blog post (or your gallery) with your layout or card and a link back to this post is much appreciated.

You will need to ensure your link is added by the 30th of April (11.59pm).

Enjoy x

Monday 24 March 2014

Flip Books!

Hello all, Jenny here!

Today I have something to show which really took me out of my comfort zone. Sarah recently received the new Teresa Collins Flip Books in stock at S J Crafts and asked the DT if any of us would like to have a go with one. I had already been looking at these and thought they would be fun to play with so I said "Yes!"


 Only then did I realise just how far out of my comfort zone I had taken my self. Now I’m not ashamed to admit that scrapbooking frightens the life out of me - all that space on a 12x12 sheet? No thank you I’d rather stick to my 6x6 cards! 

But these flip books are great - they are all ready for you to decorate, made from thick black card which is a nice and neutral for any colour scheme. They are available in two different sizes and have a clever built in mechanism so that when the tab is pulled the pages "flip over" one by one.

I decided I was going to use mine to record Aimee’s first experience of horse riding. I chose to use the Glitz Wild & Free papers as some of the papers had horses on and the rest had lovely bold patterns which went with my photos. I didn't mount any of my papers as the black pages looked perfect as a background for the papers, plus it helped not to make the book too thick so the flipping action still worked. Embellishment wise I used some washi tape, some Studio Calico wood grain enamel dots, punched flowers and some chipboard shapes which I coloured with my promarkers and ink pads. 

I'll warn you that the rest of this post is quite picture heavy ... I wanted to show you each page ... if you have any questions please ask by leaving a comment! 

Front Cover:

Inside Front Cover:

Page 1:


Page 2:


Page 3: 


Page 4:


Page 5:


Page 6:


Page 7:


Page 8:


Page 9:


Pages 10 & 11:


Pull Out Page:


 For those of you that have seen my blog will know I generally make cards but I hope this demonstrates that anyone can try scrapbooking using these flip books .... they really are a great way to record those precious memories! 

Don’t forget Annie from the Design Team also posted her flip book including a fab video, you can find her post here.


Jenny makes beautiful projects and shares them on her blog Dragonllew's Spot, check it out and be inspired!

Monday 17 March 2014

Mother's Day Card and Tea-Lights Gift Box!

Hello everyone, it's Jenny here today!


Mother's Day is coming on the 30th of March, so I've got a little Mothers Day set to show you - a card and a matching box which holds 4 tea lights!  


For my card I started with a scalloped card blank. I cut a 14 x 14cm piece off a 12 x 12" sheet of paper from the new Teresa Collins Daily Stories collection, this sheet is called 'Flowers'. I rounded the corners off and inked the edges with Milled Lavender Distress Ink. The sentiment is a digital stamp from Pink Petticoat which I cut out using Labels 1 Nestabilities Dies, again I have inked the edges. To finish the card off I added a die cut rolled rose and swirl, a tiny punched butterfly and some of the gorgeous Woodgrain Studio Calico Enamel Dots.


Onto the little box... 


Starting with a piece of card measuring 14 x 29cm, score at 8 cm, 16 cm, 18cm, 26cm and 28cm along the long edge, and 1cm, 3cm, 11cm, and 13cm along the short edge. I've drawn up a little template to help to show what your card should look like once you have scored the lines:


The bits I have shaded in purple you need to cut off and discard so that it ends up looking like this:


You can see I have cut out a window with my Labels 1 dies and I have rounded and angled some of the flaps. Behind the window I attached some acetate. Fold the box up the and stick it together remembering to leave an open flap so you can fill it with your tea lights! 


I used some more of the Teresa Collins paper to decorate the top inside and outside and around the edges, before I stuck this down I attached a piece of ribbon the the lid which runs down the back of the box and underneath it to tie the box shut. I've printed another digital stamp to add to the top and decorated it to match my card. 


Here you can see the inside of the box with the tea lights.

I hope you have enjoyed my little project, and don't forget if you have a go at making one leave me a link so I can come and have a peek!


Jenny blogs her gorgeous cards and ideas over at Dragonllew's Spot, she'd love it if you pop by to say hello!

Monday 3 February 2014

February Challenge - A Sketch!

Welcome to our first challenge of 2014!!

Here at S J Crafts we love a challenge. Something to take us out of our comfort zone or to encourage us to try something a little different.

Each month throughout the rest of 2014 we will set a challenge and we'd love it if you would play along and take up the challenge. Each month the challenge will vary - sometimes we'll have a sketch, sometimes a colour palette, a photo inspiration or a "recipe" of stash to use or maybe a technique.

At the end of the post there is "linky tool" for you to link up your challenge entry so we can pop along and see and we will feature a few of our favourite projects next month. We really hope lots of you will play along with us and take up the challenge!


Our first challenge is a Sketch designed by DT member Jennifer and based on her "Muddy Puddles" scrapbook layout shown below, which was originally featured here!


To get you started here's a few samples from the S J Crafts Design Team:


Louise adapted the sketch to include more photographs. Her supplies included Simple Stories Say Cheese collection.


Jenny used My Minds Eye Cut & Paste 6" x 6" papers and Basic Grey Candy Buttons and shows how a layout sketch can be adapted for a card.


LJ's lovely page tells a great story and uses Echo Park's This and That Graceful collection.


This layout uses Simple Stories Daily Grind, Glitz heart washi tape and a sprinkling of enamel dots.


and from one of our new DT members: 

Annie


Annie's cute layout features Glitz Designs "Wild & Free" collection, some snippets from Simple Stories "Say Cheese" and My Mind's Eye "Chalk Studio" label stickers.


And this fab layout by our other new DT member: 

Jemma


Using Simple Stories (Urban Traveller & 24/Seven) and a few Crate Paper scraps, Jemma has created a super affect by dividing her photo into three sections.


So, will you take up our challenge this month?

Will you increase the photos, rotate it, flip it or stay true to the sketch?

Our New Design Team member Jemma is kindly offering a prize to celebrate joining the S J Crafts team. She will select one person at random from all those who link up to win a small prize!

Use the linky tool below to add a link to the blog post (or gallery) with your layout or card and a link back to this post is much appreciated.

You will need to ensure your link is added by 28th February (11.59pm) and we'll select a few favourites to be featured in a post soon after.

Enjoy x