Tuesday 30 December 2014

River Photos Layout

I hope you all had a wonderful and peaceful Christmas time!

I am keen to get my 2015 scrapping off to a great start so in preparation I've been having a bit of a sort out of my craft space recently and earlier today I found myself putting away some of my recent layouts. But before I put them in my albums I took a few photos as there was a fair few I've not yet shown you.

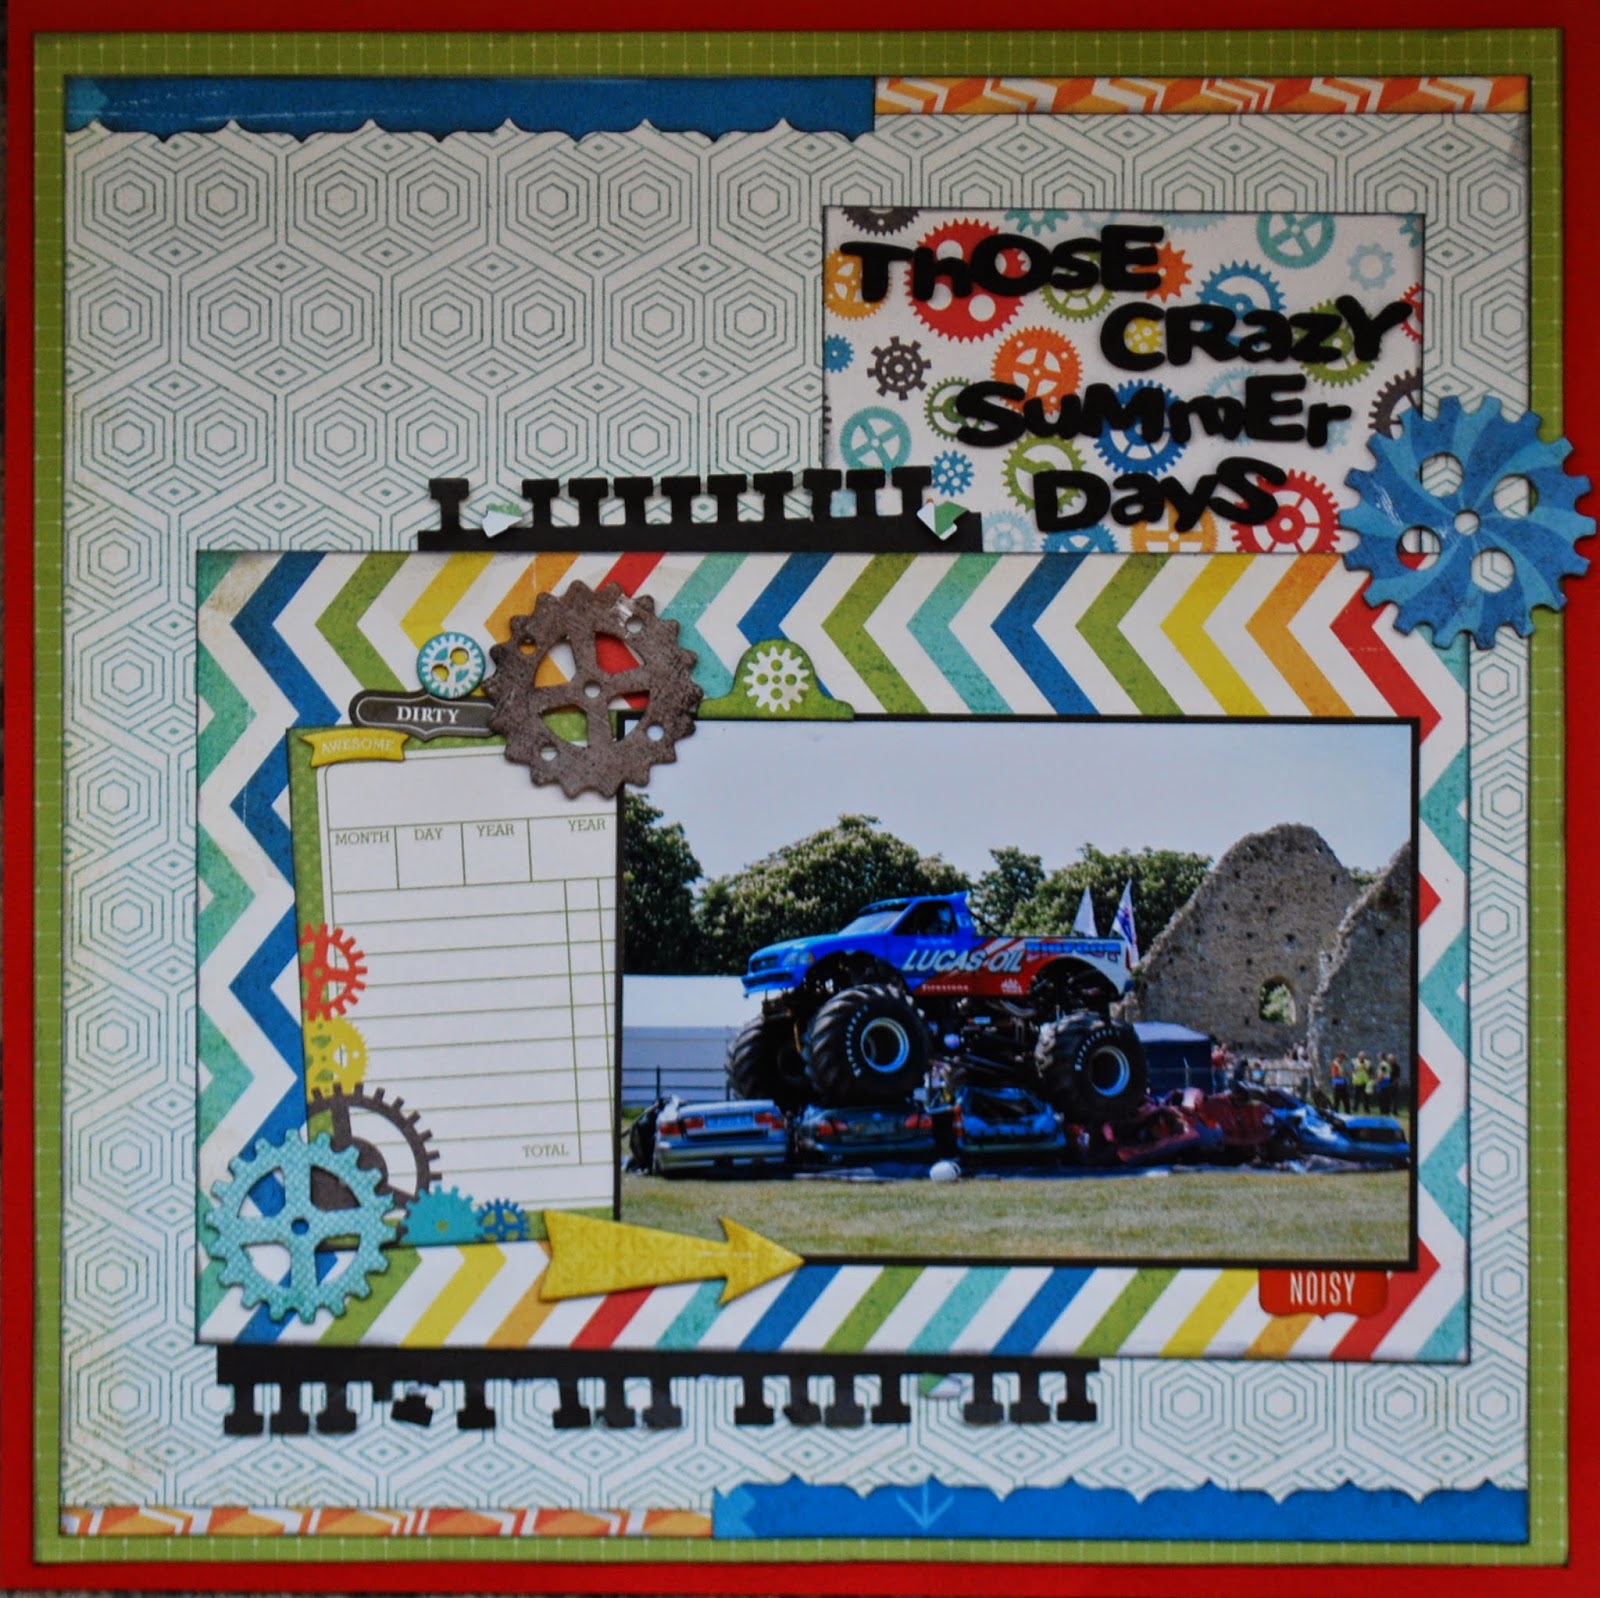
First up is this "River Photos" layout, made at the recent scrapbook weekend!

I'm lucky enough to live near both the beach and the River Stour and so tend to have a never ending supply of both beach and river photos to scrap. 

This particular day was just another weekend stroll by the river ...  with my daughter in the mood for posing for a few photos!! She only took a little bit of persuasion!


I took inspiration from this "Explore" layout which I had pinned onto my Pinterest board quite a while ago. 

I changed the original layout to include my 3 photos rather than 2 photos + a journal card and also moved the embellishment cluster to the bottom left corner. 

I used some Echo Park papers from their "This & That" Collection which I received in my "Secret Santa" gift on the retreat. Thanks to Paula for the loan of the gorgeous border punch and to Lisa-Jane for the pink Cosmo Cricket "Tiny Text" stickers. The camera stamp is by Stampin Up and is coloured with pro marker pens. 

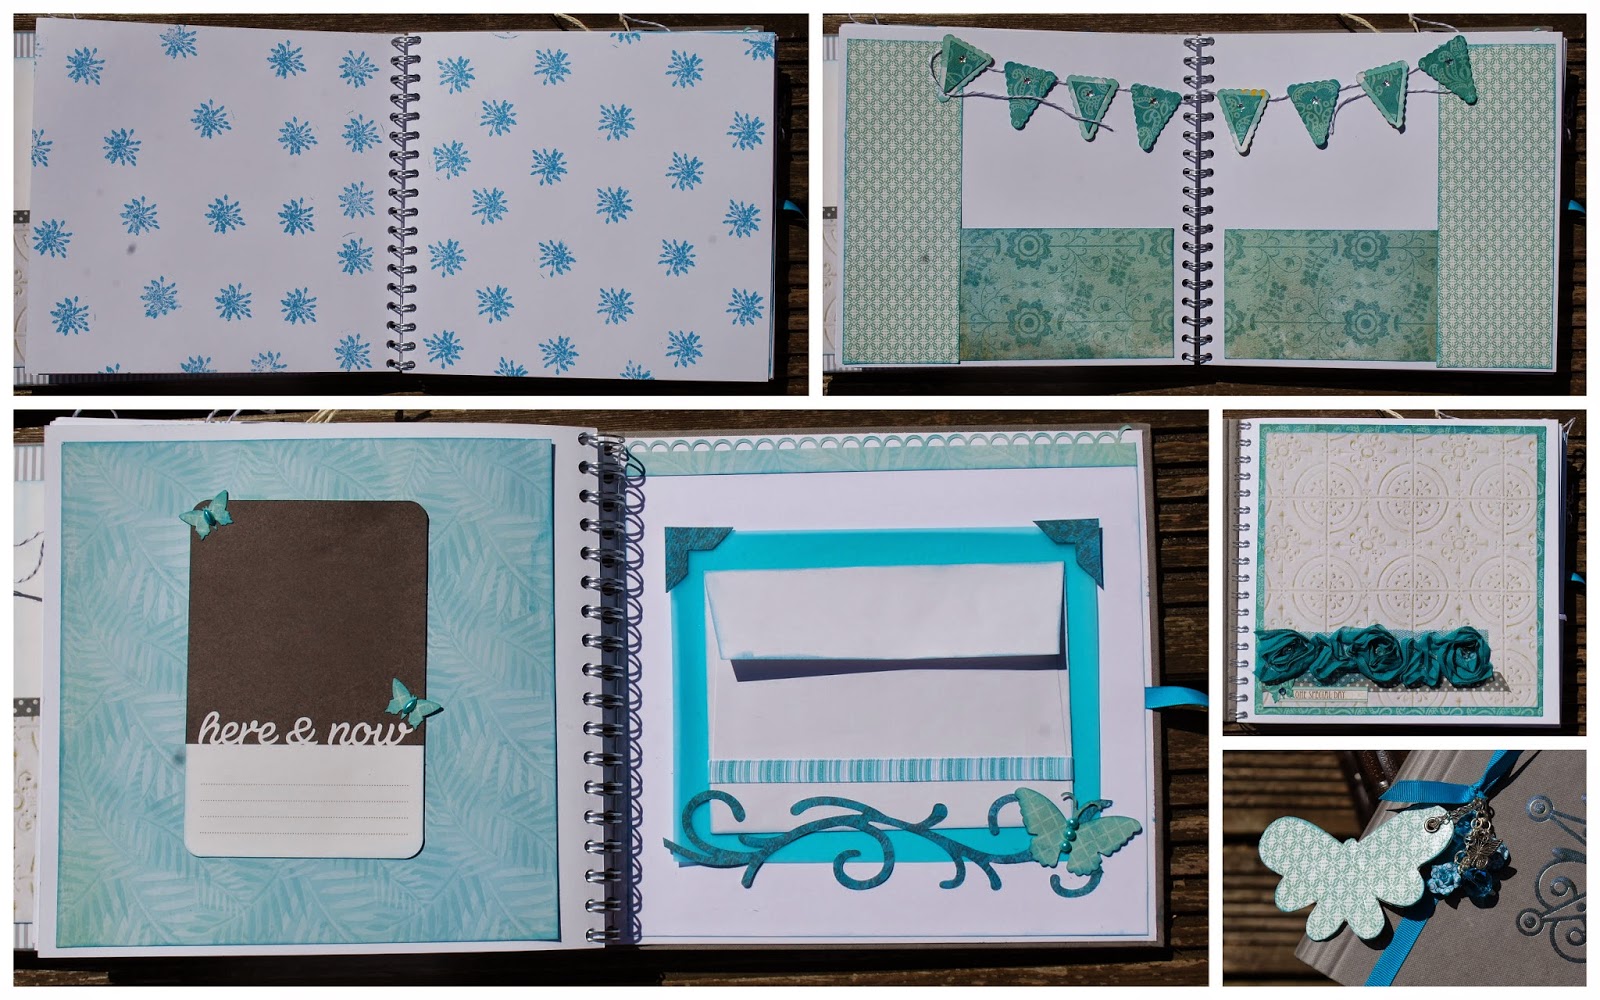
Here's some close ups of the details ...


Thanks so much for stopping by today .... I'll be back soon with another layout to show you!

Are you ready to kick start your 2015 crafting?

Friday 28 November 2014

Scrapbook Retreat - Beach Layouts!

A few weekends ago I was away on a Scrapbook Retreat with some lovely ladies including my good friends Lisa-Jane and Jennifer, staying in a beautiful barn deep in the Dorset countryside. 

We spent our days chatting, eating yummy, home baked cakes, drinking tea/coffee/wine, enjoying leisurely strolls around the farm land and some of the ladies went in the swimming pool/hot tub/gym although I decided that wasn't really my "thing". There was much laughter and of course lots of playing with pretty papers!!

I managed 8 layouts in total over the weekend - fairly productive for me!

Today I'm sharing two of the layouts, both feature photos taken from the same day out at the beach last Summer. 

Beach Day Layout


Regular readers will know I live near the south coast and scrap rather a lot of beach photos. It's getting tricky coming up with different titles - hence the somewhat uninteresting and predictable title of "Beach day" for this page!


I'm afraid I didn't take note of the papers I used as most of them were out of my "Scraps" Box. 

I've been waiting for just the right layout to use this lovely Happy Scatter Sandcastle wood piece on and I think it fits perfectly with these photos.

I added a couple of stickers, a splatter of gold Heidi Swapp Colour Shine and a few enamel dots and it was another fabulous "Beach Day" recorded and in the album.


Little Surfer Girl


For this page I  used a photo of my daughter taken on the same beach trip as the first layout.

She loves to use her body board in the sea and will quite happily spend a whole afternoon splashing about and trying to "catch a wave"! This particular day she was using a brand new board purchased on the way to the beach as her old one had broken. It's a bigger board than her previous one and so she felt like a proper "Little Surfer Girl"


Papers and stickers are from Simple Stories "Good Day Sunshine" collection and I used my favourite Stampin Up Chevron punch to punch out the coloured chevrons from small scraps.

I'll be back soon with more layouts from the retreat.

Thanks for popping in today - please do leave me a comment to let me know you stopped by!

Monday 24 November 2014

"Hello Santa" Layout

A few months ago I was asked to create a layout for Scrapbook Magazine on the theme "Hello Santa" .... it's in the current issue No: 85 on sale now so I'm now able to show you at last.


The lovely Jen at Wear Crafts sent me the Simple Stories Cozy Christmas collection kit to work with and it was just perfect for this theme. I knew I had to use the "Hey Santa" 3" X 4" journal card as soon as I saw it in the pack!


I started with a sheet of red cardstock onto which I layered white cardstock and then began to layer up some patterned papers and journal cards.

See the little red and white striped pieces just peeping out each side - I cut one of the 3" x 4" cards in half so I could tuck a piece in each side of the photo. This is something I often do with journal cards!

I added a little bit of sparkle with some American Crafts glitter tape and some My minds Eye gold stars.


The title is a mix of red chipboard alphas and white foam thickers.

The Simple Stories sticker sheet in the Collection pack has some lovely word stickers on it - I added "Wonder & Magic", "Ho Ho Ho" and "he's making a list" in 3 different areas of my page, adding a star and red gem to each making a visual triangle.


The photo is one of my favourites of the many that I have of my daughter meeting Santa over the years. Even though it doesn't show her face, I love the twinkling lights and stacks of presents in Santa's grotto and I remember how she listened in earnest to him telling her to "make sure she goes straight to sleep on Christmas Eve!"

So, that's two layouts made with this kit (if you missed the other it's here!) and I'm already half way through a third page so I'll be back to show you that soon.

How are your Christmas preparations going?
Anyone got their tree up yet?

Wednesday 22 October 2014

"Our Lovely Girl" Layout

Hello
Sorry for the lack of blog posts lately!
I have been scrapping and have several finished layouts to show you - it's just finding the time to photograph them in decent daylight and upload to the blog that I'm struggling with.

Anyway, here's one that I made a couple of weeks ago at the Artful Angels Crop. I always enjoy going to this crop but it was even better this month as my lovely crafty friend Jennifer Grace came along with me. It was her first visit to the crop and I think she had a fun and productive day and we had a great time scrapping, chatting and catching up. 


I used Crate Boys Rule papers for this layout. I love using collections for different themes other than the one intended by the manufacturer. For example, this collection consists of lots of  traditional "boy" colours and images but it was perfect for this photo of my daughter. Most of the time she is definitely a "Girlie Girl" but at the time this photo was taken she was going through a bit of a "Tom Boy" phase favouring denim shorts or jeans and pumps all the time and even this pose with her hands in her pockets suits the feel of the layout.


The wood arrow is also from the Boys Rule collection and I added the date using some Tim Holtz mini alphas and a sticker and the chipboard heart is by Studio Calico.


I created the title with Black Thickers and a "lovely" sticker. The "You Rock" sticker is matted onto some grey card to match the photo mat and raised up on foam pads.


A few splatters of Heidi Swapp ink to finish and to balance with the title in the opposite corner.

Another finished layout about my girl for her album and not a bit of pink in sight!!

Do you use "Boyish" papers on girl pages or "Girl" papers on boy layouts or do you tend to stick to the theme the papers were intended for?

Thanks for stopping by today!

Friday 26 September 2014

Changes and Christmas Scrapping

Hello! How are you?
September has been a busy month in our house.  
A month that has seen a lot of changes.
I was quite sad to finally close the S J Crafts online shop although I know it is the right thing for me and my family. My daughter started the next phase of her life as she moved up to her new secondary school and has quickly settled into her new routine and enjoying the opportunities school now offers her! And Me?! I have started a new part time job! I can't believe how lucky I have been to land myself this little job which gives me all the school holidays off!! I'm very thankful for this next phase of life for me and my little family!

Recently I was lucky enough to work with the brand new Simple Stories "Cozy Christmas" collection pack from the lovely Wear Crafts for a magazine commission. Unfortunately I can't yet show you the layout for the magazine but I can show you this layout which I created with some of the left over papers.


I started off with a row of three photographs across the middle of the page. The word "Joy" and the stars in the bottom right corner were already on the paper as was the little gold strip on the top edge so I simply used these two areas as my start point to build up the design, adding the red striped border sticker (cut into small pieces), little stars, the gold "25 Dec" and word stickers (all from the sticker sheet which is included in the collection pack). I also die cut the larger red stars and the small woodgrain stars. The "Oh what fun it is" card is cut from one of the patterned papers in the kit and I added the heart sticker to match the red heart printed on the paper next to the word "joy". 

I finished off with some metallic MME arrows, date stamp and a scattering of gems.

Here's a few close ups of the details:


And here's a look at what you get in the collection pack:


A gorgeous selection of double sided papers and journal cards in traditional reds, greens,  mixed with some woodgrain and more neutral creams and golds. The two sticker sheets have lots of really useful words and festive icons which I know I will use up on more layouts very soon.

Have you started your Christmas Crafting yet? 

Thursday 28 August 2014

Scrap 365 September Sketch

I love the monthly sketches over at  the Scrap365 blog and one of the things I'm happy about since the shop closure is that I now have a little more scrappy time which means I can play along with a few of the challenges that pop up in blogland and on UK Scrappers.

This is the September Scrap 365 sketch


and here's my take on it


I kept fairly close to the sketch, layering up my papers, stickers and embellishments on the cardstock onto which I had drawn the "half circles" with a gold pen.


As on the sketch, I placed my title to the right hand side of the layout. 
I added some Studio Calico gold hearts and Heidi Swapp gold mist droplets. Then some Mister Huey green mist for good measure!


I love these American Crafts Cork arrows .... and I'm down to my last few so I'm now using them sparingly!!! 

This one helps to draw the the across the page to the journalling and the title!

I really enjoyed this sketch and look forward to the next one!

Tuesday 26 August 2014

Start to Finish Challenge #1 ~ Favourites and winner!

A few weeks ago I set the first "Start to Finish" Challenge, where I showed you the very early stages of a layout with just a few pieces of paper layered up and challenged you to copy the "Start" but to add further papers, photos and embellishments in whichever way you chose to. 

Here's my Start and the Finish Layout ...


Lots of you found it a great way to jumpstart your layout and it was lovely to see how all the layouts finished up so differently!

I loved all your layouts and it was so difficult to pick out just a few favourites but here they are ...


Top left: "Aren't you lovely" By Laura
Top right: "Look at you" By Annie
Bottom left: "Soakin' up the rays" By Jackie
Bottom right: "Lovely" By Sharon

The winner picked at random using "Random.org" is No 5 which is:


Congratulations Petrina - please drop me an e mail to sarah_sjr at hotmail (dot) com with your address so I can get a little prize off to you!!

Look out for another "Start to Finish" Challenge coming soon!!


Monday 25 August 2014

Our Sweet Girl Layout

Hello and Happy (if a little too rainy!) Bank Holiday Monday to you! 

I recently got my hands on some of the lovely Highline collection by Basic Grey, the colours and embellishments are just perfect for scrapping photos of my daughter!

Sometimes I find it tricky to find collections suitable for older children (past the cute/princess/disney stage but not yet a teenager!) but the bright, funky pinks and oranges mixed with the black were spot on!


I used a Heidi Swapp stencil and mist to create the "Love This" in the right hand corner.


A few Heidi Swapp Puffy stickers, Basic Grey Highline chipboard pieces and black gems were all I needed to embellish my page

The chevrons are made with the Stampin Up Chevron punch.

A few ink droplets to finish off!


The finished layout!


 Thanks so much for popping in today!! 

Which collections do you use for scrapping photos of older children?!!

Saturday 9 August 2014

August Challenge - A theme and Stash Challenge!

Hello!!
Where did July go? I can't believe it's August already!!
So, time for a new Monthly Challenge!

Thank you to everyone who played along with July's challenge. There were some lovely entries and I'll be back soon with some of my favourites and also a few favourites from June's challenge too (as I've realised I've not done those yet!) and of course the winners of the prizes (chosen at random) for both challenges.

The August Challenge is a "Theme and Supplies Challenge"

I would like to see projects on the theme: HOLIDAYS AND/OR TRAVEL AND USE "SOMETHING OLD & SOMETHING NEW" on your project.


So, break open that brand new pack of embellishments that's been on your craft desk for a while or get that new stamp that's not yet been inked up and use it ..... and have a good rummage through your crafty stash for something old - something you've had for ages. Have you been saving something for just the right layout? Well, go get it and use it!!

As usual, there's some samples from the Design Team


Sarah (Me)

Another page from our Ibiza holiday from a few years ago using some new papers and stickers from the Simple Stories "Good Day Sunshine" collection. My older stash includes the washi tape that I've had for a while, the red thickers and some very old Prima e. pearls.


I made some pockets pages from our Florida Holiday. I mixed up some new and old stickers. I'd been hoarding some of these stickers for a very long time and my something new is the simple stories label stickers, to journal on. 


My daughter's friend is leaving the UK to go back to live in Korea so I have made her a card.
My something old is my Fiskars border punch. I think this was one of the first punches I bought and my something new is my Digital stamp which I bought to make this card.


I've used papers from the Crate Paper "Boys Rule" collection which came in a recent SJ Crafts monthly kit, and created an embellishment for my page with some snippets from the Echo Park "Brothers" collection which I've been hoarding for at least a year. I've also dug out some half-used packs of alphas which were lurking in the very bottom of a drawer and mixed them up to create my title. My new stash includes some brand new MME Necessities wooden arrows, a Studio Calico wood veneer camera and the cute cloud washi tape.


I wanted to make something special for my son's teacher as her end of year gift.  She's getting married soon so I have made her an album for her to keep her honeymoon photos and travel memorabilia in. I've used a complete mixture of papers, some very old and some quite new.  Scattered through the album are some Project Life cards that I purchased just a few weeks ago. These are just a few of the pages. 


I've used some new stash, bought in the recent SJ Crafts sale and mixed it up with much older supplies to make up my latest Counterfeit Kit.

The MME Cut & Paste Charm papers were the right colours & designs for a story about the Duelling Dragons roller-coasters, yet the Basic Grey Marrakech alpha stickers also matched the scales and arrows perfectly.  In fact there's also some very new stash on there ... faux dots made especially for the page from ThermoMorph plastic pellets ... you can't get newer than that!


So are you ready to take up the challenge this month? 

Add your entry to the linky tool below if you want to play along. A link back to this post is much appreciated.

This challenge will close on 6th september at 11.59pm

I look forward to seeing your Holiday or Travel projects using your old and new stash!!

Have fun!

Monday 14 July 2014

.... To Finish!

Hi and welcome back to the "Start To Finish Challenge", a new challenge series hosted here on S J Papercrafts.

A few days ago, I showed you the very start of a layout. A few sheets of patterned paper layered to make the "bare bones" of a layout and explained that the idea behind this new challenge series is to help overcome that "scrappers block" that so many scrappers tell me they get when they sit down to create.  If you missed that post you can catch up on it here!

Why not play along with this challenge and instead of pushing papers around for 20 minutes or so .... Cut into them and stick them down in the same position as the "start" layout. Simply copy it .... and then add your own photos and embellishments to finish off your layout in any way you choose.

And here's my finished layout:


With my papers already layered I had a nice base for adding my photos. I trimmed 2 journal cards down and tucked the "these boots are made for walking" card underneath the smaller photo and placed the other card (pink with the # phrases on it) above the larger photo to balance it out. Some washi tape, tiny hearts (punched from the rest of the pink journal card), chipboard heartsenamel dots, a few stickers and a title and I was almost done. I added some journalling to tell the story of a very muddy walk in the forest. To finish off my layout I flicked on a few drops of Heidi Swapp Pink Colour Shine.


If you want to play along, start off your layout by copying the "start"of this layout by positioning your papers in the same, or a similar placement (if your papers work better slightly higher/lower/further over to one side then go ahead and change it up slightly )  and then you are free to carry on to finish your layout in anyway you choose.

Use the linky tool that can be found on the first "Start" post to link us up so we can come and see. Remember to take a photo of your start layout before you add your photos and embellishments as well as a photo of your finished page.

Have fun!

Saturday 12 July 2014

Start To Finish .... A New Challenge!

Hello! How's your weekend going?

One of the things I often hear Scrapbookers say is "I don't know where to start with a layout". 
Have you ever been in the position where you've managed to squeeze in some scrapping time into your busy week and you've sat down at your craft desk and chosen a photo or photos from your stack of "To Scrap" and picked out a few sheets of pretty paper that you want to use ..... and then you spend the next 20 minutes (or even more) deliberating what to do next??!!
Do you stare at the paper, thinking "Which way should I cut into the paper" .... "How big shall I cut?" ....  "Can I even bear to cut it - it's so pretty!" .... "Should I stick that piece horizontal or vertical?" 
Sound familiar??!! 

Well, if it sounds even a little bit like you (maybe just sometimes) then this challenge is especially for you!!

I will show you a layout in it's very early stages, which you can then copy!! Yep, no thinking about it - just grab your trimmer and cut and stick!!

You can cut full sheets of paper to the same size or you can use scraps that are about the same size - afterall it's always good to use up those scraps, right?!

Once you've got the basics in place, you just need to add your photo(s) and finish it off with embellishments however you choose to. 

So many scrappers tell me it's getting started that is the hard bit so hopefully this challenge will help with that.

Once your layout is finished, upload it to your blog, online gallery or our Facebook Page with a photo of your "Start" and a 2nd photo of your "Finished" layout and then use the Linky Tool at the bottom of this post to share your layout with us.

So here's the Start:


The background is a full 12" x 12" sheet (you could "gut" the centre if you wanted to and keep that spare piece for another project) or you could use plain cardstock for your background if you prefer. Add another paper (I used the yellow spotty paper) cut to 11" x 11" layered on top, a vertical panel measuring 3.5" x 11" placed towards the left hand edge then I layered a scrap (the light blue flowery piece) which was about 8.5" x 6" on top. Finally I added the yellow camera piece of paper  which is actually a 6" x 4" Simple Stories card on top.

Of course, if you feel you need to move the papers slightly or adhere them higher/lower than I did or use slightly different sizes then go ahead. As long as it gets you started on that layout!

I'll be back in a day or two to show you my finished layout!

This challenge will stay open until 8 August and as it's the first one I will pick 1 entry at random to win a small prize !

Don't forget to take two photos .... 1 of your "Start" and another of your "Finish"!!

A "link back" in your blog post is much appreciated.

I look forward to seeing your "Start to Finish" layouts soon.

Have fun!

Sarah x

Monday 7 July 2014

Chococino Love Layout

Hi everyone

Firstly, thank you so much for all the lovely emails, messages and comments in response to my recent news!

For those that have asked me "Will you still be scrapbooking?" .... Yes, most definitely! I will still continue to make layouts. I have a whole mountain of photos to scrap so I have to get those into the albums. 
And yes, I will still pop up from time to time in your blog reader (don't forget there are bloglovin' and feedly "follow" buttons on the sidebar if you fancy making use of those)

The monthly challenges that I started earlier this year will continue (in fact July's challenge is right here) and there will be layouts, sketches, ideas and even more challenges to keep you happily scrapping popping up right here soon. And for those of you that were with us last year, there is even a little rumour that "Six on the 6th" (or something very similar) may be making a return appearance!!

So, that's a quick update .... and in other news....

.... this is a layout which I made for Scrapbook Magazine Issue 82 (Currently on sale)

Chococino Love


I started off with a sheet of plain white cardstock and spritzed a little light green Mister Huey ink onto it quite lightly. I knew the photo mat would go in the centre and cover the area of intense ink spray so that just the lighter splatters would show at the edges of the photo.

I then built up the page with patterned papers from the Capture Life collection, tucking the "Today" journal card in the left hand side and adding stickers (some raised up on foam dots).

The scattered stickers, chipboard stars and hearts, cork arrow & camera, wood "yummy" and enamel dots help to bring the eye in towards the photo.

Here's a couple of close up shots of some of the embellishments:


I'm trying to create more layouts about our everday life recently. I realised I tend to scrap our holidays, days out, birthdays and so on but sometimes I forget the more everyday stuff, like visiting our local coffee shop where my daughter has grown rather fond of their chococinos (they're a little like a cappuccino but no coffee, just hot chocolate!)

Do you scrap the everyday stuff? 
Do you use "pocket page" style scrapbooking for documenting your daily activities or do you still make 12" x 12" layouts.

There's lots of texture on this layout - wood, cork, chipboard, enamel, ink ...

Do you include different textures or are you a mainly paper type of girl?!

Have a wonderful day and don't forget to check out the Closing Down Sale!

There's still loads of bargains!


Friday 4 July 2014

Some News!

It is with mixed emotions that I write this blog post ....

As many of you will know I  have been involved in the craft retail industry for around 7 years, initially working in a Bricks and Mortar shop, which I then took over as owner to starting and running S J Crafts for the last 3 years!

Sometimes in life our priorities change.....

In those seven years my priorities have changed a few times ... at first it was to gain my dream job in a craft shop and then to start my own business .... to be able to work from home so that I could do the school run and "be there" for my young daughter .... to get my work published in a scrapbooking magazine .... to establish and then buildup my on line shop in the craft world.

More recently, my priorities have changed again and, together with my family we have made a lifestyle choice. A choice which I'm very excited about!

It is therefore with some sadness that I tell you that the S J Crafts on line shop is closing!

As you may know there is currently a Summer Sale in the shop. There will be a Closing Down sale with further reductions all across the store, although please do bear with me whilst I get that up and running.

At the moment it is my intention to continue with the monthly challenges (with examples from the Design Team) here on the blog and to regularly post my craft projects to share with you. I would love it if lots of you will continue to follow the blog and play along with the challenges.

I have been lucky to work with six very talented ladies - Louise, Lisa-Jane, Jennifer, Jenny, Annie and Jemma, some of whom have been on the S J Crafts Design Team since the early days. 
These ladies have all been wonderful to work with and I continue to be in awe of their crafting talents - thank you to all of them! I'm happy to say that most of them have agreed to stay on to design samples for the monthly challenges.
I will post separately very soon to thank each of them properly and provide you links to their blogs should you wish to continue to follow their crafting journeys.

Thank you to each and everyone of you who has shopped with us, come along to a class or a crop, joined in the challenges, chatted on facebook, visited the blog, commented on a post .... I have become friends with many of you (albeit some online) and sincerely hope to stay in touch either through blogging, facebook or the crops.

Thank you and please do get ready to shop in the Closing Down Sale so that I can reclaim by craft room/dining room soon!!

Sarah xx


July Challenge - 1 Of Five!

Hi and welcome to a New Monthly Challenge!

The July Challenge is called "1 Of FIVE"


The idea for this challenge is that you choose 1 out of the five shapes/symbols to include on your project, 1 of the five phrases as your title or inspiration/theme and 1 of the five colours to include on your project.

The Shapes/symbols are: Butterfly - Banner - Star (or this could be a sun) - arrow - circle.

The Phrases : Summer Days - Right Now - You and Me - Explore - The Story ... 
* You don't need to include the exact phrase but something very similar .... I need to be able to see the link *

Colours: Yellow - Light blue/Aqua - Red - Black - White    
 *Any shade of the colour is fine!*

This month we have some fabulous examples from the Team:


Jemma had fun with an Easter photo from last year and some very ancient stash (the Christina Cole Life Happens paper from 2006).  The page started life with the June sketch by MiniOwner but ended up elsewhere! 

Shapes/symbols: Circles
Phrase : (Here's) the story...
Colours: White and Aqua


Louise used  a photo taken a few weeks ago with Heidi Swapp products
from the April Kit along with the new Heidi Swapp shapes stencils and pink color shine, Tim Holtz stars layering stencil and inks

Shapes/symbols: inked arrows stars and sunburst paper
Phrases : Right Now
Colours: Yellow, Light blue and White


Annie used a photo from back in 1982, when her son was just starting to explore his little world. The design was inspired by a Glitter Girl video and uses 3x4 cut-aparts from the collection, so it will co-ordinate perfectly with a pocket page layout using more photos from around the same time.

Shapes/symbols: Arrows
Phrase : Explore
Colours: Yellow, White, Aqua & pops of Red

Supplies: Simple Stories Homespun Collection Kit and Simple Stories Daily Grind Chipboard Stickers.


Lisa-Jane chose a photo from last summer about a crazy day watching Big Foot.  


Shapes/symbols: Star/Sun (The cogs!)
Phrase : Summer Days
Colours: Red, yellow, white, black and blue (Well done LJ for getting all the colours on her page!) 

Supplies: Echo Park All About A Boy, red cardstock and the rest from stash.

If you click on the name above the image of the layout it will take you to their blog. The team work hard to create their sample so if you could take a minute to pop over to their blogs and leave them a comment I know they would really appreciate it! 

So, are you up for this month's challenge?

Add your entry to the linkt tool below if you want to play along. A link back to this post is much appreciated. 
The challenge will close on 31st July 2014 at 11.59pm

Have fun!