Friday, 26 April 2013

Joy Fold Card Tutorial

 
Hello and a very Happy Friday to you!
It's Jenny here today  with a tutorial to show you how to make a Joy Fold card.
This is a great design when you want to make a special card for someone or something a little different!


To start off with you will need 2 different sizes of card blanks.


  I've used a 135mm square and a 96 mm square card blank.
Take your biggest card and cut half of the front piece off. 
This is shown on the bottom card in the photo below.


Next you need to pretty up your card blanks I've used papers from My Minds Eye - Collectable - Memorable 6 x 6 pad. You will need to cover the fronts as well as the insides of both card blanks. You can create a small border if you wish by matting and layering.


Now position the smaller card blank on top of the larger one as above and stick down.
The front of the biggest card blank (the piece you cut in half earlier) closes over the back of the smaller card blank as shown below.


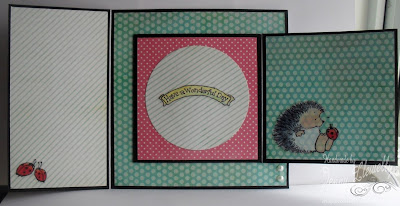
Next you will need to attach something to the front which will act as a catch to hold the front of the smaller card shut. I've used a sentiment to hold mine closed but you could use some other kind of embellishment. I've raised my sentiment up on foam pads to allow room for the front to slide under it.


Here's my card closed up ready to decorate. I have used some Penny Black Stickers on the front and again on the inside. The only other thing I added to mine was some self adhesive pearls.


I hope you might have a go at  makingthis style of card ... if you do I would love to see it. Why not leave a link in your comment to your card made following this tutorial so we can pop by and see it!
 
The S J Crafts Design Team have all been busy making samples for our Brand New Sketch Challenge which is coming very soon .... and there's a prize for one lucky sketch challenge entry! So keep an eye out for that!
 
Have a wonderful day!
Jenny x
 
See more of Jenny's crafting over on her blog : Dragonllew's Spot


Tuesday, 23 April 2013

My Minds Eye Collectable Birthday Card

 
Hello!!
 Jenny here today to share a card that I made using some of the papers from My Minds Eye - Collectable - Memorable 6 x 6 pad.
 

 I kept the card very simple to show off the gorgeous colours in this pad - lots of pinks / aqua / pale yellow and lime green. I cut the circles with nesties and inked the edges with distress inks just to soften them against the harsh white background I used the following colours Antique Linen, Worn lipstick & Iced Spruce. The White has been embossed with my swiss dots folder. The image has been stamped directly onto the patterned paper and I coloured it with my promarkers. I made a rolled flower from some scraps of paper and added some self adhesive pearls to finish it all off.
 
I'll be back soon with a tutorial to show you how to make a "Joy Fold" card!!
 
Jenny x
 
See more of Jenny's fabulous cards over on her blog : Dragonllew's Spot 

Tuesday, 9 April 2013

Monthly Kit Samples ... All About A Boy

Hello ... hope you are well!
It's Louise here today!
SJ Crafts have released two new kits and and I had the opportunity to create with the
This kit feautires gorgeous Echo Park papers and is full of colour with a big selection of chipboards and stickers to embellish. At first the name of this kit might suggest that it is more suited to layouts featuring young children. I wanted to show you that not only is it suitable for the younger boy but for the bigger boy too. In fact I used the kit to create three layouts, one for a little boy, one for a big boy and one for the biggest boy of all!!

I used the kit exclusively and did not dip into any other supplies at all - not even my favourite washi tape ... the tape I seem to reach for constantly.

For the little boy layout I used layers with all the patterned papers. I love the colour orange and use it a lot on layouts of my boys.


The big boy layout uses one of the 12x12 patterned sheets. It reminds me of denim and I just know that this paper will be falling into my shopping basket next time I place an order with SJ Crafts!  It's fabulous!


Onto my third layout ....
This layout has a photo of the biggest boy of all who just couldn't help himself!
I wanted space to journal and created the flap on the right hand side to record some more details from our holiday.


After creating three layouts I had one sheet of cardstock left and lots of scraps so I made two cards. A Happy Birthday Handsome card ...


and a Thank You Best Friend card ...


The kits are currently available in the shop ...

S J Crafts Scrapbook Kit ~ March/April ~ All About A Boy *New*  Click here to buy "All About A Boy" Kit!

 S J Crafts Scrapbook Kit ~ (March/April) "Sweet Girl" *New*  Click here to buy "Sweet Girl" Kit
You really will not be disappointed!!
Enjoy the rest of your day!
Louise x

See more of Louise's crafting projects on her blog:
Boys, Bugs and Beautiful Buttons