Showing posts with label Louise. Show all posts

Thursday 10 October 2013

Dapper Dan And Vellum!!

Hello everyone!

Louise here today to share with you the new Dapper Dan collection from the wonderful Glitz Designs. When I received my DT pack from Sarah, it struck me that this is a very masculine collection full of bold colours and patterns - perfect for my boys. I pulled together some stamps, embellishments and vellum that I thought would work well with it.

Recently I've joined Instagram and I love collecting everyday photos. I knew that some of photos I'd Instagramed would work perfectly with Dapper Dan. I used my home printer to print the photos I'm sharing today, complete with the instagram effects.

Vellum seems to be coming back into crafting lately so I also want to show you a few ways to incorporate vellum into your scrapbooking.

1. Using vellum to layer and soften

I wanted lots of layers for this photo. It was the start of the rugby season at the beginning of September. Kitted out in his new boots, I wanted to record how long my little man has been playing.

I've used six different patterns from the Dapper Dan pad (some were small pieces of pattern rather than whole 6x6 sheets) with two layers of vellum to soften some of the bold colours and patterns. With one sheet of vellum I punched circles into it to allow the strong colour and pattern to show through.
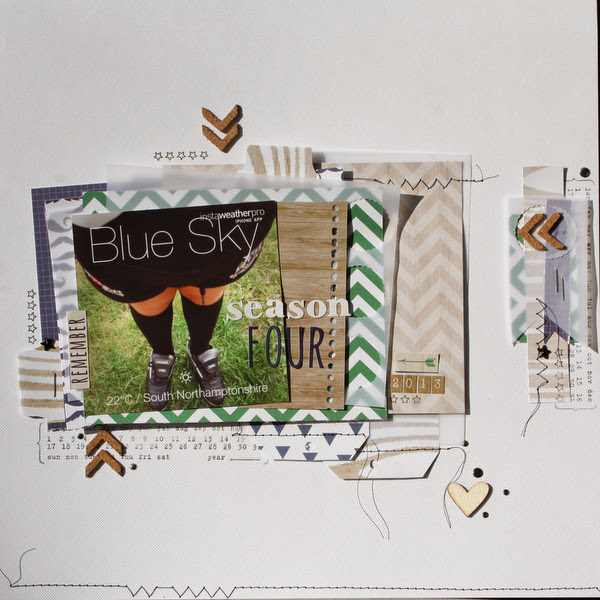


I used stamps to fill in the background gaps. I love this technique, it gives me a chance too, to hook out stamps that I don't use often....or have forgotten I have.

The little woodgrain tiny alphas were perfect for adding the year.

Using all of these layers allowed me to hide my journalling underneath.


2. Using vellum to embellish.

Having to wear a shirt and tie is all part of starting secondary school. The day before my gorgeous man started school he realised he didn't know how to tie a tie, so a quick demonstration with dad and he had it down to a fine art.  Another moment I captured on my phone and instagramed.

The Dapper Dan collection is predominately blue, green and browns. Again I used many patterns on this layout, using shapes cut from scraps.

With this layout I used vellum between the layers of patterned paper and on its own to create an embellished section.

Using a border punch on the edges adds an extra embellished detail.


I journalled onto a tag made from the Dapper Dan patterned paper and tucked it under the layers and photo.


I have another layout and a couple of cards to show you so I hope you'll come back to see that in a day or two!

Have you used vellum lately or does this post make you want to try adding it to a layout?

Louise x

You can see more of Louise's crafting at Boys, Bugs and Beautiful Buttons where she regularly blogs about scrapbooking, card making and life with her boys!!

Supplies used:

Dapper Dan 6 x 6 pad


Friday 6 September 2013

September's Six Cards on the 6th! Prize added!

Hello and welcome to the September edition of 'Six Cards on the 6th'! This series encourages you (and us!) to get some Christmas cards made in advance of the festive season - this year we will be prepared!

On the 6th of each month from now until December, there will be a post filled with Christmas card inspiration for you. You will be able to link up your own cards at any time throughout the month, and at the end of the series one link up from all the posts will win a prize (more details on that at the end of this post)! 

If you join in with the series at any time, or if you just want to help us spread the word, it would be fantastic if you can copy this button into your post or sidebar! You just need to select all the text in the box below the image, and copy that either into a html gadget (or text widget) in your sidebar, or into the html on a blog post. Then the button will appear and will be linked back to the series - your button won't have a box underneath!

 photo Sixon6thbutton200pix_zps673fb713.jpg


Today we have cards by Jenny and Louise to inspire you to get started!

First up is Jenny:

 Last month it was mentioned that making up a kit might speed up the creative process. I'll admit starting off a cardmaking session with a kit is not something I would normally do, so I decided to just pull out some basics to start me off! My kit consisted of a MME 6x6 Mistletoe Magic paper pad, some sheets of cardstock and some Christmas stamps.
As I got stuck in to my creative session I also used diamond, gold & silver stickles, scalloped lace border punch, zig zag border punch, tag punch, gems, ribbon, Memento black ink pad , promarkers , various spellbinder dies and six scalloped 6 x 6 square card blanks.


Here's the six cards I made:


Jenny x


Next is Louise:


 Jennifer and Sarah shared photos of the Christmas kits they pulled together last month. Taking the lead from them I did the same, and then discovered the Teresa Collins 6x6 Santas List paper pad had all the elements I needed to make my cards! The only touches I ended up adding were the snowflakes and twine:


Louise x

Didn't they both do a great job? I love how the cards in each set all go together, but each have their own distinctive charm too! 

So what are you waiting for? Jenny and Louise have both shown you can just grab a 6x6 pad and a few extra details and get stuck in... and you have the added incentive that joining in with the series could win you a prize:

One person who links up to the Six Cards on the 6th series will receive a prize - a Christmas present with a mix of old and new scrapbooking goodies for you to unwrap and enjoy! It will be a pizza box nicely stuffed with goodies. Each time you link up a set of six cards you'll earn an extra entry into the draw, so join in each month for more chances to win! Last month's entries will be included in the draw too. (NB: the prize will go out in early January to the lucky winner, to allow for late December link-ups).


I hope to see your cards soon! Jennifer x

Tuesday 18 June 2013

Carta Bella Boardwalk ~ Part 3

Hello and welcome back to the 3rd (& last) post in my series using the Carta Bella Collection Kit
 
If you missed them you can see Part 1 here and Part 2 is here!

When I originally planned to use the Carta Bella Collection Kit  I was thinking of my holiday album and the photos I had yet to scrap from a day at a Water Park. This collection has been a perfect match for my photos but it would also suit lots of other holiday destinations or you could scrap your summer days out using it.
Today I want to share with you two more 12x12 layouts, from another park ... Seaworld!! Again, Beach Boardwalk was perfect!!

When I first received the collection kit I noticed the reference to whales. Hmmm....Sea World came to mind! So, once I'd finished working on the Water Park layouts and the mini-book I found I had enough scraps for a double layout. I haven't made a double layout for a long long time and have recently been inspired by one of the other S J Crafts design team members Lisa-Jane, who creates amazing double layouts.

I had those adorable whale stickers and titles I wanted to use. Who'd have thought that I'd find whale stickers? Another reason why I love this collection so much.
 

Having a Whale of a Time at Seaworld Layout
 
All elements are from the collection kit, excluding the wood veneer hearts and arrows and the yellow bracket.
I stitched a pocket, so I am able to tuck away the journaling. Both pages have a pocket and the other one has a journaling card which the boys have written on from the entries they made in our travel journal.
 
A close up of the Whale Sticker - I love it and of course you don't have to have Whale photos to use it!


Relax & Enjoy the Show Layout


Using more of the kit elements & stickers this title quickly came together.


To bring these layouts together I wanted some elements to flow while still being able to keep the layouts individual. I placed a border on both edges and used panels of patterned papers. Each page hold's it own title while, I hope you agree, both titles complement each other. Having a Whale of a time at Seaworld - Relax and Enjoy the show. To join the two layouts together I have stitched a circle element across the pages.


A close up of the titles.....


and the stitching....


These layouts bring me to the end of my projects using the Carta Bella Collection Kit. In all, I have made four 12x12 layouts, one divided page with 4x6 pockets and a mini book. Not only is my holiday album filling up nicely I have layouts that I know I will enjoy for many, many years.

Thank you for stopping by and again thanks to Sarah for letting me work with a such a wonderful collection kit (have I told you how much I loved it!!).

I really do hope I have inspired you to try one of the Collection Kits in the SJ Crafts shop.

Louise x

See more of Louise's crafting at her blog: Boys, Bugs and Beautiful Buttons

Tuesday 11 June 2013

Carta Bella Mini Book ~ By Louise

Hello ... Louise here again!!

Last week I shared some projects with you using the Carta Bella Beach Boardwalk Collection Kit. Today I want to show you a small mini book, created to sit between the 12x12 layouts in my holiday album.


I didn't really have a plan for this book. I just jumped straight in!!
The patterned papers I picked out of the collection Kit were very busy patterns so I made a decision not to use any Mister Huey Mists. My fingers and my dining room table were pleased with this decision!

I started with the back page cutting it roughly to 7"x8"


Then I made a large tag, cut roughly 7" x 5.5"


The top of the tag was scored so it could be lifted up to reveal the page underneath (See below)


Before cutting any more pages I worked out what photos I wanted to use....ideally I should have done this first.... sometimes though I like it when I have no plan to see what I end up with. Once the photos had been selected I added the circle page (10 x 5.5"), cutting off the overlap and scoring along the edge so that it folded over nicely.


The front flap was cut to 7 x 4" and the edge scored along so that again it folded over nicely too.


The pages are all held together with stitching. My machine did find it a little tough to go through the papers as they are a thick/good quality paper but we got there in the end.

I have used photos and titles in this book to tell the story. Let me see if I can show you what I mean.

The underneath of the tag has a pocket holding journaling cards which my three boys used to record what they liked/thought about the water park. The arrow pointing down links the tag page to the back page...


...which reads "Riding the Waves @ " with an arrow pointing to the inside of the circle page.


The inside of the circle page holds a photo of the Water Park name. Blizzard Beach. So hopefully you can see that when the pages are opened out it reads "Riding the Waves at Blizzard Beach"


The inside of the opening flap for this book holds a title to accompany the first photo on the tag page. When my son was little I used to read to him the "Harry and my Bucketful of Dinosaurs" Books. Mainly because they had his name on them but also because he loved them. When I saw this photo of him with his bucketful of ice-cream I had my title!


Here's my completed book all folded up.
I will be punching some holes along the left hand side so that it sits in my holiday album between the 12x12 layouts.


I like how this little book turned out and may well make a similar one for another of the parks we visited. If this inspires you to make your own please link up in the comments so we can come see.

Many thanks once again to Sarah for letting me have the pleasure of working with the wonderful Carta Bella Boardwalk Collection Kit.

All elements except the wood veneers hearts, arrows and camera and some of the alphas are from the Collection Kit.

I still have some more 12x12 layouts to share with you from this collection kit and will be back very soon to share them with you.

Friday 7 June 2013

Beach Boardwalk Collection - Part 1 ~ By Louise

Hello Hello, Louise here today to share with you some of my projects made with the Carta Bella Beach Boardwalk Collection.

When Sarah emailed me to say she'd like me to work with either the Echo Park Perfect Summer or the Carta Bella Beach Boardwalk Collection Kit for my next DT project and which would I prefer .... my first thought was Echo Park please ... as I adore EP ... but then I looked at each collection a little closer and decided that the Carta Bella with it's blues and oranges was better suited to me and the photos I had in mind. Carta Bella please Sarah, I said.

I have never been more pleased ... the papers arrived and instantly I loved them. Normally I am a "B" side kinda girl, not this time the "A" sides are incredible, there are sharks, surfboards, flip-flop papers and much much more.
 
Look, see what I mean.....


Currently I am working on a holiday album. It's a mixture of 12 x 12 layouts, 12 x 12 with 4x6 pockets both horizontal and vertical and photo freedom page protectors. From this collection kit I have a mixture of projects to share with you over the next few days. I have made 12x12 layouts, a mini book and divided protectors. All using photos from a day at a Water Park.
 
First up is my layout "Fun Times With You". I want to keep a flow throughout my album and as I have used White Bazzill cardstock for my holiday layouts so far I wanted to use white again but the background needed something ... so I hooked out my Mister Huey Mists.


Selecting four of the mists which best suited the papers I set to work on the background.

As my theme is a water park I wanted waves and bubbles and droplets. I used a chevron and arrow stamp and some bubble wrap to help create this effect. After making a terrible mess, enjoying it immensely, this is what I ended up with.


All elements are from the collection pack and I've added the Studio Calico wood veneer hearts and arrows, you can find these here. (Out of stock at the moment but restocks due in soon!)


A little cose up so you can see the surf boards raised up and the dimension created by all the different textures within the cluster.


I moved on to a second page ..... and I thought you might like to see more of how I created the background. Again I gathered together some stamps, bubble wrap and my Mister Huey Mists.


I layered up some patterns and positioned the photo and papers onto the 12x12 white cardstock. I knew I wanted some elements in the top right hand corner and bottom left hand corner. I sprayed the middle of my chevron stamp directly with the Huey Mists and made sure that I blotted the stamp before placing it onto the cardstock. This was to get rid off the excess ink/paint and minimise the blobs of paint on the card. Spraying directly onto the bubble wrap with the yellow and stamping made for a muted effect which I liked. I knew my photo and papers would go in the centre of the cardstock I left this area clear.


Using the mists again, I created some droplets then started to layer up the papers and embellishment clusters. I added elements to the top right and mid-bottom left...with wood veneers. The wood veneers were inked for my first layout and misted for this layout. Both ways are really effective and give good coverage.


This is how  the final layout turned out ...

 
Lots of layering .... and a shark ... I adore the shark paper!


Top right cluster ...


You may notice that there is no journaling on these pages, this is because I saved it for the 4x6 pocket protectors. The background paper I chose here is one fantastic sheet of 12x12. I cut it into 6 4x6 rectangles and pieced them together with the photos. Again all elements are from the Collection Kit with the exception of the wood veneers.


Earlier in this post, I mentioned that I've also made a mini book to sit between these 12x12's .... you will need to check back here in a few days to see that! 
 
Thank you so much Sarah for letting me choose a Collection Kit that was a pleasure to work with.
 
Have a wonderful day!
 
Louise x
 
PS .... Just in case you haven't heard yet ... the new S J Crafts Bi Monthly kit has just gone on sale here!!
 
 
See more of Louise's work on her blog: Boys, Bugs and Beautiful Buttons

Saturday 4 May 2013

Visit the Design Team - Challenge 3 (For NSD)

Hello again!
 
So, how is your day going? Plenty of scrapping? Enjoying this beautiful weather?
I certainly am! I have been scrapping lots today and enjoyed a fun trip to our local park with my girl this afternoon!

It's time for another NSD challenge!!
 
If you're new here, a big welcome to you!!
You can catch up on Challenge 1 here: A Sketch Challenge
Challenge 2 here: Just ONE manufacturer
And details of a giveaway here: Facebook Giveaway
 
For this next challenge I'd like you to "meet" the wonderful  S J Crafts Design Team!!


These ladies have all been with me since the start and have been a fantastic support to me and S J Crafts. Their endless enthusiasm for papercrafting and desire to share their creative talents with others is second to none! I now consider them my firm friends and have been lucky enough to meet and craft with three of them and hopefully one day soon I'll also "meet in person" the fourth!!

So, for this challenge you will need to visit each of their blogs and have a browse around and find the answers to the questions below.
 
When you have all the answers send an e mail to me with DT Visit Challenge in your subject line and tell me what you think the answers are.
E mail me at:   sarah (at) s j papercrafts.co.uk (remember to turn it into a proper e mail address .... just don't want loads of those rubbish spam messages in my inbox!)
 
Whilst you are visiting the DT Blogs it would be absolutely wonderful if you would leave a comment for them to let them know you stopped by and of course if you like what you see there you could follow their blog too! I know they'd all appreciate it!! 
 
Here's the blog links:
 
Lisa-Jane :  Inside My Head
 
And the Questions:
 
* What was the item of clothing that Lisa-Jane scrapped about recently on a layout featuring her young son?
 
* Jennifer recently scrapped about a wet weather walk with her daughter. What colour and pattern are on Jennifer's footwear on that layout?
 
* What did Louise's son say about the Harry Potter ride in Florida which features as a title on her recent layout made with Studio Calico's Snippets collection?
 
* Jenny recently made a lovely Christmas card featuring a snowman. What colour is the snowman's tie and which papers did she use on the card?
 
One winner will be picked at random from all the correct entries (all questions must be correct!) to win a prize pack of Crate DIY Shop papers and stickers (shown in the pic below).


Closing date for entries: Saturday 11th May 10pm BST
The winner will be announced on this blog soon after the closing date!
 
Good Luck and enjoy "meeting" the Design Team Girls!!!
 
I'll be back later this evening (or possibly first thing sunday morning!) with a special NSD discount code just in case you fancy a little stash shopping this bank holiday weekend!!