Sunday, 26 February 2012

My Minds Eye Dolled Up Collection

As soon as the My Minds Eye stock delivery landed here at S J Crafts, I sent a selection of the Miss Caroline papers and some matching embellishments to DT member Jennifer to have a play. Today I'd like to share with you her lovely layout.


Over to Jennifer to explain how her "Cuddles with Granny" layout came together....

"I was so excited to open up the parcel of MME Dolled Up supplies. The papers are so pretty, and I love the collection's contrast of lots of woodgrain, with delicate details like doilies and flowers. I chose to use the living everyday paper because it really showed off this contrast, and I liked the little space for journaling that it featured.

I decided to show off the corner pattern even more by cutting it out and using foam tape to give it extra dimension. To secure it onto the layout I took a corner of kraft card stock and attached it to the back of the main piece, then stuck the 3D tape onto that.


Before I stuck the corner detail back on I added some Kraft Funday twine to the bottom of the layout, by speading out a line of Mod-Podge and using an old paintbrush to help me shape the twine, one colour at a time, whilst sticking it down. I also used some of the lovely Dolled Up cute brads as flower centres on the corner detail, they really make the flowers look 'finished'. 
My photo is matted onto the 'b' side of the living blooms paper, and the vertical strip behind the photo is the Living Blooms 'a' side. The woodgrain butterflies from the clear stamp set are also stamped onto the same paper and cut out. I love the idea of woodgrain + butterflies - so simple and yet so original! 
I stamped the flower border from the same stamp set down the left edge of my photo and added another of the cute brads with the little banner attached, to the bottom right of my photo. 
Finally, I used white Glitz teeny alpha stickers and Glitter Alphas, to create my title. I'm loving tiny alphas like these Glitz ones at the moment - they make it so easy to make a longer title, or add a sub-title, to my page."


Shop for Miss Caroline "Dolled Up" collection here!!

Don't forget to enter our challenge - one random entry will win a Miss Caroline Paper pad!!

Thursday, 23 February 2012

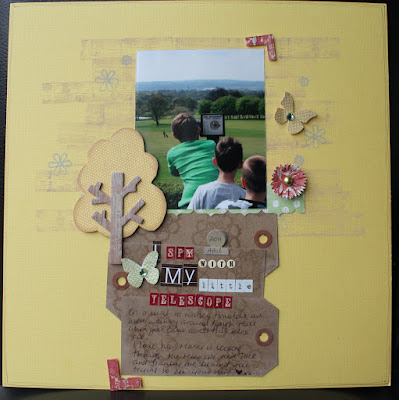
"I Spy ...." Layout ~ By Louise

Hello and a very warm welcome to all our new followers, thank you for joining us!

Today I'd like to show you a layout by DT member, Louise. If you have never visited her blog it's well worth stopping by and having a browse.

One thing I often notice about Louise's layouts is the "depth" and layering. She acheives this by creating areas of interest on the background such as adding a few paint splatters or stamping onto the background and then layering up papers and embellishments and adding lots of little details. This layout is certainly no exception.


Captured on camera - 3 boys and a telescope!!

Do you remember Jo's lovely little tag book? Louise has used the same tags to journal on, having first stamped the background. The title is a lovely example of how mixing up different letter stickers can work and that titles don't always have to be created with large letters. Smaller titles are sometimes the way to go!


The background cardstock is stamped with the woodgrain stamp from the MME Dolled Up stamp set. The little flowers are from the same set.


The tree trunk is also stamped with the woodgrain stamp.

Supplies: MME Lost & Found Two Papers, Glitz Alphas in rose grunge and white type, Jenni Bowlin alphas in vintage brown and chalkboard, Prima pearls and crystals

Before I go, a little reminder that it is our monthly open day this Saturday (25th feb), all the details are here. If anyone in the Dorset/Hampshire area would like to come along, we'd love to see you!

Wednesday, 22 February 2012

MME Howdy Doody Card

Jenny has made this beautiful card with 6" x 6" howdy doody papers from the new My Minds Eye Miss Caroline Collection.


The edges of the card have been inked with Antique Linen distress ink and Jenny used nesties to cut round the image and also to create the flower which is finished with a pearl.


Don't forget there's still plenty of time to enter our monthly challenge - the theme this month is flowers and to use red or pink.

Thursday, 16 February 2012

Challenge 1 - Winners & Top 3

As promised, I'm back to announce the winner from our first challenge. thank you to everyone who played along, there were so many fab projects that I had a tough job picking my favorite 3 entries but I got there in the end.

I used a random number generator to pick the winner of the £10 to spend in the shop!!
The winner is number 20, which was Fiona with this lovely card


Fiona, please e mail me sarah@sjpapercrafts.co.uk so I can sort out your prize.

Okay, onto my Top 3 ....


Gemma

I loved Gemma's card, with such a cheery colour scheme and cute image!


A fabulous layout of a birthday picture - the placement of the title is great!


Carole Anne

Carole's card stood out for me with all the flowers layered up and the colours are gorgeous!


I'm sorry we don't have prizes for the Top 3, but if you would like to email me sarah@sjpapercrafts.co.uk for a "Top 3 badge" which you can display on your blog! Well done everyone!!

Wednesday, 15 February 2012

Monthly Challenge 2 (February)

Thank you for all the entries to our last (and first!) challenge. The Design Team have enjoyed seeing all your wonderful creations.

Please remember to check out the monthly challenge rules on the tab at the top of this blog, before entering. We have tried to keep our rules fairly straightforward and fair to all who join in.

A quick reminder:

Your entry may be a card, scrapbook layout or any other papercraft project.
You may combine your entry with other challenge(s)
No more than 3 entries per person please.
Please link directly to your post & not a general link to your blog.
You must include a link back to the challenge in your entry post.
No back linking please - new work only.
Please ensure your work is your own and not copied.
One random entry will win a prize which will be announced on this blog. The winner must contact me by e mail to receive their prize. A few of our favourites will also be selected to be featured on this blog!
The final (& most important rule) is to have fun!!
So, let's get on to your challenge for this month!

Challenge # 2 ... Flowers

Added Extra : Include red or pink!

Just a few ideas to get you started ...  create a scrapbook page about your favourite flowers, scrap photos taken in your garden or  you could embellish your project with flowers or make your own flower embellishment. A stamped image of flowers would fit the theme too!! I'm sure you will come up with lots more ideas!

Closing date for entries is: 14th March at 1pm.

One random entry will win this Howdy Doody 6" x 6" Pad from the new Miss Caroline Collection by My Minds Eye.
MME ~ Miss Caroline ~ Howdy Doody ~ 6" x 6" Paper Pad *NEW*

Here's some inspiration from our fabulous Design Team.
If you want to see more of their work, just click on their name to visit their blog.

Jennifer

Jennifer's lovely, bright card features kraft  cardstock, MME Miss Caroline papers, MME brads for the flower centres, twine and a sentiment from Favourite clear stamps


Jenny

Using patterned paper from the Dolled Up Pad by MME, glossy accents, a doily and some twine, Jenny has made this really cute card.


Louise's "Garden of Eden" layout is beautiful. Her supplies include: chalkboard alphas, tattered rose distress ink pad to ink the edges of the doillies and papers from the MME Lost and Found Two


A pretty layout by Lisa-jane entitled "How Does Your Garden Grow" using American Crafts papers, kraft cardstock, vintage photo distress ink applied with a blending tool (both by Ranger) and glossy accents on the flowers.


I hope the DT projects inspire you!

I can't wait to see your flower projects!

Please remember to link directly to your project and not just your blog and to include a link back to the challenge. If you do not have a blog, please e mail your entry to me at sarah@sjpapercrafts.co.uk and I'll upload it for you.

I'll be back soon to announce the winner of challenge 1 and the Top 3!!

Tuesday, 14 February 2012

"A Fun Day" Tag Book!!

Have you seen these packs of Ranger Tags ? They are great for adding to layouts for journalling or how about decorating them "Tim Holtz" style or add some small photos and create a tag book?

I sent DT member, Jo a few tags and an envelope of stash and here's what she did with it all!!


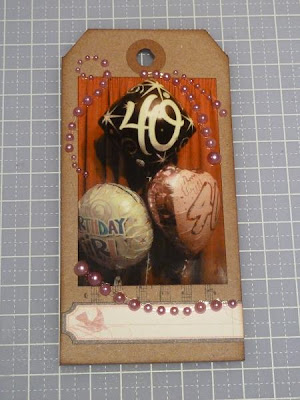
Jo has recently celebrated a special birthday and she made this super cute tag book to record the fun day that she had, celebrating with her friends and family!


Jo explains how she made it together with pictures of each page!


The blue glittered border on the MME Lost and Found 'Fun Day' title just didn't seem to work with my other colours so I cut the sentiment out and just used that. 


I used the Lost & Found label stickers as accents and layers rather than labels, I think it's a great way to use up the labels that have a sentiment on them that you know just won't go with anything else you have.


I inked all the tags with vintage photo distress ink.


I LOVE swirls and the Sweet "Sweet" one was too nice to use on just one page so I cut it up and used a piece on each tag.
I also added some pearls and crystals to most of the pages.


Once all my pages were done, I fastened all the pages together with some twine!

The tags are also available here in a slightly bigger size!

To see more of Jo's craft projects, pop over to her blog.

If this post inspires you to make a tag book, leave us a comment and a link on this post as we'd love to come and see it!

Friday, 10 February 2012

Half Term Offer - 20% off this weekend!!

I'm not sure if all the schools are on half term holiday this coming week or just us down here in the south of England!!!
If it is half term for you and you have children to keep occupied and entertained during the day why not treat yourself to a few crafty goodies for some well deserved " Me Time" once the little ones are tucked up in bed!!
Even if it's not half term for you, you can still enjoy our fantastic HALF TERM OFFER!!!

We have 20% off EVERYTHING in our shop all weekend up until 4pm on Sunday) - so why not treat yourself?!!

Enter the code HALFTERM in the coupon code box and select UK Standard delivery to activate the discount.

Have a lovely weekend!

My Minds Eye - Miss Caroline!!

Have you seen it yet??!!!
No?? 
It's here!!

And it is absolutely Beautiful!!
My favourite collection from MME ever!!
There's Butterflies ... Flowers .... Wood Grain ... Doilies ...

Seriously, what is there not to love in this collection?!

Miss Caroline is made up of 4 different lines: Dilly Dally, Howdy Doody, Fiddlesticks and Dolled Up.

We are stocking the 6" x 6" pads - although I'm still awaiting delivery of the Dilly Dally pad!

MME ~ Miss Caroline ~ Dilly Dally ~ 6" x 6" Paper Pad * NEW *     MME ~ Miss Caroline ~ Dolled Up ~ 6" x 6" Paper Pad * NEW *
MME ~ Miss Caroline ~ Fiddlesticks ~ 6" x 6" Paper Pad *NEW*     MME ~ Miss Caroline ~ Howdy Doody ~ 6" x 6" Paper Pad *NEW*

We have the 12" x 12" Papers from the "Dolled Up" Collection, which I'm totally in love with! These are all double sided and a lovely cardstock quality.

Here's just a few of my favourites ...

MME ~ Miss Caroline ~ Dolled Up ~ Cute Garden (MC0217)    MME ~ Miss Caroline ~ Dolled Up ~ Day Butterflies (MC0201)    MME ~ Miss Caroline ~ Dolled Up ~ Favorite Decorate (MC0196)
MME ~ Miss Caroline ~ Dolled Up ~ Day Worn (MC0202)    MME ~ Miss Caroline ~ Dolled Up ~ Living Blooms (MC0207)    MME ~ Miss Caroline ~ Dolled Up ~ Living Everyday (MC0206)

I just have to show you these ...

MME ~ Miss Caroline ~ Dolled Up ~ Favourite Clear Stamps

Yes, clear stamps with butterflies, flowers, wood grain and really handy date and place tags!! Love 'em!!

To see more of Miss Caroline, hop over to here!!

Wednesday, 1 February 2012

How To .... Punch the edge!

As many of you know I teach at classes and Craft Days and I am often asked for ideas on getting the most out of your stash and how to use various tools and products. In just the last two weeks I've been asked about stamping, heat embossing, using punches, paint dabbers and distressing.

This led to an idea for a new series of blog posts we will be running through 2012. Each month we will highlight a tool, a crafting technique or a particular product and explain how to use it and also show you some samples of projects incorporating some of the ideas!

Now, I know we have a wide variety of readers of this blog, some are very experienced crafters and some who have only just discovered the wonderful hobby of papercrafting. So, I will say now, before we go any further, some of you may read some of the "How to... "posts and discover nothing you didn't already know and that's ok, but for others who may learn something or pick up a new idea or two, we hope you will find these posts useful!

So, first up is .... BORDER PUNCHES!!

I set Design Team member Louise to work on our first "How to ... " blog post using one of my favourite craft tools, the Fiskars bracket border punch and she has created some step by step instructions for using border punches.

*  *  *  *  *


Hi, it's Louise here ...
Punches are most probably my favourite scrapping tool - they are easy to use and small enough to store easily. The table I work on is usually pretty full when working on a project. I make a huge mess and spread right out. If I want to use my die cutting machine, I have to get it out of the cupboard and attempt to clear a space on the table for it, so more often than not I prefer to reach for a punch!

Border punches are straight forward to use, they have guidelines on them making them easy for lining up your paper or card, enabling a continuous line. Lots of craft manufacturers make border punches but two of the most popular are Fiskars and Martha Stewart. There are lots of different designs for creating pretty and interesting borders. Here I show you how I use my new fabulous bracket border punch.


When I buy a new punch I always like to give it a test run on a piece of scrap card before using it on my projects. On the punch you can see the continuous design with the punch section in the middle.....


.....line up your card ready to punch. I always start with the card in the middle of the punch, so I get a nice half design on the edges. You can do this or punch in the middle of the card and work on either side of the design. Ensure the edge of your card is "butted up" against the raised lip on the punch.


.... make your first punch. You may need to press on the lever quite firmly!!


.... next, carefully line up your punched card with the design marker on the base of the punch. You can see the white design lined up with the pattern you've already punched. Again ensure the card is lined up against the raised lip and then punch again.


.... continue lining up your card with the design pattern, and punching.


.... until you have punched the desired length of your cardstock.


Here, in the final photo, I've punched the two edges to show you how gorgeous the design is.

Here's a couple of layouts with punched borders:


For my Pumpkin Carving page, I punched two borders and put them together with the design offset. The punch was also used on the edge of the green paper, right at the very bottom of the page.


The Spooky page shows one of the simplest ways to use a punched border - to add interest between two patterns.

Also, don't forget to use your border punches on your cards too!!
Here's a couple of ideas:


On this last card I also used  a couple of regular punches, a scalloped circle and a Martha Stewart butterfly punch.

I hope this has given you a few ideas for border punches!!

*  *  *  *  *

To see more of Louise's work you can visit her blog here!

Don't forget to enter our monthly challenge where the theme is "Happy" and the "added extra" is to use a punch!! One entry picked at random will win a £10 voucher for the S J Crafts shop!