Monday, 24 October 2011

12 Days of Christmas Projects ~ By Jennifer

Design Team member Jennifer has been working on some projects with the gorgeous MME 12 days of Christmas products.
You can see the collection here! and Jennifer's blog is here!


Jennifer explains how her layout came togther:
I printed my photos at home so they were the size I wanted (approx 3.5” x 5”), but you could trim down some 4”x6” photos to fit. I matted the photos onto a 10” x 6.5” piece of  seasons greetings paper, and then adhered this to the Bazzill Basics ‘Quick Sand’ cardstock (which I had machine stitched a border on).
The rest of the layout was built around this. I love the chipboard accessories - they make it so easy to give dimension to the layout and to bring it all together! I had to have the fabulous banner across the top of the page, and I wanted to repeat this with a flag under one of the photos. I made the flag with a bit of ‘b’ side of the ‘Seasons Greetings’ paper that had been left over – the great thing about ‘b’ sides is that you always know they’ll co-ordinate with your page. I made the flag pole with a bit of the chipboard sheet – part of the negative area around the shapes – I just cut a rectangle from it with scissors and inked the edge with a blue ink pad. I added a title with some Jenni Bowlin chalkboard stickers.
I had fun decorating my tree with the twine and a rhinestone from the pack of trims. The Chipboard Accessories are sticky on the back so the twine was easily held in place when I wound it round.  
Close Up of tree with twine! 
Other Supplies: Bazzil ‘Quick Sand’ Cardstock, Studio G stamps (alphas and swirl), ‘Funky Heart’ Punch, Uniball White Gel Pen, Sakura Gelly Roll Black Sparkle Pen, Brilliance ‘Moonlight White’ Dew Drop Ink Pad, Light Blue Ink It Up ink pad, White Cotton

I added some silver glitter glue along the green ric rac  – this was a happy accident!! I used the wrong adhesive (wet glue instead of tape) on the ric-rac and it showed through, so I had to cover it up with something – I went for glitter glue. I’m only telling you so you know you don’t have to give up on projects if something goes a little wrong, I’m glad it did as I like the addition of the glitter!

The strip on the bottom right is actually the barcode strip on the Seasons Greetings paper – don’t forget to keep hold of these little strips as they are great for adding a little extra detail.
I love how the MME 12 Days of Christmas is so bright and goes so well with my daughter’s personality and outfits! 

Christmas Cards
I used to be amazed when I saw people making cards with patterned papers and big chipboard elements – I loved how they looked but thought ‘how can they afford that?’ Then I realised that you only need to use one big, or a couple of small, chipboard elements per card and you can get a couple of cards out of each 12x12 sheet. I’ve worked out these cards cost less than £1.50 each to make, which is much cheaper than a nice card like this would be in the shops. As long as I use up all the elements of chipboard, then they are cost-effective and so quick to make!

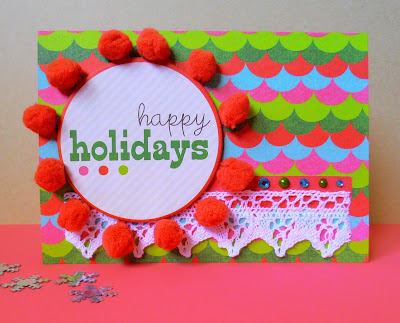
Happy Holidays Card


Supplies:
MME 12 Days of Christmas ‘Tinsel’ Paper, Chipboard Accessories, Trims, and Rhinestones.
Lace trim
White Cotton


Techniques:
I cut the ‘Tinsel’ paper down to make an A6 card. This paper was great for a card as the ‘b’ side is almost plain red (very faint pattern) – if you use a paper with a busy pattern on the ‘b’ side you will also need to line the card to give yourself somewhere to write!
I used some pom-pom trim around the edge of the circular ‘happy holidays’ greeting from the chipboard accessories sheet. It was easy to do this because the Chipboard is sticky-backed, and I only had to add a little extra adhesive to the pom-pom edging when adhering the circle to my card.
I added a strip of a scrap bit of the ‘b’ side under my lace trim so that my line of rhinestones would stand out from the background. The lace trim is machine-stitched onto the card, and I used a little bit of Mod-Podge on the ends of the lace to stop it fraying (PVA glue would probably work for this too if you don’t have Mod-Podge).


Seasons Greetings Card
Supplies:
 
Bazzil Basics ‘Blue Calypso’ Cardstock
MME 12 Days of Christmas ‘Seasons Greetings’ Paper,  Chipboard Accessories, Trims, and Rhinestones.
Anita’s Outline Stickers
Scraps of cream and red card
Uniball White Gel Pen


Techniques:

I used a sheet of Bazzil Basics ‘Blue Calypso’ cut in half to make a 6” square card.
The seasons greetings paper was perfect for cutting into a candy cane shape. I drew the shape in pencil on the back and cut it out. I also thought the line of swirly circles on the chipboard accessories sheet went well with it as they looked a bit like sweets, so I cut the strip to size and added rhinestones to the centres.
The ric-rac and doodled scallops around the card edge both add to the whimsical feel, making the card feel like something that could have been posted from Santa’s workshop!
I hope you have enjoyed these christmas projects and don't forget if you make anything inspired by my projects please do leave a comment so we can come and see too.

Thursday, 20 October 2011

This Week's Special Offer!!

Hi Everyone!

As many of you will know, at S J Crafts we have a weekly offer which usually goes live on Thursdays and so this week's Special Offer is now up & running!!

£1.00 off all 6" x 6" Paper Pads!
Enter code PADOFFER in the coupon box to receive the discount.

Offer is valid for up to 4 pads per customer and until 11pm Wednesday 26th Oct or until stocks last, sorry UK delivery only!
 
 
                     My Mind's Eye Lost & Found Two 6" x 6" Paper Pad ~ Breeze       Crate Paper ~ Random Collection ~ 6" X 6" Paper Pad
 
Maybe you will choose MME Lost & Found or Crate Random or one of the others!!
 
Click HERE to browse all the 6" x 6" Pads!
 
Have a fabulous Thursday! x
 

Tuesday, 18 October 2011

Sand Between Her Toes

In my previous post I shared Lisa-Janes layouts made with MME's 12 Days of Christmas collection and today I want to show you how versatile this collection is especially if you use the b sides of the same papers. It's easy to think Christmas collections can only be used with your christmas photographs but hopefully this post will demonstrate that they can be used all year round!


I love this beach themed layout, such a cute photo and a great design for using up your scraps of paper.

Lisa-Jane trimmed the MME papers to squares, rounded the corners, inked the edges and adhered them in a grid pattern. A chipboard frame cut into two, backed with a piece of coordinating paper and  positioned in the two opposite corners going off the edge of the page balances the page. 


Other supplies: MME green ribbon, chalkboard stickers, other letters, flowers and stickers from Lisa-Jane's own stash.

Time for a quick shop update:
There have been quite a few deliveries of gorgeous new stock over the last few days!! I've uploaded the beautiful Echo Park Times & Seasons which is already flying off the shelves! Today I hope to get the Martha Stewart punches on as well as restocks of essentials including kraft cardstock and the ever popular glossy accents!

Sorry, there hasn't been a special offer this week ... there will be one this Thursday ... I promise!!

Saturday, 15 October 2011

Scrapping with MME 12 Days!!

Do you still have photos from last Christmas or even from years before that that you have never got around to scrapbooking?  I'm guessing the answer is probably Yes!!

When I sent Lisa-Jane some of the new MME 12 Days of Christmas collection to play with she jumped at the opportunity to pull out some photos taken at Christmas time and get them scrapped. Today I'd like to share with you her fabulous layouts.

Layout 1 : Bauble Fun


 Lisa Jane says ...

"I'm usually a traditionalist when it comes to colours for Christmas themed projects but I loved the colours in 12 Days of Christmas  because they are bright and modern. It was a great change! 


The bobble trim is lovely and great for adding dimension and texture. I used a frame from the chipboard sheet with  a scrap of notepaper behind to make a journalling spot.


The baubles are also from the chipboard sheet and the twine from the pack of trims.  I added one of my favourite rosette flowers. You get so much chipboard on the sheet that it can be used for absolutely loads of layouts and cards! I inked everything with vintage photo distress ink.

Other supplies & tools: Christmas Tree punch, Martha Stewart Starburst punch, MME letters. 

Layout 2: What's Under The Tree?


The photos on this layout are a bit blurry but I love them and the photos are what its about for me. I used the Wrap It Up paper as my background and layered up the other papers on top. MME is such a good weight paper it is good as a base too. I added some of the chipboard elements and a couple of strips of green trim to add some interest and texture.


I wanted the layout to be really blingy and sparkly and fun like the photos so I used lots of rhinestones and some glittery letter stickers but I still wanted more sparkle so I added some stickles to the chipboard letters too."


Two lovely, festive layouts by Lisa-Jane but she also made a non-christmassy layout to show you how versatile the collection is!!

I'll be back soon to show you her 3rd page!

 You can see more of Lisa- Jane's crafting over on her blog here!

We hope this post has made you want to dig out the photos you took last christmas (or from years gone by!!) and scrap them! I'd love to see your Christmas layouts, leave a comment so I can stop by your blog/photo gallery and see!!