Showing posts with label MME. Show all posts

Tuesday 17 April 2012

Simple Recipe - For Uk Scrappers!

Each month over on UK Scrappers a sponsor is setting the Simple Recipe Challenge.

S J Crafts were delighted to be invited to "cook up" the recipe for April!!

The aim of Simple Recipes is to give you a starting point to kick off your creative time. Often, when we sit down to scrap, actually getting started is the first hurdle we come to, so the recipes are designed to give you a helping hand to pick out your papers and get started.

Each month's recipe has a colour scheme and some "added ingredients" to help you put your supplies together. There's samples and sketches too and of course you can take as much or as little from each recipe as you like.

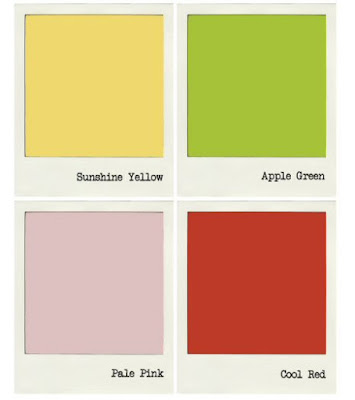
As Spring seems to be here (hopefully!) I came up with a colour combination full of spring colours!


The added ingredients for April are:
To use stickers as part of your design and feature twine, wool or thread!!

April's recipe can be downloaded in full from here - it has lots more ideas for using up stickers and twine, a sketch to work from and shows how my layout came together!!


If you do use the recipe to create a layout we'd love to see .... upload your layout to your blog and link us up in the comments so we can stop by!!

Tuesday 13 March 2012

Miss Caroline Trinket Box

It's Mothers Day soon, so today we would like to show you an idea for a very special hand made gift!

DT member, Jennifer has made this fabulous Trinket box!


Jennifer explains how ....

I love the Miss Caroline 'Day Worn' paper with the woodgrain and doilies effect, and wanted to use it to make something special


I began by painting the inside rims of the box, as I knew I wouldn't want to cover these with paper. Once that was dry, I measured the box lid and sides, cut the 'Day Worn' paper to match (also cutting notches into the back pieces for the hinges), and adhering them on with matt Mod-Podge. I put a layer of Mod-Podge onto both the box and the back of the paper, so that there was a nice layer to make sure the glue went into any cracks on the box surface. You can use watered down PVA glue instead of Mod-Podge, but be aware that PVA may yellow over time.


Once this first layer was dry, I then painted another coat of Mod-Podge over the whole box - working it into any joins to make sure they were sealed, and to give protection to the paper. I repeated this process to line the box with the 'Day Butterflies' paper, it's a nice suprise when you open the box!


To decorate the lid, I used Mod-Podge again to attach some lace, and then stamped the line of flowers from the Miss Caorline stamps, using Staz-On ink. The Glitz Alphas were used on a MME label sticker to spell the word 'trinkets', and this is adhered to the box using foam tape. I cut a flower from a scrap of 'living blooms' paper and placed a brad in the centre, then glued this on with a hot glue gun. I also used wire cutters to cut the backs off a couple more brads from the set, and adhered these with hot glue too. Finally I used thick foam dots to attach the butterfly which comes with the Miss Caroline brads, and also stuck on a couple of yellow prima pearls.
Now the box is all ready to store some lovely items!

Supplies:
Dolled Up 'Day Worn' and 'Day Butterflies' paper, 'Cute' brads, Favourite sticker accessories, Favourite clear stamps, scrap of living blooms paper for flower - All from MME Miss Caroline collection

Glitz teeny alpha stickers, Black Staz on Ink Pad, mod podge, Prima e. pearls and crystals , white acrylic paint, lace (similar to this) and mounting foam tape.

Tuesday 14 February 2012

"A Fun Day" Tag Book!!

Have you seen these packs of Ranger Tags ? They are great for adding to layouts for journalling or how about decorating them "Tim Holtz" style or add some small photos and create a tag book?

I sent DT member, Jo a few tags and an envelope of stash and here's what she did with it all!!


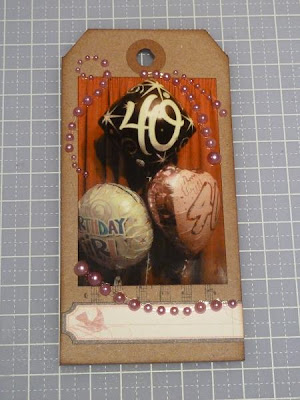
Jo has recently celebrated a special birthday and she made this super cute tag book to record the fun day that she had, celebrating with her friends and family!


Jo explains how she made it together with pictures of each page!


The blue glittered border on the MME Lost and Found 'Fun Day' title just didn't seem to work with my other colours so I cut the sentiment out and just used that. 


I used the Lost & Found label stickers as accents and layers rather than labels, I think it's a great way to use up the labels that have a sentiment on them that you know just won't go with anything else you have.


I inked all the tags with vintage photo distress ink.


I LOVE swirls and the Sweet "Sweet" one was too nice to use on just one page so I cut it up and used a piece on each tag.
I also added some pearls and crystals to most of the pages.


Once all my pages were done, I fastened all the pages together with some twine!

The tags are also available here in a slightly bigger size!

To see more of Jo's craft projects, pop over to her blog.

If this post inspires you to make a tag book, leave us a comment and a link on this post as we'd love to come and see it!

Wednesday 16 November 2011

Free MME Chipboard!!

I'm loving seeing all the amazing Christmas Crafting popping up all around blogland!!

Would you like a free gift to help you with your Christmas creativity??  Yes??!! S J Crafts have a very special offer this week ... call it an early Christmas gift!! 

All you have to do is spend £25 in the shop in one transaction between now and 11pm on Friday evening (18th November) AND enter FREECHIP in the discount code box and we will send you a My Minds Eye 12 Days of Christmas chipboard sheet  (worth £4.95) with your order absolutely free!!!

MME ~ 12 Days of Christmas ~ Chipboard Accessories (D101)
Offer only available for UK Delivery and whilst stocks of the free gift last (although we have plenty ready!!)

Check out the DT projects using this chipboard here and here and also here!!

Happy Shopping!


Monday 24 October 2011

12 Days of Christmas Projects ~ By Jennifer

Design Team member Jennifer has been working on some projects with the gorgeous MME 12 days of Christmas products.
You can see the collection here! and Jennifer's blog is here!


Jennifer explains how her layout came togther:
I printed my photos at home so they were the size I wanted (approx 3.5” x 5”), but you could trim down some 4”x6” photos to fit. I matted the photos onto a 10” x 6.5” piece of  seasons greetings paper, and then adhered this to the Bazzill Basics ‘Quick Sand’ cardstock (which I had machine stitched a border on).
The rest of the layout was built around this. I love the chipboard accessories - they make it so easy to give dimension to the layout and to bring it all together! I had to have the fabulous banner across the top of the page, and I wanted to repeat this with a flag under one of the photos. I made the flag with a bit of ‘b’ side of the ‘Seasons Greetings’ paper that had been left over – the great thing about ‘b’ sides is that you always know they’ll co-ordinate with your page. I made the flag pole with a bit of the chipboard sheet – part of the negative area around the shapes – I just cut a rectangle from it with scissors and inked the edge with a blue ink pad. I added a title with some Jenni Bowlin chalkboard stickers.
I had fun decorating my tree with the twine and a rhinestone from the pack of trims. The Chipboard Accessories are sticky on the back so the twine was easily held in place when I wound it round.  
Close Up of tree with twine! 
Other Supplies: Bazzil ‘Quick Sand’ Cardstock, Studio G stamps (alphas and swirl), ‘Funky Heart’ Punch, Uniball White Gel Pen, Sakura Gelly Roll Black Sparkle Pen, Brilliance ‘Moonlight White’ Dew Drop Ink Pad, Light Blue Ink It Up ink pad, White Cotton

I added some silver glitter glue along the green ric rac  – this was a happy accident!! I used the wrong adhesive (wet glue instead of tape) on the ric-rac and it showed through, so I had to cover it up with something – I went for glitter glue. I’m only telling you so you know you don’t have to give up on projects if something goes a little wrong, I’m glad it did as I like the addition of the glitter!

The strip on the bottom right is actually the barcode strip on the Seasons Greetings paper – don’t forget to keep hold of these little strips as they are great for adding a little extra detail.
I love how the MME 12 Days of Christmas is so bright and goes so well with my daughter’s personality and outfits! 

Christmas Cards
I used to be amazed when I saw people making cards with patterned papers and big chipboard elements – I loved how they looked but thought ‘how can they afford that?’ Then I realised that you only need to use one big, or a couple of small, chipboard elements per card and you can get a couple of cards out of each 12x12 sheet. I’ve worked out these cards cost less than £1.50 each to make, which is much cheaper than a nice card like this would be in the shops. As long as I use up all the elements of chipboard, then they are cost-effective and so quick to make!

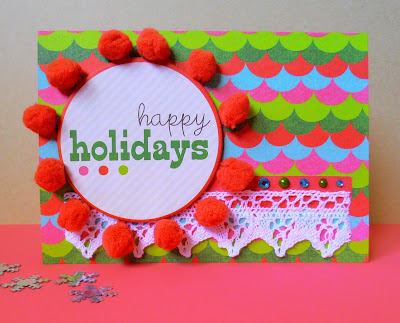
Happy Holidays Card


Supplies:
MME 12 Days of Christmas ‘Tinsel’ Paper, Chipboard Accessories, Trims, and Rhinestones.
Lace trim
White Cotton


Techniques:
I cut the ‘Tinsel’ paper down to make an A6 card. This paper was great for a card as the ‘b’ side is almost plain red (very faint pattern) – if you use a paper with a busy pattern on the ‘b’ side you will also need to line the card to give yourself somewhere to write!
I used some pom-pom trim around the edge of the circular ‘happy holidays’ greeting from the chipboard accessories sheet. It was easy to do this because the Chipboard is sticky-backed, and I only had to add a little extra adhesive to the pom-pom edging when adhering the circle to my card.
I added a strip of a scrap bit of the ‘b’ side under my lace trim so that my line of rhinestones would stand out from the background. The lace trim is machine-stitched onto the card, and I used a little bit of Mod-Podge on the ends of the lace to stop it fraying (PVA glue would probably work for this too if you don’t have Mod-Podge).


Seasons Greetings Card
Supplies:
 
Bazzil Basics ‘Blue Calypso’ Cardstock
MME 12 Days of Christmas ‘Seasons Greetings’ Paper,  Chipboard Accessories, Trims, and Rhinestones.
Anita’s Outline Stickers
Scraps of cream and red card
Uniball White Gel Pen


Techniques:

I used a sheet of Bazzil Basics ‘Blue Calypso’ cut in half to make a 6” square card.
The seasons greetings paper was perfect for cutting into a candy cane shape. I drew the shape in pencil on the back and cut it out. I also thought the line of swirly circles on the chipboard accessories sheet went well with it as they looked a bit like sweets, so I cut the strip to size and added rhinestones to the centres.
The ric-rac and doodled scallops around the card edge both add to the whimsical feel, making the card feel like something that could have been posted from Santa’s workshop!
I hope you have enjoyed these christmas projects and don't forget if you make anything inspired by my projects please do leave a comment so we can come and see too.

Tuesday 18 October 2011

Sand Between Her Toes

In my previous post I shared Lisa-Janes layouts made with MME's 12 Days of Christmas collection and today I want to show you how versatile this collection is especially if you use the b sides of the same papers. It's easy to think Christmas collections can only be used with your christmas photographs but hopefully this post will demonstrate that they can be used all year round!


I love this beach themed layout, such a cute photo and a great design for using up your scraps of paper.

Lisa-Jane trimmed the MME papers to squares, rounded the corners, inked the edges and adhered them in a grid pattern. A chipboard frame cut into two, backed with a piece of coordinating paper and  positioned in the two opposite corners going off the edge of the page balances the page. 


Other supplies: MME green ribbon, chalkboard stickers, other letters, flowers and stickers from Lisa-Jane's own stash.

Time for a quick shop update:
There have been quite a few deliveries of gorgeous new stock over the last few days!! I've uploaded the beautiful Echo Park Times & Seasons which is already flying off the shelves! Today I hope to get the Martha Stewart punches on as well as restocks of essentials including kraft cardstock and the ever popular glossy accents!

Sorry, there hasn't been a special offer this week ... there will be one this Thursday ... I promise!!

Friday 8 July 2011

Grab Box Projects

Hi Everyone

Lots of you have bought one (or in some cases two!!) of the grab boxes and I hope you have enjoyed creating some lovely cards and scrapbook layouts with your new papers.

The very talented Jenny didn't waste any time in cutting into her new papers and made this beautiful card with the My Minds Eye Little Flowers paper from her grab box.


She also made this gorgeous box with another sheet of paper from her box.


For details of how she made both the card and box and to see more of her crafting projects why not pop over to her blog.

I'd love to see what you make with your grab box goodies or in fact anything purchased from the S J Crafts Shop. E mail a photo or a link to your blog. My e mail is:  sarah at s j papercrafts dot co dot uk (obviously remove the spaces and change the dot to a .) Just don't want loads of those webrobot thingys e mailing me too!!! lol!

There is another grab box coming soon so watch this space for that and also details of the OPEN DAY are now up on the website here 

Those of you that have asked about the Ranger Blending Tools and Replacement Foams ~ They are on order and should be here any day now!

Have a fabulous, craft filled day!