Showing posts with label Christmas. Show all posts

Wednesday 14 November 2012

Jennifer Grace - Inspired By Winter

Welcome to our very first "Inspired By Winter" Post!

Just over 12 months ago I announced our Design Team here. Since then we have had a fantastic 12 months working together. Their endless support and talents continues to amaze me and I can honestly say they have all become firm friends.
A few weeks ago, I asked them if they were happy to continue on the S J Crafts Team and I'm delighted that Jennifer, Louise, Lisa-Jane and Jenny all agreed to stay on the team.

This new blog series, "Inspired By Winter"  is a celebration of my amazing Design Team, a chance for you, our readers to get to know them a little better and  best of all enjoy seeing some crafty goodness!

Each week, on a Wednesday there will be a chance to "meet" a DT member and find out what inspires them this Winter!

I hope you will join us!!

First up is .... Jennifer!

*  *  *

Hello! I'm Jennifer Grace, a craft-crazy mum-of-two, from Dorset, England, and I'm super happy to be on the SJ Crafts Design Team for another term!


I like to craft as much as possible, and I frequently run around with alphas stuck on my top when my daughter wants to decorate me with my stickers, or with a glittery baby on my hip because he wanted to investigate mummy’s supplies! I love going on family adventures (especially to the beach), dressing up (I was Ariel the Mermaid for my 30th birthday), and celebrating the little moments of joy that life brings!

Here's a few questions & answers to help you get to know me and my crafting:
  • What was your last crafty purchase? I've been buying lots of winter/Christmas crafting supplies, including bits from the collections of Crate Paper's Sleigh Ride, Pink Paislee's City Sidewalks, My Mind's Eye All is Bright, and Studio Calico's Wonderland!

  • Who is your favourite Craft Manufacturer? This is a hard question as I love all those mentioned above, and more! I guess right now it's My Mind's Eye, but I reserve the right to change my mind on a daily whim!

  • What is your favourite technique/style? I don't know how to define my style - it's somewhere between graphic and arty! I like my photos to always be straight, but I don't mind tilting other elements, and I love to scatter small circular items - most often gems/pearls, but also sometimes buttons, brads, or drops of mist. If anyone can come up with a phrase to describe my style, I'd be happy to hear it!

We're approaching winter now - it really feels like it here, as it's been cold and drizzly! But I don't mind, as I love crafting in winter... I'm especially inspired because it's a season of 'giving'. I love crafting gifts, cards, and tags, to give to those I know and love, and hopefully light up their day. It's a great feeling to see someone appreciating what you've made for them, I love sharing my hobby and putting my thoughts and love into projects to pass on to others!

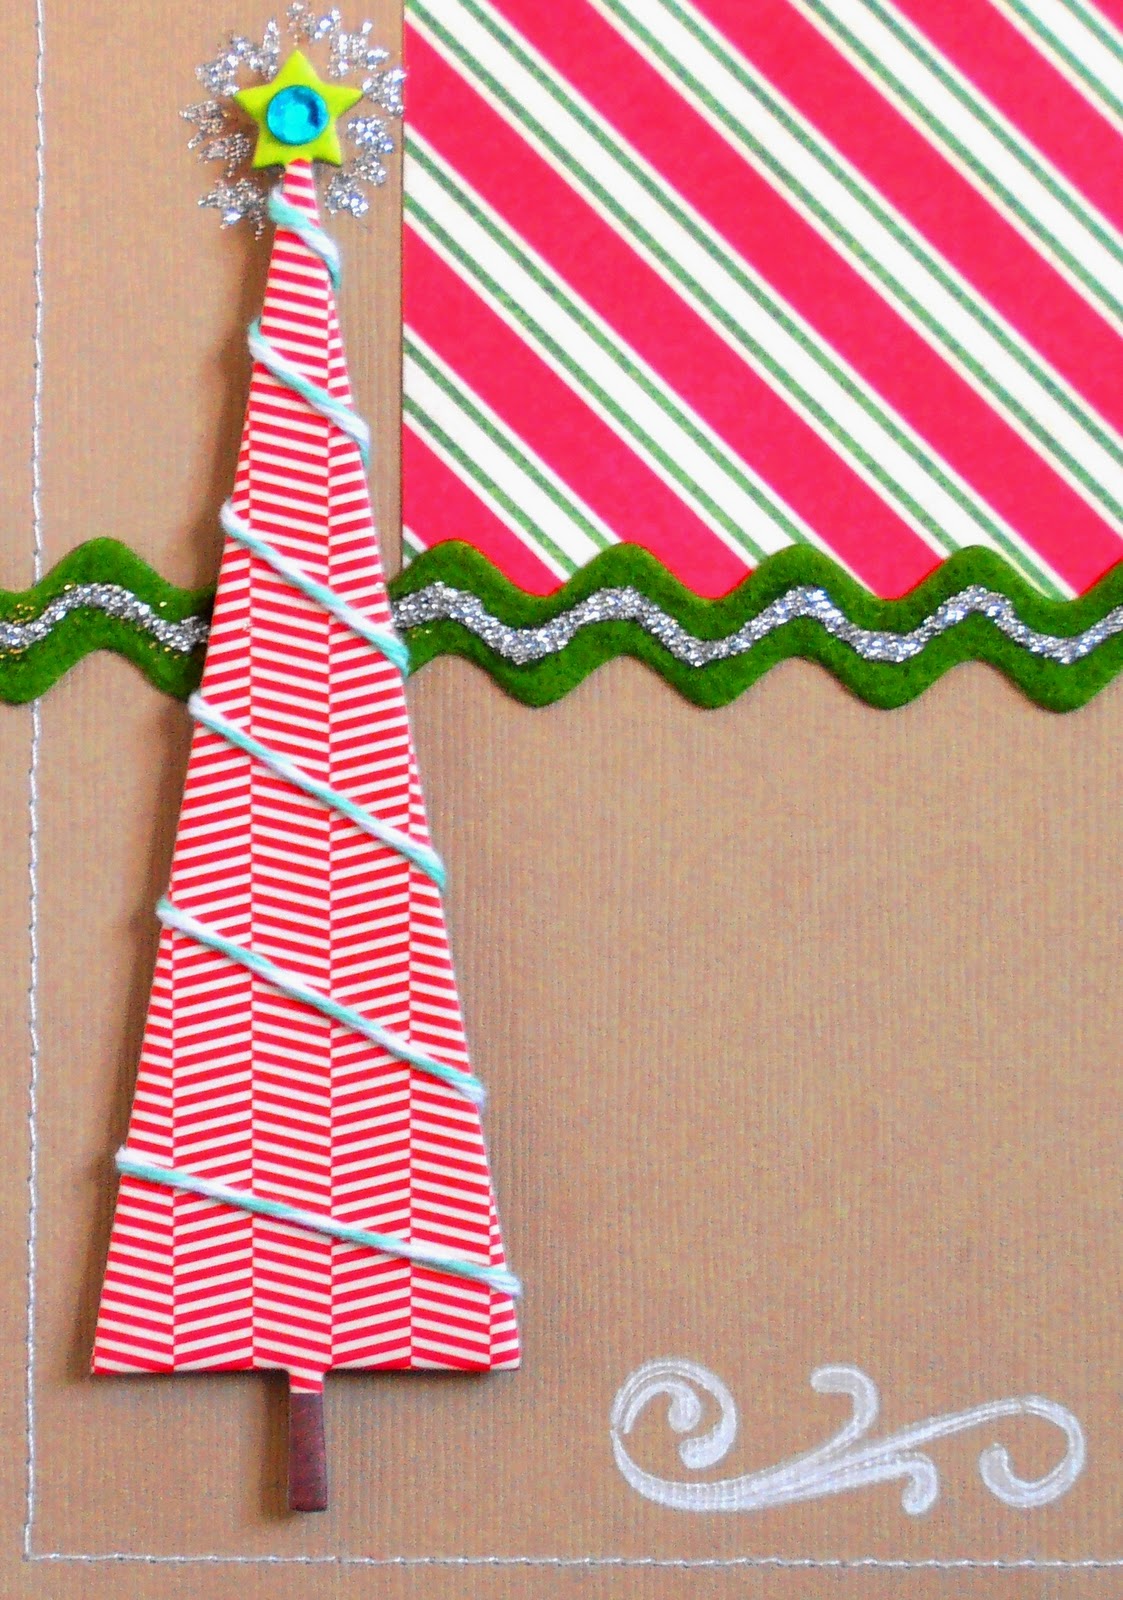
With this in mind, I've made a couple of tags to decorate some gifts this Christmas:


Supplies: White CardstockJenni Bowlin Studios Kraft Flag TagsRed Rhinestone Stars, andClear Rhinestone Stars, Hero Arts Clear GemstonesGlitz 'Yours Truly' Alpha stickersStudio Calico My. Huey Calico White Mist, Sewing Machine with White Thread, Bakers Twine.

They look great on some gifts with a bit of twine and ribbon:


These are a tiny sample of the things I've been making lately with a winter or Christmas theme.
I'd love it if you joined me for my 'Frosty Festivities' Blog Event this coming weekend (16th - 18th of November) to see more! There will be winter themed posts every hour, including tips, tutorials, challenges, crafts, a blog hop, and lots of GIVEAWAYS! Check out more information in my announcement post here.

I hope you'll be able to stop by, but either way I'm sure I'll see you again on the SJ Crafts Blog soon! Thanks for reading a bit about me, it would be lovely if you can leave a comment to say hello!

Jennifer x

Visit Jennifer's blog at Jennifer's Jumbles

Monday 26 December 2011

10% Off Everything!!!

I hope you've had a fabulous Christmas and Santa treated you well!!

There are still lots of bargains to be had in our Winter Sale and now there is 10 % off absolutely everything in the shop!!

 Enter the code CHRISTMAS in the discount box!!
Code valid until 11pm 29th December!!

Yes, that's another 10% off the sale prices too!!!

What are you waiting for??? 


We will start processing and dispatching orders from 28th Dec onwards! Orders will be dispatched in strict order received so please bear with us during this busy time!

Wednesday 16 November 2011

Free MME Chipboard!!

I'm loving seeing all the amazing Christmas Crafting popping up all around blogland!!

Would you like a free gift to help you with your Christmas creativity??  Yes??!! S J Crafts have a very special offer this week ... call it an early Christmas gift!! 

All you have to do is spend £25 in the shop in one transaction between now and 11pm on Friday evening (18th November) AND enter FREECHIP in the discount code box and we will send you a My Minds Eye 12 Days of Christmas chipboard sheet  (worth £4.95) with your order absolutely free!!!

MME ~ 12 Days of Christmas ~ Chipboard Accessories (D101)
Offer only available for UK Delivery and whilst stocks of the free gift last (although we have plenty ready!!)

Check out the DT projects using this chipboard here and here and also here!!

Happy Shopping!


Friday 4 November 2011

Christmas Decorations

Did you know it's only 50 more days until Christmas?

So, with Christmas just around the corner we thought it was time to turn our thoughts to making some cute decorations!!


Design Team member, Jennifer has made these really lovely tree decorations and made a video tutorial with instructions on how to make them!


Jennifer used the My Minds Eye 12 days of Christmas collection.

I am going to have a go at making a few of these to hang on our tree this year!

You can see more of Jennifers fabulous work on her blog here!

Thanks for stopping by!

Monday 24 October 2011

12 Days of Christmas Projects ~ By Jennifer

Design Team member Jennifer has been working on some projects with the gorgeous MME 12 days of Christmas products.
You can see the collection here! and Jennifer's blog is here!


Jennifer explains how her layout came togther:
I printed my photos at home so they were the size I wanted (approx 3.5” x 5”), but you could trim down some 4”x6” photos to fit. I matted the photos onto a 10” x 6.5” piece of  seasons greetings paper, and then adhered this to the Bazzill Basics ‘Quick Sand’ cardstock (which I had machine stitched a border on).
The rest of the layout was built around this. I love the chipboard accessories - they make it so easy to give dimension to the layout and to bring it all together! I had to have the fabulous banner across the top of the page, and I wanted to repeat this with a flag under one of the photos. I made the flag with a bit of ‘b’ side of the ‘Seasons Greetings’ paper that had been left over – the great thing about ‘b’ sides is that you always know they’ll co-ordinate with your page. I made the flag pole with a bit of the chipboard sheet – part of the negative area around the shapes – I just cut a rectangle from it with scissors and inked the edge with a blue ink pad. I added a title with some Jenni Bowlin chalkboard stickers.
I had fun decorating my tree with the twine and a rhinestone from the pack of trims. The Chipboard Accessories are sticky on the back so the twine was easily held in place when I wound it round.  
Close Up of tree with twine! 
Other Supplies: Bazzil ‘Quick Sand’ Cardstock, Studio G stamps (alphas and swirl), ‘Funky Heart’ Punch, Uniball White Gel Pen, Sakura Gelly Roll Black Sparkle Pen, Brilliance ‘Moonlight White’ Dew Drop Ink Pad, Light Blue Ink It Up ink pad, White Cotton

I added some silver glitter glue along the green ric rac  – this was a happy accident!! I used the wrong adhesive (wet glue instead of tape) on the ric-rac and it showed through, so I had to cover it up with something – I went for glitter glue. I’m only telling you so you know you don’t have to give up on projects if something goes a little wrong, I’m glad it did as I like the addition of the glitter!

The strip on the bottom right is actually the barcode strip on the Seasons Greetings paper – don’t forget to keep hold of these little strips as they are great for adding a little extra detail.
I love how the MME 12 Days of Christmas is so bright and goes so well with my daughter’s personality and outfits! 

Christmas Cards
I used to be amazed when I saw people making cards with patterned papers and big chipboard elements – I loved how they looked but thought ‘how can they afford that?’ Then I realised that you only need to use one big, or a couple of small, chipboard elements per card and you can get a couple of cards out of each 12x12 sheet. I’ve worked out these cards cost less than £1.50 each to make, which is much cheaper than a nice card like this would be in the shops. As long as I use up all the elements of chipboard, then they are cost-effective and so quick to make!

Happy Holidays Card


Supplies:
MME 12 Days of Christmas ‘Tinsel’ Paper, Chipboard Accessories, Trims, and Rhinestones.
Lace trim
White Cotton


Techniques:
I cut the ‘Tinsel’ paper down to make an A6 card. This paper was great for a card as the ‘b’ side is almost plain red (very faint pattern) – if you use a paper with a busy pattern on the ‘b’ side you will also need to line the card to give yourself somewhere to write!
I used some pom-pom trim around the edge of the circular ‘happy holidays’ greeting from the chipboard accessories sheet. It was easy to do this because the Chipboard is sticky-backed, and I only had to add a little extra adhesive to the pom-pom edging when adhering the circle to my card.
I added a strip of a scrap bit of the ‘b’ side under my lace trim so that my line of rhinestones would stand out from the background. The lace trim is machine-stitched onto the card, and I used a little bit of Mod-Podge on the ends of the lace to stop it fraying (PVA glue would probably work for this too if you don’t have Mod-Podge).


Seasons Greetings Card
Supplies:
 
Bazzil Basics ‘Blue Calypso’ Cardstock
MME 12 Days of Christmas ‘Seasons Greetings’ Paper,  Chipboard Accessories, Trims, and Rhinestones.
Anita’s Outline Stickers
Scraps of cream and red card
Uniball White Gel Pen


Techniques:

I used a sheet of Bazzil Basics ‘Blue Calypso’ cut in half to make a 6” square card.
The seasons greetings paper was perfect for cutting into a candy cane shape. I drew the shape in pencil on the back and cut it out. I also thought the line of swirly circles on the chipboard accessories sheet went well with it as they looked a bit like sweets, so I cut the strip to size and added rhinestones to the centres.
The ric-rac and doodled scallops around the card edge both add to the whimsical feel, making the card feel like something that could have been posted from Santa’s workshop!
I hope you have enjoyed these christmas projects and don't forget if you make anything inspired by my projects please do leave a comment so we can come and see too.


Saturday 15 October 2011

Scrapping with MME 12 Days!!

Do you still have photos from last Christmas or even from years before that that you have never got around to scrapbooking?  I'm guessing the answer is probably Yes!!

When I sent Lisa-Jane some of the new MME 12 Days of Christmas collection to play with she jumped at the opportunity to pull out some photos taken at Christmas time and get them scrapped. Today I'd like to share with you her fabulous layouts.

Layout 1 : Bauble Fun


 Lisa Jane says ...

"I'm usually a traditionalist when it comes to colours for Christmas themed projects but I loved the colours in 12 Days of Christmas  because they are bright and modern. It was a great change! 


The bobble trim is lovely and great for adding dimension and texture. I used a frame from the chipboard sheet with  a scrap of notepaper behind to make a journalling spot.


The baubles are also from the chipboard sheet and the twine from the pack of trims.  I added one of my favourite rosette flowers. You get so much chipboard on the sheet that it can be used for absolutely loads of layouts and cards! I inked everything with vintage photo distress ink.

Other supplies & tools: Christmas Tree punch, Martha Stewart Starburst punch, MME letters. 

Layout 2: What's Under The Tree?


The photos on this layout are a bit blurry but I love them and the photos are what its about for me. I used the Wrap It Up paper as my background and layered up the other papers on top. MME is such a good weight paper it is good as a base too. I added some of the chipboard elements and a couple of strips of green trim to add some interest and texture.


I wanted the layout to be really blingy and sparkly and fun like the photos so I used lots of rhinestones and some glittery letter stickers but I still wanted more sparkle so I added some stickles to the chipboard letters too."


Two lovely, festive layouts by Lisa-Jane but she also made a non-christmassy layout to show you how versatile the collection is!!

I'll be back soon to show you her 3rd page!

 You can see more of Lisa- Jane's crafting over on her blog here!

We hope this post has made you want to dig out the photos you took last christmas (or from years gone by!!) and scrap them! I'd love to see your Christmas layouts, leave a comment so I can stop by your blog/photo gallery and see!!