Showing posts with label 12 x 12 collection kits. Show all posts

Monday 24 November 2014

"Hello Santa" Layout

A few months ago I was asked to create a layout for Scrapbook Magazine on the theme "Hello Santa" .... it's in the current issue No: 85 on sale now so I'm now able to show you at last.


The lovely Jen at Wear Crafts sent me the Simple Stories Cozy Christmas collection kit to work with and it was just perfect for this theme. I knew I had to use the "Hey Santa" 3" X 4" journal card as soon as I saw it in the pack!


I started with a sheet of red cardstock onto which I layered white cardstock and then began to layer up some patterned papers and journal cards.

See the little red and white striped pieces just peeping out each side - I cut one of the 3" x 4" cards in half so I could tuck a piece in each side of the photo. This is something I often do with journal cards!

I added a little bit of sparkle with some American Crafts glitter tape and some My minds Eye gold stars.


The title is a mix of red chipboard alphas and white foam thickers.

The Simple Stories sticker sheet in the Collection pack has some lovely word stickers on it - I added "Wonder & Magic", "Ho Ho Ho" and "he's making a list" in 3 different areas of my page, adding a star and red gem to each making a visual triangle.


The photo is one of my favourites of the many that I have of my daughter meeting Santa over the years. Even though it doesn't show her face, I love the twinkling lights and stacks of presents in Santa's grotto and I remember how she listened in earnest to him telling her to "make sure she goes straight to sleep on Christmas Eve!"

So, that's two layouts made with this kit (if you missed the other it's here!) and I'm already half way through a third page so I'll be back to show you that soon.

How are your Christmas preparations going?
Anyone got their tree up yet?

Thursday 8 May 2014

Your Undivided Attention - Part 2

Hello, Lisa-Jane here again!

Welcome back for Part 2 of the series where I'm using Simple Stories Homespun collection, which includes lots of cards to cut apart and use in divided page protectors, to make standard layouts and more. If you missed Part One check it out HERE!

This lovely subtle 12x12 paper has little bits of printed embellishment that do lots of the hard work for you. I used several of the 6x4 cards here to create a messy stack without trying to make the pieces bigger and needing to cover joins and gaps. I made sure that each layer was a good contrast to the previous one and covered up any wording that wasn't relevant etc, so aside from the journaling block the pieces act just like sections of patterned paper and not specific 6x4 cards for 6x4 pockets:


Sometimes the sentiments on the cards go right to the edge like with this journaling block which was fine for my purposes but often there is just a some wording or a printed element that can easily be disguised if it doesn't fit your theme. My title was from the chipboard elements and I added some stickers and brads from the collection, a little doily from my stash and some gorgeous enamel dots and that was all it needed:


This next layout is another example of using the larger panels in their original form and incorporating it as part of the title. This time I added an ampersand and a couple of alpha stickers to add more meaning:


I used the long ruler sticker as a border strip and the little chipboard "Let's Stick Together" was absolutely perfect for this page about my 2 great nephews. In the Homespun collection there are bigger sections as well as the 3x4 and 4x6 cards and I used these to layer up the photograph here. 

There was a cute little border on one which was ideal to use leaving it showing even though the rest of the piece is hidden. It would also have been a great place to add some stitching over the printed stitching if you like that look. If you look for colours and patterns that you want to use instead of looking at the cards as they stand alone, then you can get a lot more versatility out of them!


I punched another pinked circle from a scrap card and added it to a paperclip with a coordinating brad. With the colourful heart paper as a background it didn't need a great deal more than a couple of items from the stickers and chipboard sheets:


Some branding strips and offcuts from other cards that were tucked behind other elements, a couple more stickers and pop dots and we have a fun and cheerful page about 2 funny little chaps.


I hope you've enjoyed these ideas for using the various sections in pieces and as whole elements and there is still not a divided page protector in sight!  

I'll see you soon for the final part of the series for a couple of "off the page" projects.

If you want to get hold of some Simple Stories items in the meantime then check out the selection at SJ Crafts HERE!

Lisa-Jane x

Lisa-Jane regularly allows us a glimpse into her life and her craft room over at her fun blog Inside My Head. Go pay her a visit!


Friday 18 April 2014

Your Undivided Attention - Part One

Hello everyone, Lisa-Jane here today!

Lots of manufacturers now are making wonderful collections aimed at people using pocket page protectors, as well as the various designs of divided page protectors themselves. Previously paper collections might have had one sheet that was designed to be cut apart but the reverse of that sheet was often a solid colour so you got the best of both worlds.  

Now though, with so many people using these divided page protectors, the reverse of the pre-designed sheets are often intended to be cut apart too. That's fine if you have that particular design of protector but what if you don't? Or, what if, like me, you love a collection but you just want to use it on standard 12x12 pages? Do we end up missing out because we don't want to use undivided protectors? I don't think so! 


In the next 3 posts I'm going to show you some designs I've made using the Simple Stories Homespun Collection which coordinates with the Simple Stories albums and protectors. However my projects in the first 2 posts fit my normal American Crafts D rings albums and protectors and the final 2 projects are "off the page" style.

Firstly I went through and cut all the sheets into their relevant sections. As I was cutting, some of the items were jumping out at me as needing to be used at their intended size and others I knew I would be happy to use in another way. This second pile that I set aside could be used for die cutting, fussy cutting, punching shapes, layering edges etc. I also took off all the branding strips and cut off the information so I was left with just the usable pieces. Making these decisions early and assembling a "kit" in this way meant that I knew exactly what I had available and also that I didn't wobble when I wanted to cut a small piece of something!

Family:


For this first layout I used one of the pieces of 12x6 as a panel just in from the left hand side. These large panels often have something you can choose to use as a title too so an alternative could have been cutting the panel along the second "plank" from the bottom. I wanted to use it in its entirety here though as I think it makes a natural home for the photo above right.

I also cut one of the 6x4 cards to make a second mat for my photo... 


I really liked the pattern and I knew I wasn't going to use the sentiment but my photo was already matted onto another 6x4 piece so I needed to do some creative patchwork!

 I cut an L shape and then adhered the piece with a small gap, then adhered the photo on top. I chose a 3x4 card from the pile I had set aside for cutting up and punched a couple of pinked circles for layering.


 The branding strips make great banners and are perfect for disguising small gaps and joins. I added some texture with stickers, chipboards and brads from the collection.  


I added the coordinating banner sticker on pop dots and I love the way it mirrors the banner on the wood grain panel.


My second layout was completed on a piece of A4 cardstock. I use the standard office page protectors for this size as they still perfectly fit the AC ring binders and add a bit of variety to the album.

Elliot:


Here I've cut down a photo to 3x4 and made a grid from 3 other 3x4 cards that I really liked. Two of the cards are decorative and the third is for journaling. I adhered them to a piece of the cardstock that I cut from the centre of the background to make a narrow frame for the grid. This helps the eye to see the grid as one whole piece and also lifts it slightly from the busier background.

I added texture and dimension with buttons, twine, bobble trim and a couple of branding strips. I also added to the printed embellishments using chipboard stickers:


The little label area on this card was a perfect home for my great nephew's name and the red alphas in the set worked perfectly with the reds I was bringing out in my colour scheme.

So lets recap - so far we've used a 6x12 panel as it is, incorporated it as a title, made photo mats with 6x4 cards, made a grid with 3x4 cards, used a 3x4 card for a journalling block and used "spare" cards and branding strips for punching shapes and making embellishments. 

Wow! Who said you could only use this collection with divided page protectors? 

And there are still 2 posts to go in this series! Join me again soon!

Lisa-Jane x

P.S. Are you loving Simple Stories right now? Check out the other Simple Stories collections in stock at SJ Crafts HERE!

Lisa-Jane shares lots of crafty creations and regularly joins in with 'What's On Your Workdesk Wednesday' over on her blog 'Inside My Head'!

Friday 4 April 2014

Cutting Into A Collection!

Hello everyone, Jemma here today!

Are you a photo-first scrapper? Someone who selects a photo and then chooses just the right papers, cardstock and embellishments to showcase it? Or do you see a paper collection for sale and fall in love with the colours, textures and ephemera, hoping that the perfect photos can be located in your to-scrap pile?

I'm generally in the latter category, partly because there are no bricks & mortar scrapbook shops nearby, meaning that I generally shop online, and partly because I have years of photos to scrap with so it's easier to start with stash that I want to play with.

However making that first cut in the first sheet of paper of a kit or collection is always a little tricky:
Which side of a double-sided sheet should I use?
Would those stripes be better cut vertically or horizontally?
What if the next page's photos needed this paper design?
What if I run out of a favourite pattern?
Here's a look at my Seven Step Process for cutting into a collection; specifically what I did with the Teresa Collins' My Name Is Collection.

Step One - Look at the Collection

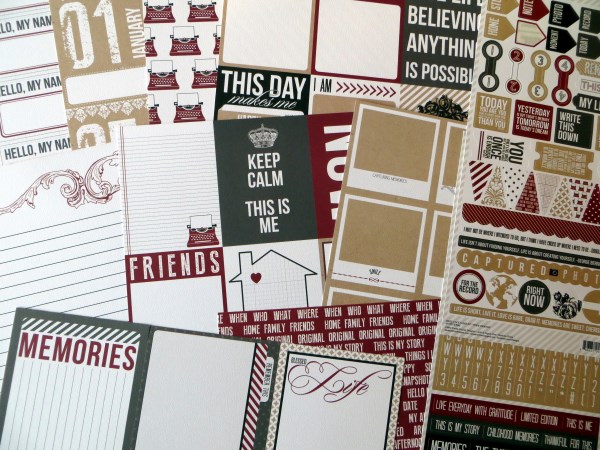
First of all I emptied out all the papers and thought about the sorts of pages I might use them for. Highlights from the A sides included:
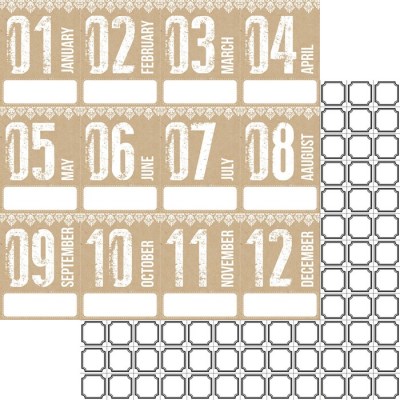
• a whole sheet of monthly 3x4 cards for a year-long project
• lots more 4x6 and 3x4 cards with quotes and phrases or space for journalling
• a sheet of 16 fun kraft polaroid frames
• a sheet of words and phrases that could be cut into strips
Teresa Collinns - Hello My Name Is - S J Crafts

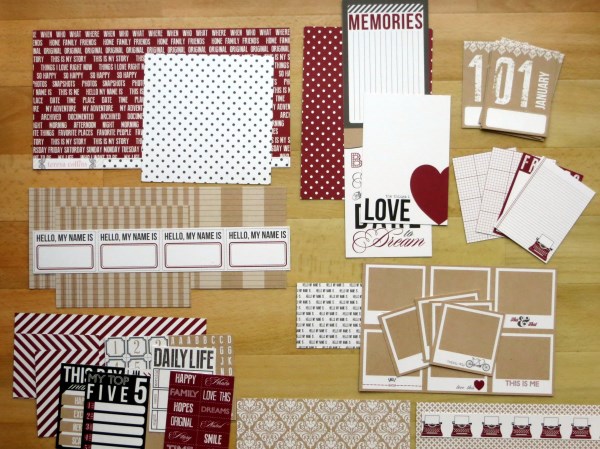
Flipping the sheets over, I discovered that there were some versatile background patterns amongst the B sides and realised that I would have to choose which 4x6 or 3x4 cards I definitely wanted to use before cutting up any sheets at all.

Teresa Collinns - Hello My Name Is - S J Crafts

Teresa Collinns - Hello My Name Is - Months - S J Crafts
Step Two - Reserve "Special Sheets"


I'm not a pocket page scrapper but I do like to scrap monthly summaries each year so my first job was to cut up the sheet of calendar cards for this year's album. I'll use these with scraps from the other papers and some of the left-over 4x6 and 3x4 journalling cards. I'm full of admiration for the designer at Teresa Collins - if I had been using divided page protectors the designs are intact on both sides after cutting.

Step Three - Grab Some Photos

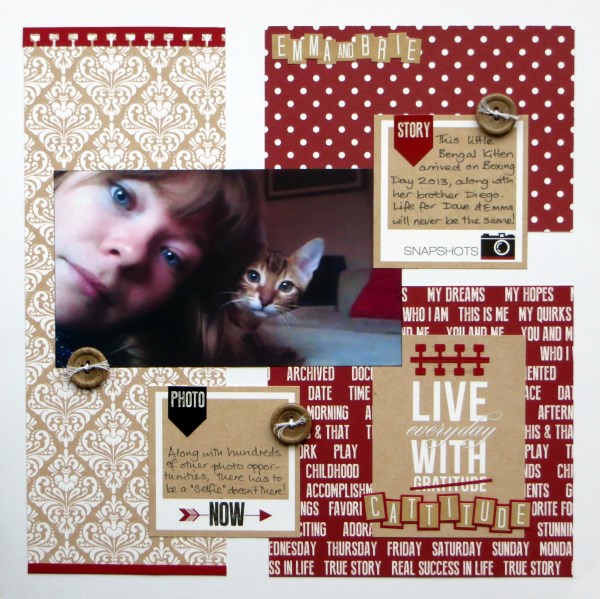
I had two (sets of) photos in mind for these papers by now: a selfie of my son's girlfriend plus kitten, and a set of photos from a visit to a match museum last summer.

Step Four - Extract/Discard Journal Cards

I cut the 'Polaroids' sheet to release my favourites (the B side pattern didn't need any special consideration) and chose 3x4 cards from 'Record' that would work with the photos.  I knew I would never, ever use one of the 4x6 cards from 'Love' ("Don't Forget You Are Awesome") so it was an easy decision to cut it free and use the B side instead.

Teresa Collinns - Hello My Name Is - Polaroids, Record, Love - S J Crafts
Polaroids                        Record                           Love


Step Five - Start Cutting, Shuffling, Sticking

I decided that I would never use the A side of 'Journal' and therefore paid it no attention when cutting the sheet up. Some paper & card shuffling took place before I decided to add a block from the 'Words' paper to to align with the back of the 4x6 card, again paying no heed to the B side as it was a uniform pattern:

Jimjams - Cattitude - for S J Crafts

Teresa Collinns - Hello My Name Is - Noted - S J Crafts
The second set of photos needed a double layout, plenty of "white" space and non-intrusive patterns.  Along with another 'Polaroid' frame, and a 3x4 card from 'Record', I cut two horizontal strips from 'Noted' to stretch across the entire width of my sheets for continuity. Having used/reserved a number of the 3x4 cards from 'Record' I had to be creative with the remainder of the B side and lay short strips of the graph paper just under the photos. It was a real jigsaw!


At this point I did make a mistake and tried to use strips of the kraft ledger paper from 'Tag's before deciding that I hated it and replacing it with strips of red cardstock. No matter though - I need scraps for my monthly pages!


Step Six - See What's Left

OK so that was a single and a double page done and all but one sheet of paper ('Lucky') cut into ... so I cut it up to stop myself being too precious with it!

Teresa Collinns - Hello My Name Is - S J Crafts

Step Seven - Go Back to Step Three & Repeat

Time to take stock and start thinking about the next pages ... my yearly album needs some of those reserved polaroids, journalling cards and scraps, but I'm sure that there's at least one more 12x12 to come ... I'll be back!

Are you tempted to cut into a collection? SJ Crafts stocks a wide range of Collection Kits to play with, check them out!

Jemma x

Jemma blogs at Just Jimjams where she recently celebrate her 400th post, pop over there for more inspiration!

Sunday 6 October 2013

October's Six Cards on the 6th!

Hello and welcome to October's Six Card's on the 6th! Do you know it's only 80 days until Christmas?! Sorry to scare you, but it's time to get crafting for the festive season!

This series is all about inspiring you to get those Christmas cards made in time. You can link up your own cards at any time throughout the month, and at the end of the series one link-up from all the posts will win a pizza box stuffed full with scrapbook stash!

If you join in with the series we'd love you to copy this button into your post or sidebar! Just select all the text in the box below the image, and copy that either into a html gadget (or text widget) in your sidebar, or into the html on a blog post. Then the button will appear and will be linked back to the series - your button won't have a box underneath!

 photo Sixon6thbutton200pix_zps673fb713.jpg


Today we have cards by Lisa-Jane and Sarah to make you feel festive!

First up is Lisa-Jane:

I was working with some supplies from the fun new Simple Stories "December Documented" collection:


  This pack included some transparent overlays, which gave me the idea to make some shaker cards! I used the cut apart sheets and stickers to make different backgrounds and foregrounds for my glittery creations. For some finishing touches I added sparkly ribbons and trims and a few snowflake brads from my stash:


Next up is Sarah:

I opted for a red and grey colour scheme this month, using Echo Park's "Reflections Christmas" and Glitz "Hello December" papers. I also added a paper doily to four of the cards - they all have a nice vintage feel: 


Didn't Lisa-Jane and Sarah make some gorgeous cards? It's really not hard to make six cards if you use a common idea for the set. If you are struggling to come up with a 'kit' to make six cards you can always think of a theme like 'vintage' or 'sparkly' to work out what items to pull together!

Now it's your turn! Link up your cards below for a chance to win the pizza box full of stash (prize will go out in early January). We can't wait to see what you create!

Jennifer x

Friday 27 September 2013

A Perfect Summer (Part 4)

Hi there, its Lisa-Jane back again, with my ninth and final layout from Echo Park's Perfect Summer collection! 

If you missed any of my previous posts using this collection you can see them here: Part 1, Part 2, Part 3. It has been a wonderful summer this year, so I know everyone will have lots of photos to scrap that will work so well with this colourful pack!  

Remember last year? It wasn't such a perfect summer. The rain really interfered with the crops and the strawberry harvest was dire. We only managed one picking session, hence the title "One Fine Day". It was tough going and I will definitely be scrapping about the poor conditions. But this layout is about how my dear old Dad knows the ancient farmers where we go picking, and he managed to get my son a ride on a tractor:


I still had plenty of little bits to patch together to make this layout. I wanted to focus mostly on the red and the green, so I added red cardstock, green WRMK washi tape, green ribbon and a red paperclip.


I used the branding strips and a few other small leftovers to make this banner along the bottom, which adds lots of colour and interest and mimics the movement of the windy days!


So that is 9 layouts and 2 cards all made from 1 collection pack, by only adding a few bits of plain cardstock and some embellishments. And I still have these bits leftover for fun birthday cards:


I think it works out as great value for money and it also takes out a lot of the hard work of matching up supplies too! You can see lots more collection kits HERE - there's a variety to suit all tastes and themes!

I hope you've enjoyed this series. I'd love to know if you have used up a kit like this, and how much you got out of it too. If you link up in the comments we'll come and take a look!

Bye for now,

Lisa-Jane

Lisa-Jane blogs about her life and crafting at her inspiring blog Inside My Head. Check it out!

Tuesday 24 September 2013

A Perfect Summer (Part 3)

Hi Everyone! 

Lisa-Jane here today, with more layouts for my challenge to see how many layouts and projects I can make from just 1 collection pack! 

I'm using Echo Park's A Perfect Summer Collection, which started as a pack of 12 double sided papers and 2 sticker sheets. You can see my other posts and layouts here and here. I have added plain cardstock and the odd extra embellishment here and there but predominantly my supplies are all from the pack.  

When I started this challenge, the photos and colours were perfect for the sunny weather we were enjoying. Now I am so grateful for this collection to cheer me up from the awful drizzle outside!

These layouts are my 7th and 8th from this collection, so I am using offcuts in both of these pages. I also made 2 cards (I'm sorry but I was unable to photograph the cards before sending to the recipients due to a poorly camera!!)

Here I've used one of the stickers layered up on a banner strip to make the title, and then a small piece that I gutted from the sunshine paper makes a great home for my journalling:  


I love the cute bunting stickers on the alphabet sheet, because they are so perfect for a little spot of embellishment in an opposing corner.  I've added a few gems and of course the background kraft cardstock but that is all.  Not bad from leftovers!


For the next layout I was inspired by Glitter Girl's use of borders in a recent video, so I layered up some border stickers with some longer scraps. Actually that stripy piece is two small pieces but we'll just keep that secret between you and I, okay?


The large amount of teeny letter stickers meant that I could easily spell out the 3 different types of crab that we handled on a boat trip one day. I make no apology for using pinwheels again because this layout is the first of many for our 2013 holiday album. They use such small pieces of paper and make a great impact on a Summery page - perfect for a layout about a windy boat trip:


The cut-apart sheet provided the title card and a little space for a sentence or two.  Here I only added a sheet of kraft, a couple of buttons and some twine to finish off.

I hope these sunny layouts cheer you up if you are adjusting to the suddenly Autumnal weather!

I still have some scraps of papers and stickers so check back for the final instalment later this week!

Bye for now,

Lisa-Jane

See more of Lisa-Jane's wonderful creations on her blog: Inside My Head 

Thursday 5 September 2013

A Perfect Summer (Part 2)

Helloooo - thanks for popping over to see what else I made with Echo Park's "A Perfect Summer" Collection.
 
If you missed it, you can also catch up on my last post to see my first two layouts.
 
Okay, I admit it, I love this collection.  I was embracing the sunny weather and the bright colours of the line and I decided to see just how many layouts I could get out of one collection pack.  
 
 
Swim - Fun - Sunshine - Happy

I loved the little fishy paper because it has a theme but yet it is relatively subtle about it.  The colours were perfect for these rainbow paddling pool photos too.  I used one of the journalling cards from the cut apart sheet to do double duty as my title and added some WRMK washi tape and ribbon from my stash.


The matching fishy stickers that were in the kit were raised up on pop dots and then I added some gems for little bubbles.  I love the strong blue in the patterned paper on the banner piece!


I Love Summer ....
 
I wanted to keep the sunshine paper as a whole piece but it had a lovely ice-cream print on the other side which I also wanted to use!  I gutted a panel from the bottom left area so I could turn it over and use the ice cream design to mat my photo. Adding a piece of red and blue cardstock behind my photo helped to cover the hole left in the sunshine paper.  This is a great technique when you want to use both designs of a double sided paper but you  only have one sheet of it.


For my title I sectioned up a border strip from the cut-apart sheet and embellished 3 areas with some of the fun stickers. The kit includes two 12" x 12" sheet packed with fab little stickers.


To highlight the wonderful sun rays, I hand stitched around the sun and a little way up some of the rays to add texture and interest.
I used a similar stitching technique on this layout.


Now, how about something completely different?  
So far, I've made all summer themed layouts but I want to show you just how versatile this collection is.
 
Cherry Tree
 
I fell in love with this dark pink woodgrain paper and the little cherry print paper and I had the perfect photo for it.  It's actually a picture taken in the Spring and the layout focuses on the cherry tree that the school uses as a backdrop for the Easter bonnet photographs. As always with Echo Park, the papers are often suitable for more than is immediately obvious. Just because it's packaged as a summer collection or an Autumn collection certainly does not restrict your layouts.


I made a messy stack with some embossed pale pink cardstock and picked out the turquoise of the sky with the coordinating letter stickers and chevrons from the sticker sheet.  I added some very old Dear Lizzy rub-ons and cherry print ribbon for a layout with lots of negative space.


Next to this one in my album will be this coordinating page.  Its not a double page but I wanted to continue some of the colours and papers with the photos from the same day.  I made a pocket for lots of photos that are pretty poor but are special visual reminders of school life and friendships.  It was an idea that I used before during Shimelle Laine's 4x6 Photo Love class.


I edged the pocket with Glitz washi tape and again used the sticker sheets for the title and to embellish the tops of the inserts.  I finally used up all my rub-ons to embellish the background.


I've still got papers and stickers left and I am working on a couple more projects so I am getting a LOT out of this kit.  
 
Check back soon to see what else I made!
 
Don't forget it's Six on the 6th tomorrow!!
 
Have a wonderful day!
 
Lisa-Jane x
 
See more of LJ's blogging and creating on her blog: Inside My Head