Showing posts with label tutorial. Show all posts

Saturday, 10 May 2014

A "Grid" Layout with Hello Sunshine

Recently I ran a workshop at the Wilton Crop. 
We used the lovely Pink Paislee "Hello Sunshine" Papers and a selection of journal cards from Pink Paislee and Simple Stories with a focus on a grid design to create a quick layout for multiple photos.

Here's the layout and instructions should you wish to make a similar page.


Start off by "gutting" the sheet of "Hello Sunshine" paper and saving the middle piece for use on another layout. Of course, you can use a different patterned paper if you wish. Next, trim half an inch off two sides of the white cardstock so that there is a small border of stripes showing when the cardstock is adhered centrally on top of the paper.


Decide which 3" x 4" journal cards to use and crop the photos to size (if you've not already printed them to the size you want) and work out where they will all go in your grid design before starting to stick anything down. 

On my layout I had two rows of 4" high but the top row was only 3" high - this allows for a small border around the layout. You could put a 3" high row in the middle instead but it worked better for my photos and cards to have this arrangement.


You will see from the above photo that I opted to use a 6" x 4" photograph instead of two small photos or you could have 1 small photo and 1 journal card in that space instead. You can choose which ever arrangement suits your photos and the cards you wish to use.

Before sticking everything in place I rounded the corners using a Project Life Corner Rounder and also popped a doilie (cut in half) under the photos/cards each side to add some extra interest.


Add your title - this doesn't have to be in the top centre space - originally I was going to put it in the centre spot but then decided to swap it with the photo.

I chose the title "Whatever the Weather" as my layout is about how my daughter loves to go to the beach no matter what the weather is like .... even on chilly days she will go in the water and happily play on the beach.

I will add some handwritten journalling to that card with the umbrellas and rainbows on over on the right hand side before putting it away in my album.

All that is left to do is add some embellishments. I used some "Hello Sunshine" chipboard, Simple Stories DIY Boutique Brad, Studio Calico Wood heart and arrow and cut the black banner and little black arrow from scraps of paper using the Project Life Nesting die set.

Add embellishments on top of the doilies and overlapping the edge of the photos to help draw the eye towards your main photo(s)


If you do have a go at making a grid layout, please do leave a link in the comments so I can pop over and see or post your "grid" layout to the S J Crafts facebook Page.

Before I go ... don't forget there's FREE Postage and Packing over at the shop all this weekend when you spend £15 or more!! Offer ends 10am Monday 12 May!

Sarah x

Friday, 21 June 2013

Crate Washi Paper - 10 tips in 10 minutes!

Hello!

Jennifer here today, to show you a video:

Crate Washi Paper -  Ten Tips in Ten Minutes

 10 ideas to use Crate Paper's The Pier Washi Paper on your layouts

I changed a page from this:


To this:


Using just this washi paper:


Plus a few tools, and some gems and enamel dots!


Here's the video:


Okay, so it does go ever so slightly over ten minutes because of the images I added for the 'tip' title pages. I also sped some of the video up - so you can watch ten tips in ten minutes but it might take you a little longer than 10 minutes to actually use all these ideas! Of course you can just choose a tip or two to add quickly to your next project.

Here's a couple of detail photos:


You can see "The Pier" collection here! I'm loving it!!
If you make something inspired by anything you've seen in the video let us know - we'd love to see!!

Jennifer x

See more of Jennifer's craft on her blog: Jennifer Grace Creates

Friday, 26 April 2013

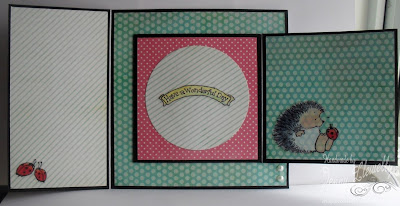
Joy Fold Card Tutorial

 
Hello and a very Happy Friday to you!
It's Jenny here today  with a tutorial to show you how to make a Joy Fold card.
This is a great design when you want to make a special card for someone or something a little different!


To start off with you will need 2 different sizes of card blanks.


  I've used a 135mm square and a 96 mm square card blank.
Take your biggest card and cut half of the front piece off. 
This is shown on the bottom card in the photo below.


Next you need to pretty up your card blanks I've used papers from My Minds Eye - Collectable - Memorable 6 x 6 pad. You will need to cover the fronts as well as the insides of both card blanks. You can create a small border if you wish by matting and layering.


Now position the smaller card blank on top of the larger one as above and stick down.
The front of the biggest card blank (the piece you cut in half earlier) closes over the back of the smaller card blank as shown below.


Next you will need to attach something to the front which will act as a catch to hold the front of the smaller card shut. I've used a sentiment to hold mine closed but you could use some other kind of embellishment. I've raised my sentiment up on foam pads to allow room for the front to slide under it.


Here's my card closed up ready to decorate. I have used some Penny Black Stickers on the front and again on the inside. The only other thing I added to mine was some self adhesive pearls.


I hope you might have a go at  makingthis style of card ... if you do I would love to see it. Why not leave a link in your comment to your card made following this tutorial so we can pop by and see it!
 
The S J Crafts Design Team have all been busy making samples for our Brand New Sketch Challenge which is coming very soon .... and there's a prize for one lucky sketch challenge entry! So keep an eye out for that!
 
Have a wonderful day!
Jenny x
 
See more of Jenny's crafting over on her blog : Dragonllew's Spot


Wednesday, 9 January 2013

Studio Calico Burst Mask - Part 2


Hello! Jennifer here, and I'm back with some more Studio Calico Burst Mask Projects!

If you missed the first part, you can find that here.

 For this next project, I decided to try something other than misting. I played with some stamping through the mask instead!

Step 1: Take a 4.5" square piece of white cardstock, and position your burst mask on top. My mask still has ink on it from where I had been trying different stamps out earlier!


Step 2: Stamp all over the mask with a rubber stamp, using a few different colours of ink pad. I used blue, yellow, and pink. The rubber stamp needs to be one with a deep design - the flatter ones won't press down enough between the mask's gaps.


Here's the card with the mask removed.


Step 3: To finish the card off, sew some straight lines in the gaps between the stamped bursts. Add a brad in the centre. Then ink the edges of the white cardstock with pink ink, and mat it onto a piece of 5" square blue cardstock. Mount it onto a 5.5" white square card.


I'll keep this card on standby to send to someone who needs cheering up with a burst of colour!


Next, I wanted to try something a bit different so I used the burst mask to make my own unique t-shirt.


It was great fun and I love the final effect! I'm going to show you how it's done - but first of all I must point out that you can't use regular scrapbooking mists on a t-shirt that you'll want to wash. They'd wash right out! You need to get some fabric spray paint and follow manufacturers instructions for drying / setting the paint.


Step 1: Protect your work surface (and it's a good idea to wear your old clothes!!) and put newspaper or similar inside your t-shirt so the paint doesn't bleed through. Then place your mask on the t shirt where you want it to go.


Step 2: Spray all over your mask going over the edges a little, with yellow fabric spray paint.


Step 3: Spray the centre of your mask with orange fabric spray paint.


Step 4: Take the lid off your orange fabric spray paint and tap it above the t-shirt so you get little drops all over it.


Step 5: Take the mask off. Just after this photo I also sprayed a couple of times with the yellow fabric spray paint, from high above, so the t-shirt wasn't quite so stark white where the mask had been.


Step 6: Leave the t-shirt to dry, or follow the fabric paint instructions for how to dry / set the paint. Sew on a few scattered orange and yellow buttons, and your new t shirt is ready to wear! 

My Mum kindly modelled it for me!!


Thanks so much for reading my Studio Calico Burst Mask projects - let us know what you think about them and whether they've inspired you to make something! 

Jennifer X

See more of Jennifer's crafting at Jennifer's Jumbles

Saturday, 5 January 2013

Studio Calico Burst Mask - Part 1


Hello, Jennifer here!

I hope you've had a wonderful Christmas and 2013 is bringing you lots of happiness and crafting time!!

I've been having some fabulous fun playing with the Studio Calico Burst Mask! I've got several projects and ideas to show you, and first up are are two layouts.

Magical Moments Layout


For this first layout, about my daughter at a Christmas parade, I used the mask in the simplest way - to fill the whole page. I began by spraying the back of the mask with removeable adhesive, to stop the mask moving as I misted, and I stuck it onto a piece of white cardstock.


I protected my surface with newspaper, and then spritzed all over the mask with Mr Huey's Honor Society Mist. To get an even coverage you need to move your hand quickly from left to right (or from right to left if you're left handed) as you are spraying.

Once the blue mist had dried a little, I carefully pulled the mask off. Remember not to leave the mask on too long if you've used adhesive on it, as it will end up getting stuck forever! About 5 minutes after misting should be okay. I then left the mist to dry completely for about an hour.

Once the blue mist was dry, I unscrewed the lids of Mister Huey's Calico White and Pretty Pink Mists, held the 'straws' over the layout, and tapped the lids with my finger to sprinkle drops of mist all over the page.


Once it was completely dry I trimmed the a little off each side, and mounted it onto some mauve cardstock. 

Then I just had to add my photo and embellish the layout!
I used: My Mind's Eye All is Bright stickers from the Collection pack 
MME Rhinestones and 6x6 Paper (for the journaling)
and a few Hero Arts Clear Gemstones!


Little Angel Layout

For my next layout, I used the mask in a few different ways...


To start this layout, about my son when he was first born, I first misted a starburst in the top left corner. I covered the parts of the mask where I didn't want the mist to seep through. It's worth testing this on a spare piece of paper to check you get the size/shape you want. Once I had done my "test" piece I cleaned the mask and placed it on the piece of Sugar Cookie cardstock (I covered up the other holes too after taking this photo) 


And then sprayed it a couple of times in the middle with Honor Society Mist. I pulled the mask off while the mist was still wet, and used the 'straw' of the Calico White Mist to flick streaks from the middle of the starbust out to the edges  - make sure you clean the 'straw' before you put it back in the bottle!!


Next I created an a mat for the journalling, by blocking off all of the mask except one section of the 'burst'.


 And then I sprayed this with My Huey Letter Jacket Mist. 

A little word of warning if you do have a go at this technique - spray quite lightly.

On my first attempt I sprayed on way too much mist and it seeped below the mask and ended up looking like this!!


Not the look I was going for! 
On my next attempt I was much more sparing with the mist and it came out much better.

I used another section on the burst as a template to cut out a piece of Studio Calico Hey Day 6x6 paper.


Which I placed below the red misted section


And added a piece of My Mind's Eye All is Bright Decorative Tape above the red section.

I checked where my photo was going to go, and added some detail to the top right corner, by covering up most of the Starburst Mask, leaving just a small arrow shape to point down at my photo.


I misted the "arrow" with Warm Calico Mist, and then outlined with a black pen so it was extra defined, and topped with a little sticker.

I then just off the layout, adding some droplets of White Calico Mist, and using the same stickers and alphas as the last layout, plus some All is Bright Decorative Brads. The cherub image was especially apt for the layout.


Hopefully this post has given you a few ideas for using the mask. I've used lots of ways all on one layout but you could use just one of the techniques.
I'll be back soon with some more ways to use the mask! 

Jennifer x


Studio Calico ~ Burst Mask ~ *New*

See more of Jennifer's crafting on her blog: Jennifer's Jumbles

Tuesday, 30 October 2012

Colouring with Distress Inks

It's no secret that I love distress inks!
When I first met Jenny a while back now, she had just a couple of distress ink pads and confided in me that she wasn't really sure what to do with them. If you have seen Jenny's demos or taken one of her classes at our Open Days or if you follow her wonderful blog, you will know what a "whizz" she is colouring with promarkers!

So, when Jenny put together this colouring tutorial I was very happy! Although I think Jenny will always prefer her promarkers it is obvious those distress ink pads are slowly taking over her craft desk!! lol!!

Over to Jenny ...


"A few months ago I only had 2 distress inks pads, today I have a collection of 13!! It seems they have become a staple item to my crafting. I know I'm a little behind the times but they frightened me at first. I saw all the amazing results other people got with them and thought there was no way I could do the same but slowly I have gained more confidence with them and now use them on most of my cards"

For this card, I stamped the image in Memento Rich Cocoa onto some Kraft card.


I used a water brush and a piece of laminated card, or you can use a craft sheet. I pressed the ink pad onto the laminated card, making a "splodge" of colour and then used my water brush to put some water onto the ink and started to colour. I've found it best to start off pale as you can always add more colour. Remember, the more water the paler the colour. For this image I used the following distress ink colours Iced Spruce, Peeled Paint, Wild Honey, Weathered Wood, Brushed Corduroy & Festive Berries


Here's the finished card!

I have inked the edges of the Kraft using the blending tool with Brushed Corduroy ink pad (it doesn't look so dark in real life) and then mounted it onto some dark brown card, stamped Happy Birthday in memento ink and stapled a piece of jute across the card.

Have you tried colouring with distress inks?

Thanks for stopping by today!
Jenny x

Tuesday, 3 July 2012

UK Scrappers Blog Hop!

Hello and welcome! 
Today we are excited to be participating in the UK Scrappers Blog Hop. If you are following the hop you should have arrived here from Sir Stampalot!!  To be in with a chance of winning the UKS Blog Hop prizes you will need to comment on this post (and on all the blogs in the hop) and remember to mention your UKS user name in your comment. Finally be sure to reply in the UKS thread on the forum when you have completed the hop.

After your visit here hop on to That's Crafty and if you lose your way or you want to start at the beginning of the hop you can find the complete list here!

We are also offering 20% off all orders placed via our online shop with the code UKSBLOGHOP entered during checkout.  The code is valid right up until 11pm on Thursday 5th July.

Our project for you today is a fairly quick layout - it took me just over an hour (excluding drying time!) to complete! We'd love you to have a go too!!

"Summer Days" Layout


This is the kit of supplies that I gathered together:
2 x patterned papers - Try to pick one bold and and one more subtle pattern. My patterned papers are from Echo Park So Happy Together
1 x bazzill cardstock (12 x 12) (for your background) and 1 scrap of cardstock - (I didn't use the green on this layout in the end so just ignore that in the pic!)
A sheet of journalling cards (mine is "jot it down" by Echo Park)
Selection of Stickers - I picked out the alphas and stickers from Echo Park's Hello Summer and So Happy Together. I love how these two collections work so well together.
Stamp Set - My stamps are from My Minds Eye, Miss Caroline. You will need a stamp for the background and this set also has a "date" and "place" stamp but you can leave these out if you don't have them.
Paint Dabber - I used Jenni Bowlin in speckled egg
Pink Gems - Mine are by Hero Arts
Washi Tape
Photograph- 1 x 6" x 4" Portrait


So, onto making the layout:
Choose your back ground cardstock (I used a sheet of kraft bazzill) and cut 2 panels from the patterned paper and scrap cardstock (or you could use another pattern instead of cardstock if you prefer). The sizes were approx 13cm x 17cm and 12cm x 16.5cm but if you are using a different size photo just adjust the sizes appropriately. 
Choose and cut out a journalling card from the 12 x 12 sheet.


Mat your photograph onto a piece of patterned paper (a more subtle pattern works better) and adhere to the other 2 panels. Don't put adhesive on the edges of the paper so you can slightly lift the corners to give some texture and also if you want to tuck anything under later.  

Position on your background cardstock (but don't stick it down just yet) and lightly mark with a pencil where your photo mat will be and then put it safely to one side whilst you apply the paint in the next step!


Stamp your background stamp using the paint dabber to apply paint to the stamp (instead of ink) and then take the lid off the bottle and dip a paintbrush into the paint and gently flick onto the cardstock. You might want to practice this on scrap card if you've not created paint splatters like this before!
Use you pencil marks to help you get the paint where you want it to show!


Once the paint is dry adhere your photo mat to the background and add a title. I used the "Summer" sticker and the small blue alphas so I could raise it with foam pads.
Choose a border sticker and tuck this under the bottom edge of the photo mat with a strip of washi tape to soften the edges a little. I tore the tape but you can cut it if you prefer a neater edge.


Apply paint to the date and place stamp and stamp onto journalling card. If you don't have stamps for this, handwrite them onto the card or you could journal onto the card instead.


Cut small strips of patterned paper and layer up on the top edge with a small piece of tape and add a punched butterfly (or a small embellishment). I used my Martha Stewart punch.
Add the journal card tucking it under the photo mat and tuck a small piece of border sticker and washi tape under the card.


Add few more stickers, raising some up on foam pads and scatter punched butterflies and gemstones to finish.


I hope you've enjoyed our step by step instructions and if you do make a layout using them do let us know if the comments so we can come and see!

So, if you're following the blog hop, your next stop is That's Crafty

That's for stopping by!