Friday 24 August 2012

6 x 6 Celebration - Part 1


Hello, Lisa-Jane here today!
Have I ever told you how much I love 6x6 paper pads? If you already follow my blog you will know I'm rather fond of them. I LOVE them! A lot!

Many people don't realise that these pads are not just quarter sheets but a scaled down version of the 12x12 design.  This makes an incredible difference to how easy they are to use in so many projects and it also makes bolder patterns easier on the eye and less intimidating than on the larger scale.  The miniaturised design gives a denser pattern making them ideal for making coordinating embellishments and die cutting smaller items.

6 x 6 papers with matching 12 x 12 to show scaled down designs!

Cost wise it can work out a great investment too.  The Echo Park Everyday Eclectic Collection that I used contains 24 double sided sheets and is just £6.20!  You get all of the designs in the collection so you don't have to make tricky decisions on which sheets to buy and miss out on any of the gorgeous patterns.  

Cutting into a single sheet of 6x6 is much easier on the heart too - I find I don't squeal like I do when I cut a full sheet of 12x12!  I did all these projects using one pad plus bits from my stash and the coordinating stickers and I still have a few bits left so it is definitely worth it.  I also bought the 12 x 12 collection kit which I love too, and using them together with the 6x6 pad makes them go a LOT further so that's a great reason to purchase both sizes!

So lets have a look at some projects shall we?

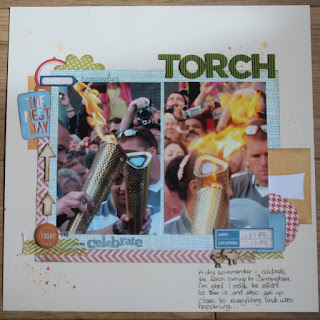
One of my favourite ways of using 6x6 pads is in a quadrant design.  You have a ready made coordinating set so just choose 4 designs and you're good to go.  To make a background you can either go overlapping or straight on, and either edge to edge or with a small border as I have here.  I trimmed off half an inch from 2 edges of each piece and stuck them to the corner of a piece of cardstock that I wasn't keen on.  I trimmed the egdes off and I effectively had an 11 inch square of patterned paper.


I gutted a 10 inch square from the middle of a piece of white cardstock so that I could use the inner portion for a photo mat.  This might seem like a palaver but the patterned paper needs something to adhere to and I  don't like wasting cardstock that I know I will use when I have colours and bashed or marked pieces that I don't want on show.  I'm all for using everything and getting the most out of your stash!


Once you have your quadrant background you can build up your layers and embellishments any way you like.  I used a another design from the pad for this layout and then I turned to the 12x12 collection for the journalling card which I made into a pocket.  I also used a 12 x 12 sheet to make the scalloped border in the same pattern as the orange quadrant so that you get the contrast of the 2 patterns but with careful joining or strategically placed embellishments you can make a border from a 6x6 sheet too. Just cut two 6" borders and carefully place together to make a 12" length!


Of course, I haven't ditched my trimmings from the 6x6 papers - I  layered up a couple of little pennant style flags and added a couple of pins and gems.  The rest of those edge trimmings?  You'll see them again in another layout later. 


Of course, lots of people use 6x6 pads for card making and they are absolutely wonderful for that too, again because of their handy size.  I recently made matching tags and cards for my son's teachers for leaving presents.  I wouldn't want to cut into a 12x12 page for a single tag and a couple of little die cuts but using the 6x6 pads make great economical sense here and I can go to town with how many different designs I use.  The pink labels are the reverse of one of the other designs so everything stays perfectly coordinated.


I used pop dots to add dimension on the die cuts and inked all the edges with faded jeans distress ink.

So that's cards/tags and quadrants covered but there are many more ways to get the most from your 6x6 pads, which I'll cover in Parts 2 & 3, so I hope you'll come back for those!

Lisa-Jane
x

Thursday 23 August 2012

Winners for Challenge 7 'The Olympics'

Hi Everyone!
It's Jenny here with the winners for Challenge 7 'The Olympics'

Our winner of a 6 x 6 Pad (of the winners choice from the shop!) , selected using random.org is.....

No 3!!
Thats Candace !!!  Well Done!

Please e mail sarah at sj papercrafts (dot) co (dot) uk and with your address details to send you your prize!       

The TOP 3!!

The Design Team enjoyed visiting your blogs and have helped me select the following 3 projects as our Favourites!!

Number 17 - Kate Wiles


Number 14 Jackie A


Number 26 Heathcliff


Congratulations to all the Top 3 entries!! 

If you would like to display our "Top 3" badge on your blog please e mail me sarah at s j papercrafts (dot) co (dot) uk and we'll get it sent to you!!


Our current challenge is still open here! You've still got plenty of time to enter!

Have a great day!


Wednesday 22 August 2012

Little Bo Peep ... A mini book and more!!

Hello Everyone!!
When the new collection from Crate Paper, Little Bo Peep landed here at S J Crafts, I just knew DT Team member, Jennifer would create something beautiful with it, so I sent her a parcel of goodies. I wasn't wrong!!

Over to Jennifer .....

Ooh, how pretty and lovely is the Little Bo Peep collection from Crate Paper?! When I opened the parcel containing it I just had to sit and stroke the papers, and show all the lovely embellies off to my friends, before I could start to use it! But once I started creating with it, I just couldn't stop...

First up is a mini book I made using the Tag Cuts sheet of paper. It's all about my daughter in the months before she finished nursery (pre-school), to capture some cute 'little girl' moments before she grows up even more! I'm going to give this as a gift to my Mother-In-Law, her Nanny:


I cut out the tags I liked, stitched a variety of lace to the bottom edges, chose small square photos, and embellished with Border StickersPhrase StickersBrads, and gems / pearls.


There are two tags without photos, on at the front and one at the back of the mini book. All of the tags have journaling on the back, some stories I might not have mentioned to my Mother-In-Law, and some thoughts about my daughter getting so grown up:


I finished it off by joining them all together with a book ring and adding some strips of ribbon to the ring to soften it. I hope my Mother In Law likes the book!

I also dug out some photos of my daughter when she was small, about 5 months old, that I've been meaning to scrapbook for ages, to create this page:


I cut half an inch at the top of a sheet of Charlotte paper, so that I could stick lots of small tags from the Tag Cuts sheet along the top, with their edges sticking over to create a shaped edge, and it wouldn't make the page larger than 12x12. Border Stickers, and some dresses on a washing line cut from the Accent Cuts sheet, were layered at the base of the tags. 

The rest of the page is not too detailed. I added white dots using Mister Huey White Mist, by undoing the mist top, shaking of the excess into the bottle, and then tapping the base of the mist dropper/tube onto my page. To make larger dots I tapped a few times. I like how it looks to accent my usual scattered gems and pearls!

Isn't she cute as a button?!

I have one more project to show you today. Here's a sweet 'Congratulations' card for a new baby girl:


The image from the Accents Sheet is so adorable, and I love the colours in the floral Eleanorpaper. This card really makes me think of happy days from my childhood!

If you haven't bought any of the Little Bo Peep collection yet, then check it out here!! Even if you don't have any little girl photos to use or to give cards too, then you could use the lovely papers and border stickers for some gorgeous summertime projects!  x

***   ***   ***

To see more of Jennifer's work, why not visit her blog: Jennifer's Jumbles

Saturday 18 August 2012

For The Record 2

A very Happy Saturday to everyone!!!

Just a very quick post (in between packing orders!) to let you know that Echo Park's gorgeous new collection For The record 2 has arrived!!

We have both the Documented kits

Echo Park ~ For the Record 2 ~ Documented Collection Kit *New*


and the Tailored kits available

Echo Park ~ For the Record 2 ~ Tailored Collection Kit *New*


I've also restocked Everyday Eclectic kits

Echo Park ~ Everyday Eclectic ~ Collection Kit *New*


Watch out for more new goodies coming soon!!!

Enjoy your weekend!