Showing posts with label Annie. Show all posts

Thursday 13 March 2014

Adding Texture with Cork and Wood!

Hi everyone, Annie here today!

I love using natural materials like wood and cork to add texture and depth to a layout. You can leave them natural, or add colour and pattern to them by stamping, painting, inking and so on. For this layout, I've altered some wood and cork embellishments to suit the style of this page about my favourite Uncle ...


I still had loads of my February Kit left after using it to make my Flip Book Album, so I thought I would use some of it to make a page for Case File #113 over at CSI, because the bright pastels and all the butterflies in the Teresa Collins Daily Stories collection would be the perfect for the page I had in mind. Here are my leftovers ...


The kit included some Wood Veneer Butterflies by Studio Calico and a Prima Wood Word, and Sarah also sent me some Cork Sticker Butterflies to play with, so I thought it would be fun to mix it up and use the cork stickers and the wood veneers together.


I also threw in a handful of Wood Veneer Stars ... I love the contrast between the texture of the wood and the shiny Enamel Dots and Decorative Brads too - they really make you want to reach out and touch the page ... or is that just me?! :o)

The ledger paper from the collection made a perfect background for my layout and I used a couple of the cut-aparts and some scraps and offcuts to build up layers, distressing and inking the edges for extra dimension ...


Now for the butterflies to add a burst of colour and movement to my page ...


... some wood veneers, some cork stickers and some paper ones cut from a sheet of the patterned paper from the collection - these were lovely just as they were, but I couldn't resist experimenting with some Distress Inks, Paints and Stains ...


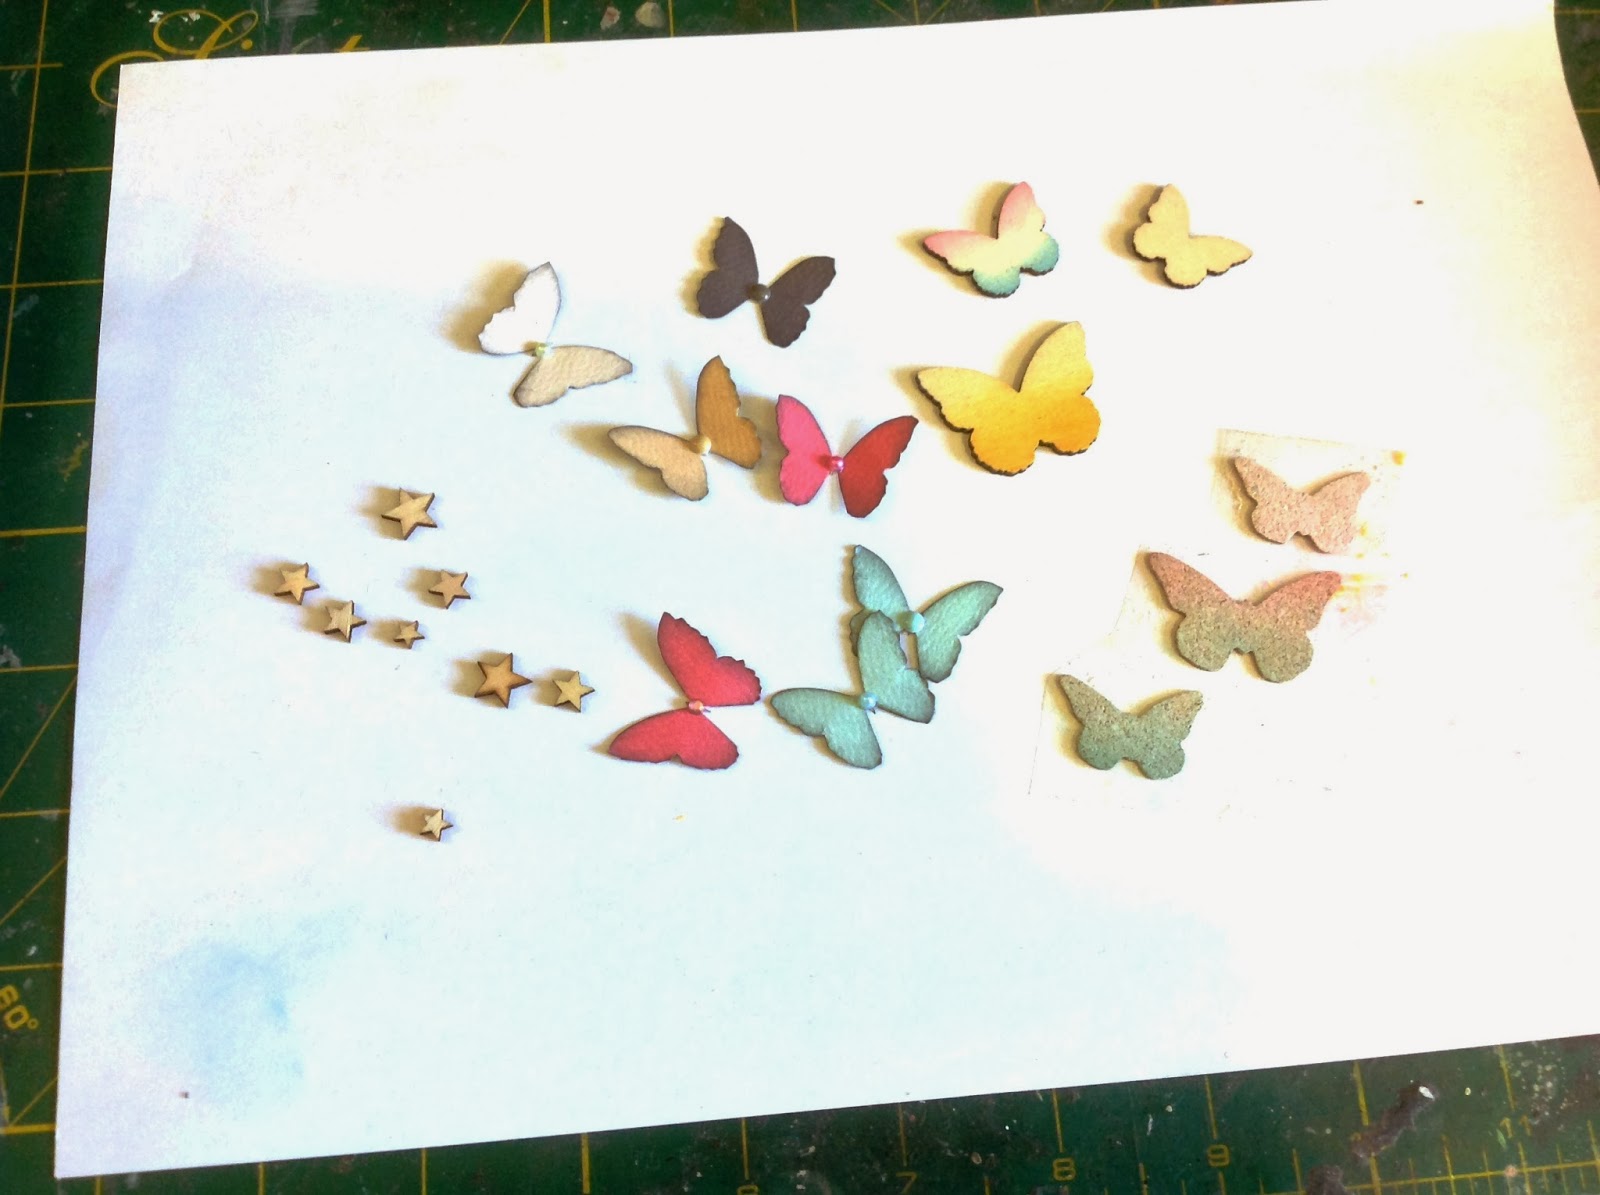
The paper ones were just inked all around the edges and finished with an enamel dot or pearl in the centre of each one. The wood and cork ones were given a base coat of Distress Stain in 'Picket Fence' and then I used different colours of Distress Ink and Paint to create an ombre effect - it looks much more subtle on the cork as you can see ...


To attach the paper butterflies to the layout, I added foam dots to the tops of the wings, then just a spot of glue to the centre - this lifts their wings off the page for a fluttery effect!

I love the look of the paper, wood and cork butterflies all mixed together and I'm sure there's lots more you could do with these - I might try stitching through the cork ones with embroidery thread and knotting it on the top ... now why didn't I think of that before?! 

Thanks for looking, and I hope you have fun playing with wood and cork on your pages!

Cheerio! Annie x

Annie recently joined the S J Crafts Design Team. She blogs her brilliant projects at her blog: Artyfarty Annie so please take a look there too! 

Friday 7 March 2014

Flippin' Fabulous Books!

Hi everyone, it's Annie here today with my first post as a member of the SJ Crafts Design Team!

Last weekend I had a lovely time trying out the new Teresa Collins Flip Book Album and I'm delighted with the end result! Here's a little peek ...

Front Cover with layered papers and embellishments from the 
Teresa Collins Daily Stories Collection in the February Kit 

These little books are SO cooool! The clever bit is all done for you, so all you have to do is add your photos and choose whether to keep it simple or embellish to heart's content ... guess which option I went for?!

The bare album is plain black, so would work with any photos, colour scheme and style you choose. To make my book, I decided to use the SJ Crafts February kit which features the Teresa Collins "Daily Stories" Collection - perfect! 

It's hard to see just how brilliant these albums are in a photo, so here is a little video of the Flip Book as it comes, along with the other ingredients I used ...


... and here's another little video showing you how my finished book turned out ...


Here are a couple more pics of the outside of the finished book and some tips and ideas on how to make one of these for yourself ...


Back Cover with an enamel butterfly highlight

Spine decorated with offcut and word sticker


The first thing I did was to work out how many photos I could fit in - I decided on 12 


... after working out roughly where they would go in the book ...


... I got started on the front cover ...


Being a frugal crafter, I "gutted" all the pieces of cardstock which made up the layers on my front cover, and I used the merchandising strips from the patterned papers as decorative borders - waste not, want not!

Here's an easy way to add a knotted ribbon ...


... just tie it in a loop like this, then snip it to the length you need and tuck the ends behind the card before adhering to the background ...


I layered up one of the cut-aparts, a die cut and some border strips, then added a photo of my happy husband and finished with enamel chevrons and a layered butterfly sticker - you wouldn't be able to add this much to the inside pages as it would interfere with the mechanism, but I felt I could go to town a bit on the front cover!


Then I moved on to the inside of my book ...


In the picture above, I've matted one of the patterned papers onto plain cardstock slightly smaller than the album page, then used the reverse of the patterned paper to matt the photo. Being frugal again, I cut the tag into two - saving the other piece to use on another page.


The photo mount was "gutted" as before, not just saving the inside piece to use somewhere else, but also cutting down on the overall thickness of the finished book. I used the extra-strong tape throughout this project, as it will be sent in the post and will need to stand up to quite a bit of handling. I always use a bone folder to burnish it down well, because this makes sure the tape is adhered firmly, and it makes the backing paper peel off more easily.

Another tip I find really useful is to just peel the backing tape part-way off, leaving the ends folded out to the sides as you can see above - then when you position it on the background it will allow a little movement to get it just where you want it ...


... and once you have it lined up perfectly, you can grab the ends and remove the backing tape!


I used a border punch on some of the offcuts of patterned paper and cardstock, using them to trim the facing pages ...


This clock face was a die cut from the kit - it was too white for my page, so I coloured it with Distress Ink in Antique Linen before attaching it to the patterned paper with one of the decorative brads. All the edges throughout the book were inked with Black Soot Distress Ink, because I hate to see raw edges!

I continued to work through the book like this, keeping embellishments very flat now on the inside pages but still using lots of layers ...


There are lots of patterns layered together in the pages above, but they all go together perfectly, finished with some ribbon, a little word diecut and an enamel dot.

In the page below left, I've used the other part of that tag I cut up earlier, as well as some more of the die cuts and cut-aparts. On the opposite page I was a bit crafty ...


... this tag was the right colours and I like the arrow, but it wasn't long enough and the word on it didn't fit my page - so, I cut it up, stretched it out and covered the offending word with an offcut of a contrasting paper - BINGO! - once I add the photo you won't see the join!

By now, my photos were getting bigger and the pages were getting smaller ...


... so I kept these pages very simple and just added some word stickers from the kit ...


Well, I think you can tell that I am totally smitten with these clever little flip books and I will definitely be doing some more - they would make lovely presents for Mothers' Day, or a Brag Book for Granny's handbag or a friends's birthday maybe.

They are available in two different sizes and you can Click Here to find them in the shop.

If you make one of these we'd love to see it - remember to leave a link in your comment or come and show 'n' tell on our Facebook page.

Cheerio for now.
Annie

Annie joined the S J Crafts Design Team last month. She regularly blogs over at her blog: Artyfarty Annie and she would love it if you popped over to say hi!

Tuesday 4 March 2014

March Challenge - A Photo Collage For Inspiration!

Welcome to our March challenge! 

Thank you to everyone who joined in with the February challenge, it was fabulous to see all the different takes on the sketch & we will show a few of our the entries and announce the winner here on the blog soon!

Here at S J Crafts we love a challenge. Something to take us out of our comfort zone or to encourage us to try something a little different.

Each month throughout the rest of 2014 we will set a challenge and we'd love it if you would play along and take up the challenge. Each month the challenge will vary - sometimes we'll have a sketch, sometimes a colour palette, a photo inspiration or a "recipe" of stash to use or maybe a technique.

At the end of the post there is "linky tool" for you to link up your challenge entry so we can pop along and see and we will feature a few of our favourite projects next month. We really hope lots of you will play along with us and take up the challenge!

For this challenge you need to use the below photo collage as inspiration, in any way you wish.


Your inspiration might be to scrap a photo of a place you love to visit.

Go for a walk at a location near where you live and take photos of your surroundings to make a layout.
Be inspired by the colours : blues, greys, beige, stone, cream.
Scrap  a photo which has no people in it.
Scrap a photo of a beach, sea, sky, clouds, sunset etc
Or you could take "water" as your theme
Or you could use the design of the collage as inspiration for your photo placement.
....or you may have your own idea!!


The wonderful Design Team have created some samples to get your ideas flowing! Here they are:


For Louise the photo collage made her think 'weather', 'blue', and 'clouds'. Her supplies include This Sheet of My Mind's Eye paper, and some Wood Veneers.


The design of the photo collage inspired Annie to make this really quick and simple multi-photo page - her layout has a large 'white space' on the left instead of a large photo, with small photos down the right-hand edge. Annie used the MME Chalk Studio 2 Collection.


Jennifer was inspired to use a photo from the beach, and to use muted colours - with darker colours at the bottom going to lighter 'sky' at the top. Her supplies include some Crate Paper The Pier Paper and Stickers, Prima Canvas Alphas, Jenni Bowlin Tiny Trims Rub Ons, and Simple Stories Chipboard Stickers.


Lisa-Jane was inspired to use wood veneers, woodgrain papers and sandy coloured embellishments to echo the natural textures in the inspiration photos. She also utilised the muted tones of Crate Paper's The Pier collection. 


Jimjams - Layout - Surf's Up! - Crate Paper Boys Rule - SJ Crafts

Jemma was inspired by the water ... to scrap an aquatic activity! She used Crate Paper's Boys Rule which was just the perfect colours for her photos - the papers were Zap,  Top Score, and Vellum Stars, and she used some of the Wood Embellishments and Stickers.


So, will you take up our challenge this month?


Our New Design Team member Annie is kindly offering a prize this month to celebrate joining the S J Crafts team. She will select one person at random from all those who link up to win a small prize!

Use the linky tool below to add a link to the blog post (or your gallery) with your layout or card and a link back to this post is much appreciated.

You will need to ensure your link is added by the 31st of March (11.59pm) and we'll select a few favourites to be featured in a post soon after.

Enjoy x

Monday 3 February 2014

February Challenge - A Sketch!

Welcome to our first challenge of 2014!!

Here at S J Crafts we love a challenge. Something to take us out of our comfort zone or to encourage us to try something a little different.

Each month throughout the rest of 2014 we will set a challenge and we'd love it if you would play along and take up the challenge. Each month the challenge will vary - sometimes we'll have a sketch, sometimes a colour palette, a photo inspiration or a "recipe" of stash to use or maybe a technique.

At the end of the post there is "linky tool" for you to link up your challenge entry so we can pop along and see and we will feature a few of our favourite projects next month. We really hope lots of you will play along with us and take up the challenge!


Our first challenge is a Sketch designed by DT member Jennifer and based on her "Muddy Puddles" scrapbook layout shown below, which was originally featured here!


To get you started here's a few samples from the S J Crafts Design Team:


Louise adapted the sketch to include more photographs. Her supplies included Simple Stories Say Cheese collection.


Jenny used My Minds Eye Cut & Paste 6" x 6" papers and Basic Grey Candy Buttons and shows how a layout sketch can be adapted for a card.


LJ's lovely page tells a great story and uses Echo Park's This and That Graceful collection.


This layout uses Simple Stories Daily Grind, Glitz heart washi tape and a sprinkling of enamel dots.


and from one of our new DT members: 

Annie


Annie's cute layout features Glitz Designs "Wild & Free" collection, some snippets from Simple Stories "Say Cheese" and My Mind's Eye "Chalk Studio" label stickers.


And this fab layout by our other new DT member: 

Jemma


Using Simple Stories (Urban Traveller & 24/Seven) and a few Crate Paper scraps, Jemma has created a super affect by dividing her photo into three sections.


So, will you take up our challenge this month?

Will you increase the photos, rotate it, flip it or stay true to the sketch?

Our New Design Team member Jemma is kindly offering a prize to celebrate joining the S J Crafts team. She will select one person at random from all those who link up to win a small prize!

Use the linky tool below to add a link to the blog post (or gallery) with your layout or card and a link back to this post is much appreciated.

You will need to ensure your link is added by 28th February (11.59pm) and we'll select a few favourites to be featured in a post soon after.

Enjoy x