Showing posts with label 12 x 12 collection kits. Show all posts

Friday 30 August 2013

A Perfect Summer!

Hi, Lisa-Jane here today!

Recently, Sarah asked me to create some layouts with the lovely Echo Park A Perfect Summer Collection Kit.

I had already seen this collection in the shop and fallen in love with its bright colours - but once it arrived and I opened it up, I loved it even more!  I really don't think that the little snippet you see on the front of the collection packs do them justice - I certainly appreciated the patterns a lot more on the full page and couldn't wait to get started.

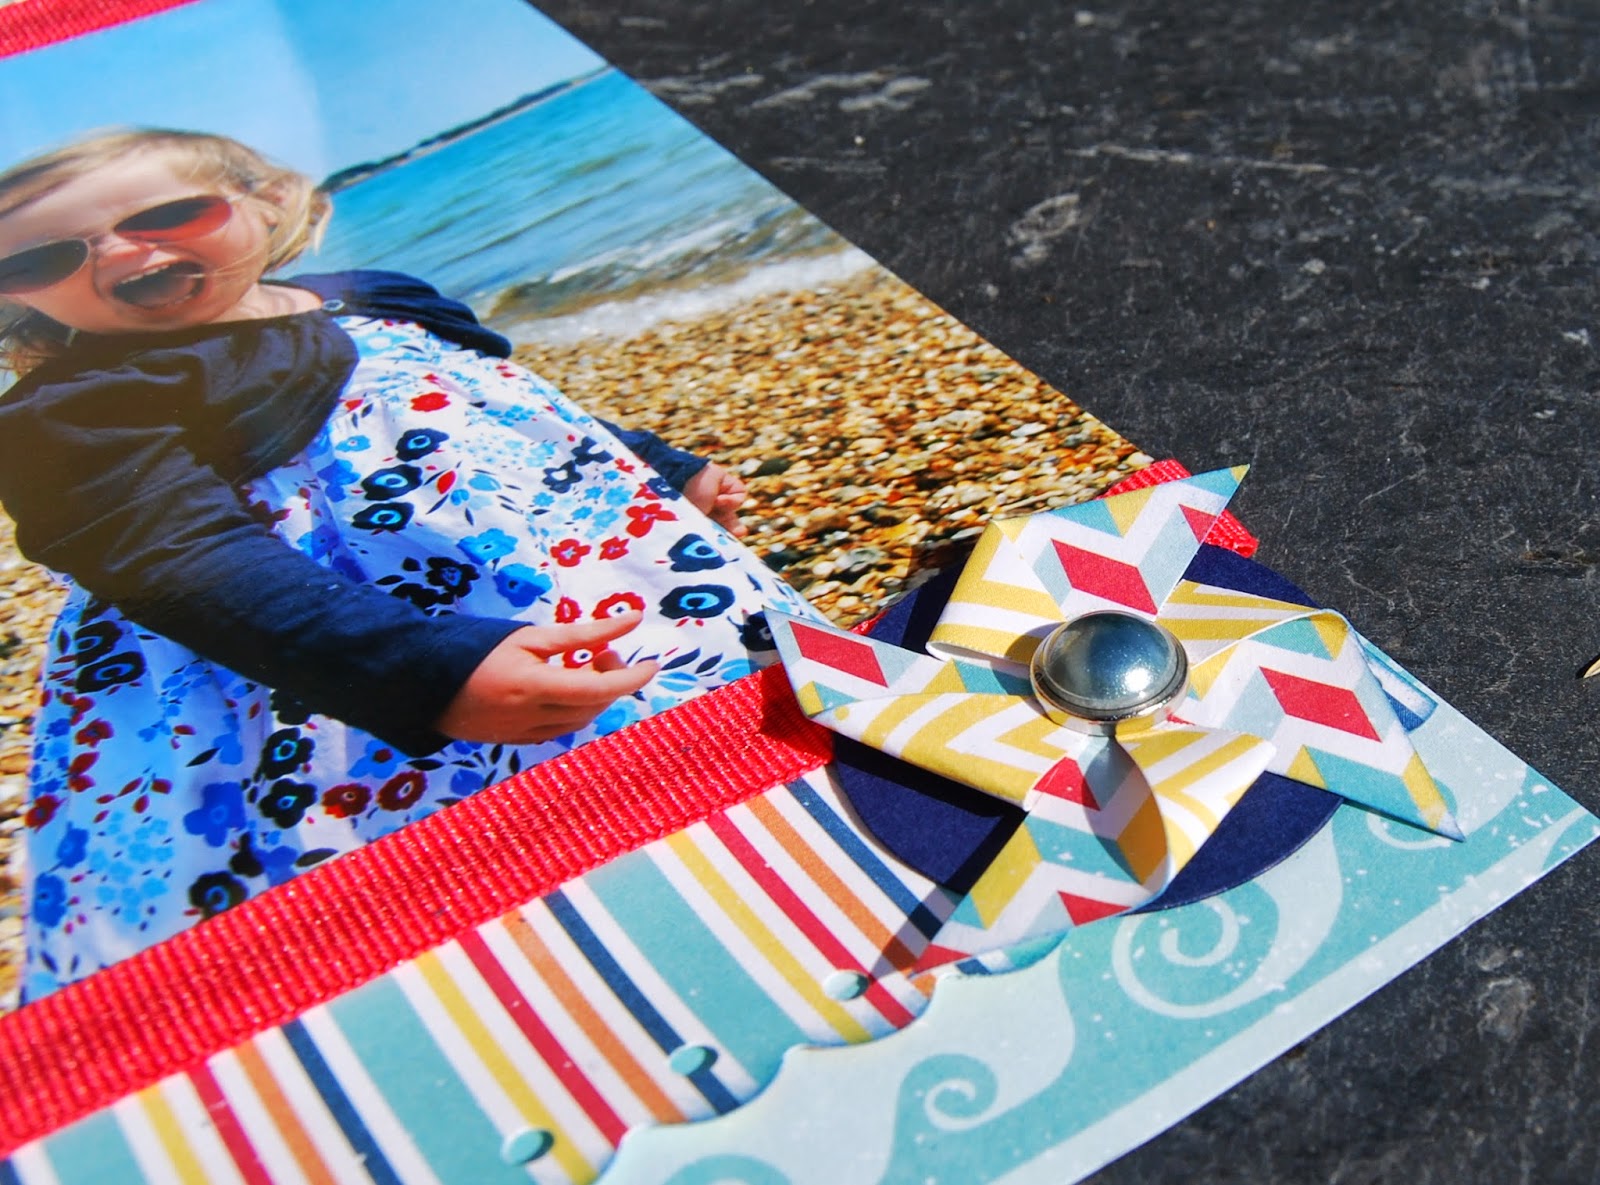
There is quite a lot of red, white and blue in this collection so it was absolutely perfect for some photos of my daughter in her pretty Jubilee dress.  The wave patterned paper is really great because it ties in with water themes of all sorts, not just summer, but isn't so themed that it is in your face and detracting from the layout itself.  The airmail postcard was the perfect place to journal too.


I added some ribbons and brads and made pin-wheels from very small pieces of the chevron paper.  I made the scalloped borders with my Fiskars Threading Water (Scalloped Lace) punch.


Although the collection is called "A Perfect Summer", I love that most of the papers and stickers are a lot more generic than purely sandcastles and sunglasses. 

This next layout is about my daughter being able to manipulate people with her cuddles and cuteness and is streetwise beyond her years when it comes to playing people.


I wanted to pick out the orange and turquoise in her outfit but, at the same time keep it subtle with the addition of the pale blues.  I added a few buttons, twine, brads and a charm from my stash to add lots of texture. I edged the gorgeous hot hair balloon paper with American Crafts ribbon and WRMK washi tape.


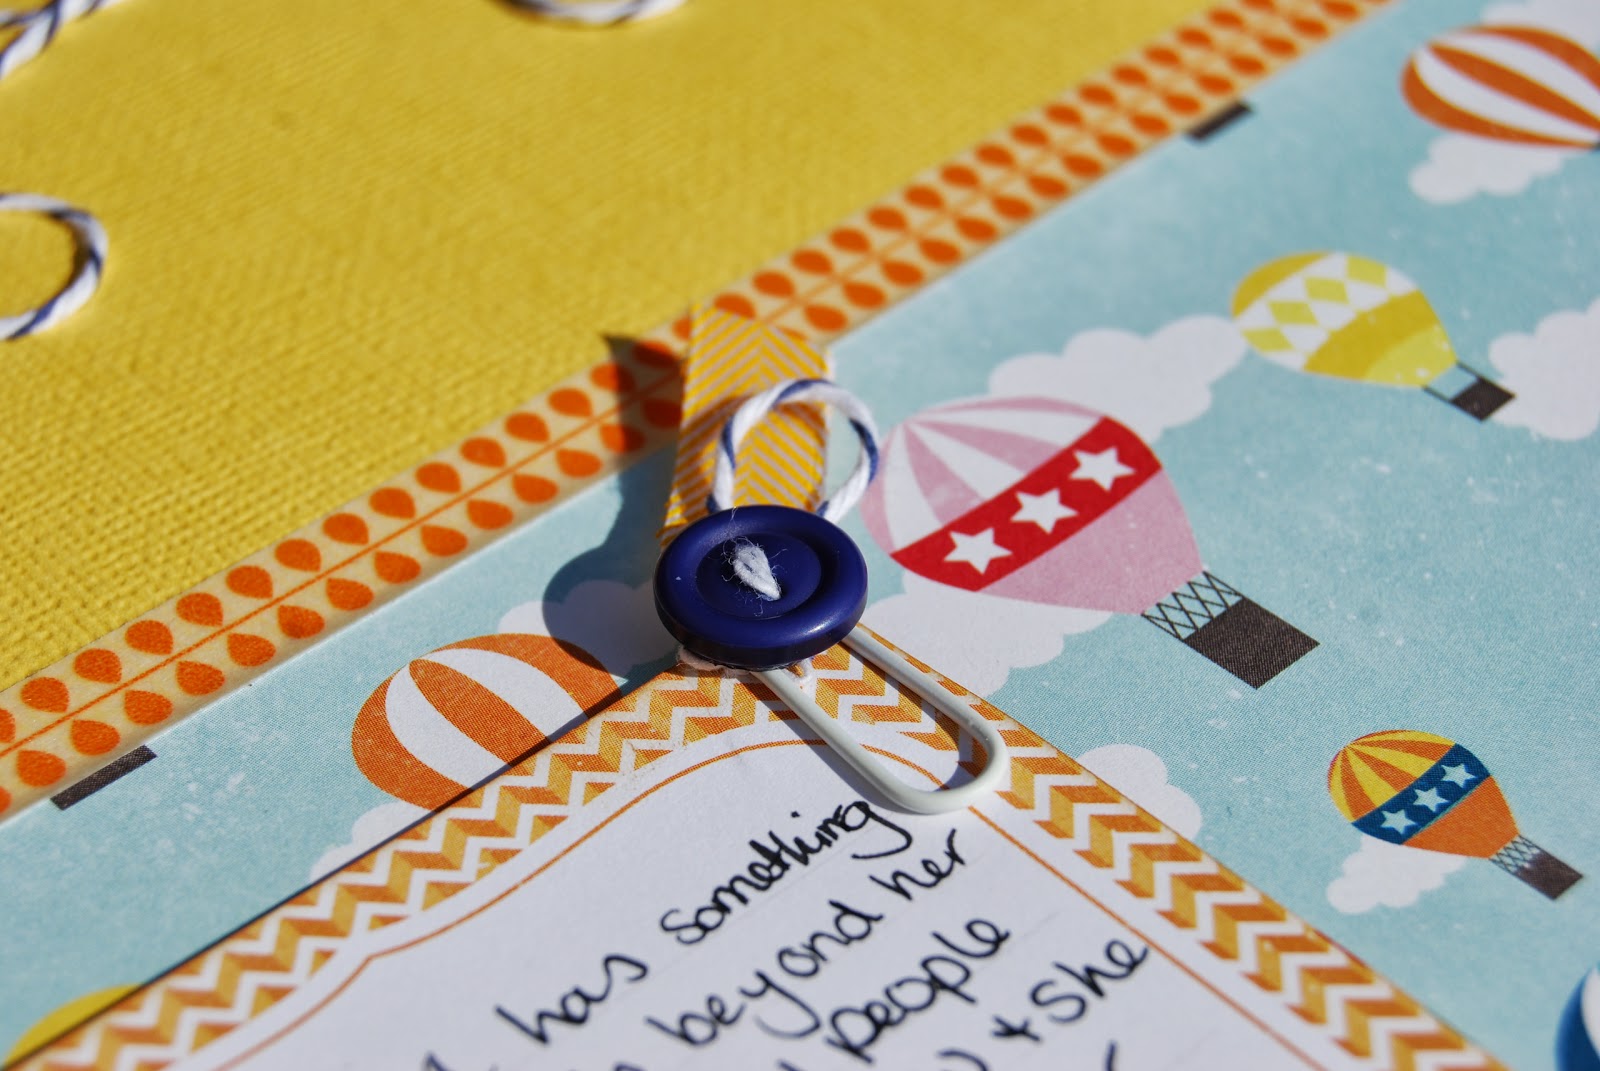
The lettering, hot air balloon and blue border along the bottom are all from the 2 co-ordinating sticker sheets that come in the collection pack.  I added the "Be Who You Are" stamp from the fabulous new Hero Arts 'My Notebook' stamp set - a wonderfully versatile and useful set


I'm busy working on more layouts with this collection so do check back soon for more colourful layouts.

Lisa-Jane x


DT member Lisa-Jane is Mum to two young children and regularly blogs at Come Inside My Head ..... she loves paper, writing and being creative in her lovely craft room!

Tuesday 18 June 2013

Carta Bella Boardwalk ~ Part 3

Hello and welcome back to the 3rd (& last) post in my series using the Carta Bella Collection Kit
 
If you missed them you can see Part 1 here and Part 2 is here!

When I originally planned to use the Carta Bella Collection Kit  I was thinking of my holiday album and the photos I had yet to scrap from a day at a Water Park. This collection has been a perfect match for my photos but it would also suit lots of other holiday destinations or you could scrap your summer days out using it.
Today I want to share with you two more 12x12 layouts, from another park ... Seaworld!! Again, Beach Boardwalk was perfect!!

When I first received the collection kit I noticed the reference to whales. Hmmm....Sea World came to mind! So, once I'd finished working on the Water Park layouts and the mini-book I found I had enough scraps for a double layout. I haven't made a double layout for a long long time and have recently been inspired by one of the other S J Crafts design team members Lisa-Jane, who creates amazing double layouts.

I had those adorable whale stickers and titles I wanted to use. Who'd have thought that I'd find whale stickers? Another reason why I love this collection so much.
 

Having a Whale of a Time at Seaworld Layout
 
All elements are from the collection kit, excluding the wood veneer hearts and arrows and the yellow bracket.
I stitched a pocket, so I am able to tuck away the journaling. Both pages have a pocket and the other one has a journaling card which the boys have written on from the entries they made in our travel journal.
 
A close up of the Whale Sticker - I love it and of course you don't have to have Whale photos to use it!


Relax & Enjoy the Show Layout


Using more of the kit elements & stickers this title quickly came together.


To bring these layouts together I wanted some elements to flow while still being able to keep the layouts individual. I placed a border on both edges and used panels of patterned papers. Each page hold's it own title while, I hope you agree, both titles complement each other. Having a Whale of a time at Seaworld - Relax and Enjoy the show. To join the two layouts together I have stitched a circle element across the pages.


A close up of the titles.....


and the stitching....


These layouts bring me to the end of my projects using the Carta Bella Collection Kit. In all, I have made four 12x12 layouts, one divided page with 4x6 pockets and a mini book. Not only is my holiday album filling up nicely I have layouts that I know I will enjoy for many, many years.

Thank you for stopping by and again thanks to Sarah for letting me work with a such a wonderful collection kit (have I told you how much I loved it!!).

I really do hope I have inspired you to try one of the Collection Kits in the SJ Crafts shop.

Louise x

See more of Louise's crafting at her blog: Boys, Bugs and Beautiful Buttons

Friday 7 June 2013

Beach Boardwalk Collection - Part 1 ~ By Louise

Hello Hello, Louise here today to share with you some of my projects made with the Carta Bella Beach Boardwalk Collection.

When Sarah emailed me to say she'd like me to work with either the Echo Park Perfect Summer or the Carta Bella Beach Boardwalk Collection Kit for my next DT project and which would I prefer .... my first thought was Echo Park please ... as I adore EP ... but then I looked at each collection a little closer and decided that the Carta Bella with it's blues and oranges was better suited to me and the photos I had in mind. Carta Bella please Sarah, I said.

I have never been more pleased ... the papers arrived and instantly I loved them. Normally I am a "B" side kinda girl, not this time the "A" sides are incredible, there are sharks, surfboards, flip-flop papers and much much more.
 
Look, see what I mean.....


Currently I am working on a holiday album. It's a mixture of 12 x 12 layouts, 12 x 12 with 4x6 pockets both horizontal and vertical and photo freedom page protectors. From this collection kit I have a mixture of projects to share with you over the next few days. I have made 12x12 layouts, a mini book and divided protectors. All using photos from a day at a Water Park.
 
First up is my layout "Fun Times With You". I want to keep a flow throughout my album and as I have used White Bazzill cardstock for my holiday layouts so far I wanted to use white again but the background needed something ... so I hooked out my Mister Huey Mists.


Selecting four of the mists which best suited the papers I set to work on the background.

As my theme is a water park I wanted waves and bubbles and droplets. I used a chevron and arrow stamp and some bubble wrap to help create this effect. After making a terrible mess, enjoying it immensely, this is what I ended up with.


All elements are from the collection pack and I've added the Studio Calico wood veneer hearts and arrows, you can find these here. (Out of stock at the moment but restocks due in soon!)


A little cose up so you can see the surf boards raised up and the dimension created by all the different textures within the cluster.


I moved on to a second page ..... and I thought you might like to see more of how I created the background. Again I gathered together some stamps, bubble wrap and my Mister Huey Mists.


I layered up some patterns and positioned the photo and papers onto the 12x12 white cardstock. I knew I wanted some elements in the top right hand corner and bottom left hand corner. I sprayed the middle of my chevron stamp directly with the Huey Mists and made sure that I blotted the stamp before placing it onto the cardstock. This was to get rid off the excess ink/paint and minimise the blobs of paint on the card. Spraying directly onto the bubble wrap with the yellow and stamping made for a muted effect which I liked. I knew my photo and papers would go in the centre of the cardstock I left this area clear.


Using the mists again, I created some droplets then started to layer up the papers and embellishment clusters. I added elements to the top right and mid-bottom left...with wood veneers. The wood veneers were inked for my first layout and misted for this layout. Both ways are really effective and give good coverage.


This is how  the final layout turned out ...

 
Lots of layering .... and a shark ... I adore the shark paper!


Top right cluster ...


You may notice that there is no journaling on these pages, this is because I saved it for the 4x6 pocket protectors. The background paper I chose here is one fantastic sheet of 12x12. I cut it into 6 4x6 rectangles and pieced them together with the photos. Again all elements are from the Collection Kit with the exception of the wood veneers.


Earlier in this post, I mentioned that I've also made a mini book to sit between these 12x12's .... you will need to check back here in a few days to see that! 
 
Thank you so much Sarah for letting me choose a Collection Kit that was a pleasure to work with.
 
Have a wonderful day!
 
Louise x
 
PS .... Just in case you haven't heard yet ... the new S J Crafts Bi Monthly kit has just gone on sale here!!
 
 
See more of Louise's work on her blog: Boys, Bugs and Beautiful Buttons

Tuesday 12 March 2013

More Scoot Projects

Hi, I'm back again today to show you some more projects I've made with the Echo Park Scoot Collection. If you missed the last post you can catch up on that right here.
 
I did lots of stitching on the layouts I made on my Scrapbooking weekend away. On this page I stitched around the pictures printed on the  patterned paper that I had decided to use for my background.


I love the definition it gives to the images!
Almost brings them to life!


I added a length of ribbon, a few stickers including a border sticker and the only other piece of patterned paper that I used was the branding strip for the red banner!


I really got busy with my die-cutter for this double page about a Lego exhibition. I die cut my chevron background and continued the papers over both pages for unity even though the 2 pages are different.


Backing negative shapes with patterned papers is a great way to stretch your stash and use up smaller pieces and you can make a background using a craft knife, scissors or even a manual die cutter depending on the size and shape you want.


I used some of the cut out bits on the other page too. I love these colourful papers which would work equally well on lots of different theme layouts ... they're not just for boys!


Finally I want to show you a card I made using the papers and stickers to make a scene. I took my inspiration for this from Echo Park Designer Jen Gallacher who did something similar recently.


I used pop dots to add dimension on some of the stickers to raise them up!


Even after all of these fun projects, I still have papers and stickers left! I'm going to finish them off by making some more cards for some upcoming birthdays using the digger stickers and some scrunched up grey paper for stones and boulders. Its such a fun collection, it really brought a smile to my face and I hope it does yours too.
 
Lisa-Jane x
 
See more of Lisa-Janes Crafting on her blog: Inside My Head
 

Wednesday 6 March 2013

Echo Park SCOOT!!

Hi there, its Lisa-Jane here today with some layouts I have made using the wonderful Scoot collection kit from Echo Park.
 
I fell in love with this collection as soon as I saw that Sarah was stocking it in the shop and once I had it in my hands it was even better in real life than it had looked on-line.  I recently went away on a scrapbooking weekend retreat so I had a great chance to play around with the fabulous and colourful papers, stickers and cut apart sheets in the collection. The collection is designed with little boys in mind but I hope you can see from my layouts that I made that its actually more versatile than you might first think as many of the "b" sides are more generic and non-themed.

This first one was fairly quick and easy using both sides of 1 sheet of paper (the fire engines and the ruled lines). I cut the paper about a third in from the edge and then stuck both pieces to a piece of cardstock. Use a sheet of card that you don't like or is damaged!  It gives the layout some stability and makes sure everything stays true to 12x12!!

I was really lucky to catch my baby boy doing his first roll over at 4 months old. I had the camera out to take a picture of him in his little fireman's uniform when he just happened to roll over! I couldn't resist using the lovely fire engines paper!!


I used some pop dots to give height to some of the stickers and added a couple of buttons, a paper clip and some ribbon.


How about something on black for some contrast to those bright colours? 
 
This layout was made when I had completed most of the others so  I decided to use up some of the scrap paper panels to make a messy layered stack. I love how the vibrant colours really pop on the black background the same way the black does on the baby mat.


I used my Cameo to cut the title which refers to the mat being a present from an Aunt in New Zealand that we have never met. She made it all by hand and sent it over in time for his birth and left a space for us to record the birth details.


I journalled around the edge in white gel pen and added a few red cross stitches to give texture and to refer to the hand stitching in the story.


Even though quite a few of the papers are aimed at little people, there is a lot of variety in the pack, especially with the B sides. I used 2 of the more generic pieces for my layout featuring my little girl wearing aqua and orange which matched the orange paper nicely.


I die cut my title and the heart background from a template by Daniela Dobson and used the hearts as a mask on the kraft background with Mr Huey's white mist. I used a few bits and bobs from my stash and then outlined the title and the hearts with a white gel pen. I love the subtle effect of kraft on kraft and kraft on orange.


I'll be back soon to show you a few more Scoot projects!
 
Have a wonderful day!
 
Lisa-Jane x
 
Visit Lisa-Jane's blog: Come inside My Crazy Head!


Thursday 31 January 2013

Trend Watch!

Hello, Jennifer here!


In January it was the Craft & Hobby Association’s Winter Show in Anaheim, California, which is when all the Scrapbooking manufacturers (along with other crafting brands) show off their upcoming releases. So I've been watching all their blogs with a close eye as they also revealed all the new products online, for us to drool over whilst we wait impatiently for it to get to the UK shops!

The good news is that Sarah from SJ Crafts has lots of lovely goodies on order, and some of it has already started to arrive! 

I want to tell you about a few of my favourite trends that I've been spotting, so you can watch out for them arriving to the shop!

Trend 1: The Pink and Turquoise Colour Combo 

This has appeared in many collections before, but it’s a combination that will never grow old for me. It just looks so fresh and pretty, and is perfect for spring and summer projects - something we all look forward to after these long grey months!
The Maggie Holmes Collection by Crate Paper has bold pink and turquoise hues, that make me think of tropical days and lots of laughter! Look out for the collection pack coming soon!


The Sundrifter Collection by Studio Calico has slightly softer pinks and blues, but it teams them with black, grey, and patterns with a slightly urban feel, that makes it oh-so trendy and cool! This one is due into stock early February.


The Collectable Collection from My Minds Eye is due to arrive at S J Crafts next week. This collection has four themes within it, and I think Memorable is my favourite with the pink/turquoise colour combination in a super sweet, girly way, with flowers, doilies, and lots of delicate details!


Trend 2: Hints of Travel

I love that a lot of brands are adding just small touches of travel to their lines, rather than it taking over a whole collection. I especially like ones that have hints of going up in the air, as it's been 6 years since I flew anywhere on holiday and I miss it! The travel details can usually be used on all kinds of pages though, so I can add an uplifting phrase here, or an aeroplane image there, and get a sense of travelling on projects that have nothing to do with going away!

The Scoot Collection by Echo Park is a really fun boy-themed collection. It's also got lots of aeroplanes and clouds, and a sweet 'up, up and away' sticker that I adore! Plus the collection pack is in stock already, so you can get your hands on this one straight away.


The Lucky Charm Collection by Dear Lizzy for American Crafts is based on bracelet charms, like horses and hot air balloons! My absolute favourite bit is the 'come fly away with me stamp' which is too dreamy for words! The mini-chevrons and clouds will be sweet little details too. The stamp and the 6x6 pad should be in the shop in early February.


The DIY Shop collection by Crate Paper also has hints of travel. It has a real vintage vibe about it, which works so well on projects all year round. The map-paper details and one little aeroplane chipboard are the perfect touch of escapism! The collection pack will be in stock very soon.


Trend 3: Arrows and Arrow Heads

This trend is so hot right now! There are arrows all over the place. I love it because each new year I feel like I need some 'direction' in my life! It looks great when you go over the top and add arrows all over the page to really emphasise something, or just one arrow tucked away on a layout or card can draw your attention to whatever it's pointing at. Whichever way you like it, the arrow trend is definitely something to embrace!


The Snippets Collection by Studio Calico has some great graphic chevron-arrow patterned papers and wood veneers. It also includes these fantastic arrow stickers, in nice bright colours - I like the mix of shapes and sizes! Look out for Snippets arriving soon. 


My final pick is from Studio Calico too - their awesome Huey's Masks. I just had to draw attention to this one from the Sundrifter collection. It's called a 'Triangles' mask, but it fits in well with the arrows trend, as it looks like arrow heads pointing up and down. This will make a great layering element on layouts, or a background for cards. And you could always block off some of the design to just have one or two rows of arrows! Look out for this and other Studio Calico goodness including more masks, wood veneers, and Mister Huey mists arriving soon.


So there's a few of my favourite trends that I'm looking out for this season! 
Has anything here caught your eye? Now I've just got to wait on the edge of my seat until it all arrives in the UK and into the SJ Crafts shop

Don't forget to 'like' the SJ Crafts Facebook page if you want to know as soon as the new stock arrives! I'll let you into a little secret (Shh!) ... Sarah usually announces new arrivals over there first!!

Bye for now, Jennifer x